4.2 模块接入
1 - 4.2.1 存量 SpringBoot 或 SOFABoot 升级为模块
模块的创建有四种方式,本文介绍第二种方式:
本文介绍存量 SpringBoot 或 SOFABoot 如何低成本升级为模块的操作和验证步骤,仅需加一个 ark 打包插件 + 配置模块瘦身 即可实现普通应用一键升级为模块应用,并且能做到同一套代码分支,既能像原来 SpringBoot 一样独立启动,也能作为模块与其它应用合并部署在一起启动。改造提供手动和自动两种方式
前提条件
- SpringBoot 版本 >= 2.1.9.RELEASE(针对 SpringBoot 用户)
- SOFABoot >= 3.9.0 或 SOFABoot >= 4.0.0(针对 SOFABoot 用户)
手动接入步骤
如果您选择手动进行改造,或需要对自动改造结果进行微调,请参考以下步骤:
步骤 1:修改 application.properties
# 需要定义应用名
spring.application.name = ${替换为实际模块应用名}
步骤 2:添加模块需要的依赖和打包插件
特别注意: sofa ark 插件定义顺序必须在 springboot 打包插件前;
<properties>
    <sofa.ark.version>2.2.16</sofa.ark.version>
    <!-- 不同jdk版本,使用不同koupleless版本,参考:https://koupleless.io/docs/tutorials/module-development/runtime-compatibility-list/#%E6%A1%86%E6%9E%B6%E8%87%AA%E8%BA%AB%E5%90%84%E7%89%88%E6%9C%AC%E5%85%BC%E5%AE%B9%E6%80%A7%E5%85%B3%E7%B3%BB -->
    <koupleless.runtime.version>1.2.3</koupleless.runtime.version>
</properties>
<!-- 模块需要引入的依赖,主要用户跨模块间通信 -->
<dependencies>
    <dependency>
        <groupId>com.alipay.sofa.koupleless</groupId>
        <artifactId>koupleless-app-starter</artifactId>
        <version>${koupleless.runtime.version}</version>
        <scope>provided</scope>
    </dependency>
</dependencies>

<plugins>
    <!--这里添加ark 打包插件-->
    <plugin>
        <groupId>com.alipay.sofa</groupId>
        <artifactId>sofa-ark-maven-plugin</artifactId>
        <version>{sofa.ark.version}</version>
        <executions>
            <execution>
                <id>default-cli</id>
                <goals>
                    <goal>repackage</goal>
                </goals>
            </execution>
        </executions>
        <configuration>
            <skipArkExecutable>true</skipArkExecutable>
            <outputDirectory>./target</outputDirectory>
            <bizName>${替换为模块名}</bizName>
            <webContextPath>${模块自定义的 web context path}</webContextPath>
            <declaredMode>true</declaredMode>
        </configuration>
    </plugin>
    <!--  构建出普通 SpringBoot fatjar,支持独立部署时使用,如果不需要可以删除;注意需要放在 sofa-ark-maven-plugin 的后面  -->
    <plugin>
        <!--原来 spring-boot 打包插件 -->
        <groupId>org.springframework.boot</groupId>
        <artifactId>spring-boot-maven-plugin</artifactId>
    </plugin>
</plugins>
步骤 3:自动化瘦身模块
您可以使用 ark 打包插件的自动化瘦身能力,自动瘦身模块里的 maven 依赖。这一步是必选的,否则构建出的模块 jar 包会非常大,而且启动会报错。 扩展阅读:如果模块不做依赖瘦身独立引入 SpringBoot 框架会怎样?
步骤 4:构建成模块 jar 包
执行 mvn clean package -DskipTest, 可以在 target 目录下找到打包生成的 ark biz jar 包,也可以在 target/boot 目录下找到打包生成的普通的 springboot jar 包。
小贴士:模块中支持的完整中间件清单。
自动化改造工具
除了手动步骤,我们还提供了自动化工具 arkctl 来快速将存量应用改造成模块。arkctl 中的 create 命令封装了 koupleless-ext-module-auto-convertor JAR 文件的功能,提供了更便捷的命令行界面,能自动完成手动改造过程的如下步骤:
- 自动修改 POM 文件,添加必要的依赖和插件
- 自动更新 application.properties 文件
- 自动创建 bootstrap.properties 文件(如果需要)
- 自动处理模块瘦身配置
使用前提
- 已安装 arkctl >= 0.2.3 工具
- Java 8 或更高版本
使用步骤
步骤1: 运行命令
./arkctl create -p <项目路径> -a <应用名称>
参数说明:
- -p 或 –projectPath: 待改造项目的根目录路径(必填)
- -a 或 –applicationName: 应用名称(必填)
示例(Windows):
./arkctl create -p "/path/to/your/project" -a "myapp"
Linux/Mac:
./arkctl create -p "/path/to/project" -a "myapp"
步骤2: 确认改造结果
命令执行完成后,检查项目中的以下变更:
- POM 文件:查看是否已添加必要的依赖和插件
- application.properties:确认是否已更新应用名称
- bootstrap.properties:如果创建了此文件,检查其内容是否正确
- 模块瘦身配置:查看是否已添加相关配置
虽然 arkctl create 命令会自动处理大部分改造工作,但可能仍需要进行一些手动调整。请仔细检查改造后的项目,确保所有配置都符合您的需求。
使用注意事项
- 在使用 arkctl create 命令之前,请确保已备份您的项目。
- 某些特殊项目可能需要额外的手动配置,请根据实际情况进行调整。
实验:验证模块既能独立启动,也能被合并部署
增加模块打包插件(sofa-ark-maven-plugin)进行打包后,只会新增 ark-biz.jar 构建产物,与原生 spring-boot-maven-plugin 打包的可执行Jar 互相不冲突、不影响。 当服务器部署时,期望独立启动,就使用原生 spring-boot-maven-plugin 构建出的可执行 Jar 作为构建产物;期望作为 ark 模块部署到基座中时,就使用 sofa-ark-maven-plugin 构建出的 xxx-ark-biz.jar 作为构建产物
验证能合并部署到基座上
- 启动上一步(验证能独立启动步骤)的基座
- 发起模块部署
curl --location --request POST 'localhost:1238/installBiz' \
--header 'Content-Type: application/json' \
--data '{
    "bizName": "${模块名}",
    "bizVersion": "${模块版本}",
    "bizUrl": "file:///path/to/ark/biz/jar/target/xx-xxxx-ark-biz.jar"
}'
返回如下信息表示模块安装成功

- 查看当前模块信息,除了基座 base 以外,还存在一个模块 dynamic-provider

- 卸载模块
curl --location --request POST 'localhost:1238/uninstallBiz' \
--header 'Content-Type: application/json' \
--data '{
    "bizName": "dynamic-provider",
    "bizVersion": "0.0.1-SNAPSHOT"
}'
返回如下,表示卸载成功
{
    "code": "SUCCESS",
    "data": {
        "code": "SUCCESS",
        "message": "Uninstall biz: dynamic-provider:0.0.1-SNAPSHOT success."
    }
}
验证能独立启动
普通应用改造成模块之后,还是可以独立启动,可以验证一些基本的启动逻辑,只需要在启动配置里勾选自动添加 providedscope 到 classPath 即可,后启动方式与普通应用方式一致。通过自动瘦身改造的模块,也可以在 target/boot 目录下直接通过 springboot jar 包启动,点击此处查看详情。

2 - 4.2.2 使用 maven archtype 脚手架自动生成
模块的创建有四种方式,本文介绍第三种方式:
从脚手架里创建模块的方式比较简单,只需要在 idea 里创建工程里传入脚手架的 maven 坐标即可。
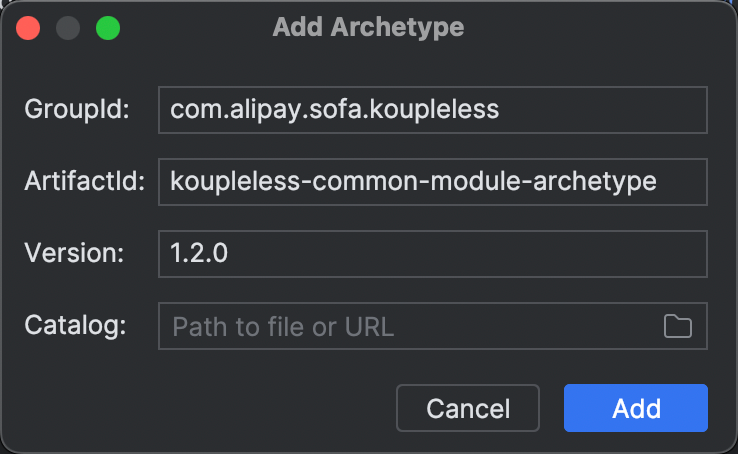
<dependency>
    <groupId>com.alipay.sofa.koupleless</groupId>
    <artifactId>koupleless-common-module-archetype</artifactId>
    <version>{koupleless.runtime.version}</version>
</dependency>
该脚手架创建出来的模块,已经集成模块打包插件和自动瘦身配置,可以直接打包成模块安装在基座上,或者本地直接独立启动。
3 - 4.2.3 Java 代码片段作为模块
模块的创建有四种方式,本文介绍第四种方式:
本文介绍 Java 代码片段升级为模块的操作和验证步骤,仅需加一个 ark 打包插件 + 配置模块瘦身 即可实现 Java 代码片段一键升级为模块应用,并且能做到同一套代码分支,既能像原来 Java 代码片段一样独立启动,也能作为模块与其它应用合并部署在一起启动。
前提条件
- jdk8
- sofa.ark.version >= 2.2.14-SNAPSHOT
- koupleless.runtime.version >= 1.3.1-SNAPSHOT
- jdk17/jdk21
- sofa.ark.version >= 3.1.7-SNAPSHOT
- koupleless.runtime.version >= 2.1.6-SNAPSHOT
接入步骤
步骤 1:添加模块需要的依赖和打包插件
<properties>
    <sofa.ark.version>${见上述前提条件}</sofa.ark.version>
    <!-- 不同jdk版本,使用不同koupleless版本,参考:https://koupleless.io/docs/tutorials/module-development/runtime-compatibility-list/#%E6%A1%86%E6%9E%B6%E8%87%AA%E8%BA%AB%E5%90%84%E7%89%88%E6%9C%AC%E5%85%BC%E5%AE%B9%E6%80%A7%E5%85%B3%E7%B3%BB -->
    <koupleless.runtime.version>${见上述前提条件}</koupleless.runtime.version>
</properties>
<!-- 模块需要引入的依赖,主要用户跨模块间通信 -->
<dependencies>
    <dependency>
        <groupId>com.alipay.sofa.koupleless</groupId>
        <artifactId>koupleless-app-starter</artifactId>
        <version>${koupleless.runtime.version}</version>
        <scope>provided</scope>
    </dependency>
</dependencies>

<plugins>
    <!--这里添加ark 打包插件-->
    <plugin>
        <groupId>com.alipay.sofa</groupId>
        <artifactId>sofa-ark-maven-plugin</artifactId>
        <version>{sofa.ark.version}</version>
        <executions>
            <execution>
                <id>default-cli</id>
                <goals>
                    <goal>repackage</goal>
                </goals>
            </execution>
        </executions>
        <configuration>
            <skipArkExecutable>true</skipArkExecutable>
            <outputDirectory>./target</outputDirectory>
            <bizName>${替换为模块名}</bizName>
            <declaredMode>true</declaredMode>
        </configuration>
    </plugin>

    <plugin>
        <groupId>org.apache.maven.plugins</groupId>
        <artifactId>maven-jar-plugin</artifactId>
        <version>3.2.0</version>
        <executions>
            <execution>
                <goals>
                    <goal>jar</goal>
                </goals>
                <phase>package</phase>
                <configuration>
                    <classifier>lib</classifier>
                    <!-- Ensure other necessary configuration here -->
                </configuration>
            </execution>
        </executions>
    </plugin>
</plugins>
步骤 2: 增加初始化逻辑
在代码片段添加:MainApplication.init() 来初始化容器。
public static void main(String[] args) {
        // 初始化模块的实例容器
        MainApplication.init();

        // ...
    }
在模块和基座的通信上,模块将实例注册在容器中,基座通过SpringServiceFinder获取模块实例,我们以biz3 为例:
- biz3 实现了以
AppService为接口的两个实例:Biz3AppServiceImpl和Biz3OtherAppServiceImpl:
public class Biz3OtherAppServiceImpl implements AppService {
    // 获取基座的bean
    private AppService baseAppService = SpringServiceFinder.getBaseService(AppService.class);

    @Override
    public String getAppName() {
        return "biz3OtherAppServiceImpl in the base: " + baseAppService.getAppName();
    }
}

public class Biz3AppServiceImpl implements AppService {
  // 获取基座的bean
  private AppService baseAppService = SpringServiceFinder.getBaseService(AppService.class);

  public String getAppName() {
    return "biz3AppServiceImpl in the base: " + baseAppService.getAppName();
  }
}
其中,模块获取基座的 bean 方式为:SpringServiceFinder.getBaseService(XXX.class),详细可见:模块和基座通信 的 模块调用基座的方式二:编程API SpringServiceFinder。
- biz3 将这两个类的实例注册到容器中:
public static void main(String[] args) {
        // 初始化模块的实例容器
        MainApplication.init();

        // 注册实例到模块容器中
        MainApplication.register("biz3AppServiceImpl", new Biz3AppServiceImpl());
        MainApplication.register("biz3OtherAppServiceImpl", new Biz3OtherAppServiceImpl());

        }
- 基座中获取 biz3 中的实例:
@RestController
public class SampleController {

    // 通过注解获取 biz3 中的指定实例
    @AutowiredFromBiz(bizName = "biz3", bizVersion = "0.0.1-SNAPSHOT", name = "biz3AppServiceImpl")
    private AppService biz3AppServiceImpl;

    @RequestMapping(value = "/", method = RequestMethod.GET)
    public String hello() {
        System.out.println(biz3AppServiceImpl.getAppName());

        // 通过 api 获取 biz3 中的指定实例
        AppService biz3OtherAppServiceImpl = SpringServiceFinder.getModuleService("biz3", "0.0.1-SNAPSHOT",
                "biz3OtherAppServiceImpl", AppService.class);
        System.out.println(biz3OtherAppServiceImpl.getAppName());

        // 通过 api 获取 biz3 中 AppService.class 的所有实例
        Map<String, AppService> appServiceMap = SpringServiceFinder.listModuleServices("biz3",
                "0.0.1-SNAPSHOT", AppService.class);
        for (AppService appService : appServiceMap.values()) {
            System.out.println(appService.getAppName());
        }
        return "hello to ark master biz";
    }
}
其中,SpringBoot / SOFABoot 基座可以通过 @AutowiredFromBiz 注解或 SpringServiceFinder.getModuleService() 编程API 获取模块中的实例,详细可见:模块和基座通信 的基座调用模块。
步骤 3:自动化瘦身模块
一般来说,代码片段式的模块依赖比较简单,您可以自行将模块中与基座一致的依赖的 scope 设置成 provided,或使用 ark 打包插件的自动化瘦身能力,自动瘦身模块里的 maven 依赖。这一步是必选的,否则构建出的模块 jar 包会非常大,而且启动会报错。
步骤 4:构建成模块 jar 包
执行 mvn clean package -DskipTest, 可以在 target 目录下找到打包生成的 ark biz jar 包。
实验:验证模块能合并部署
- 启动上一步(验证能独立启动步骤)的基座
- 发起模块部署
可以参考样例中 biz3 的模块部署:https://github.com/koupleless/samples/blob/main/springboot-samples/service/README-zh_CN.md