4.4 模块研发
1 - 4.3.1 编码规范
基础规范
- Koupleless 模块中官方验证并兼容的中间件客户端列表详见此处。基座中可以使用任意中间件客户端。
- 模块里要独立使用 System.setProperties() 与 System.getProperties(),请在基座 main 方法里增加
MultiBizProperties.initSystem(),详细可参考 samples - 如果使用了模块热卸载能力,您可以使用如下 API 装饰模块代码中声明的 ExecutorService(典型如各种线程池)、Timer、Thread 对象,在模块卸载时,
Koupleless Arklet 客户端会尝试自动清理被装饰器装饰过的 ExecutorService、Timer、Thread:
- 在模块代码中,装饰需要自动清理的 ExecutorService,底层会调用 ExecutorService 对象的 shutdownNow 和 awaitTermination 接口,会尽可能优雅释放线程(不保证 100% 释放,比如线程一直在等待),具体用法:
其中,myExecutorService 需要是 ExecutorService 的子类型。 您也可以在模块 SpringBoot 或 SOFABoot properties 文件中配置 com.alipay.koupleless.executor.cleanup.timeout.seconds 指定线程池 awaitTermination 的优雅等待时间。ShutdownExecutorServicesOnUninstallEventHandler.manageExecutorService(myExecutorService); - 在模块代码中,装饰需要自动清理的 Timer,底层会调用 Timer 对象的 cancel,具体用法:
CancelTimersOnUninstallEventHandler.manageTimer(myTimer); - 在模块代码中,装饰需要自动清理的 Thread,底层会强行调用 Thread 对象的 stop,具体用法:
注意:JDK 并不推荐强行 stop 线程,会导致线程非预期的强行释放锁,可能引发非预期问题。除非您确定线程被暴力关闭不会引发相关问题,否则慎用。ForceStopThreadsOnUninstallEventHandler.manageThread(myThread);
- 在模块代码中,装饰需要自动清理的 ExecutorService,底层会调用 ExecutorService 对象的 shutdownNow 和 awaitTermination 接口,会尽可能优雅释放线程(不保证 100% 释放,比如线程一直在等待),具体用法:
- 如果使用了模块热卸载能力,并且还有其他资源、对象需要清理,您可以监听 Spring 的 ContextClosedEvent 事件,在事件处理函数中清理必要的资源和对象,
也可以在 Spring XML 定义 Bean 的地方指定它们的 destroy-method,在模块卸载时,Spring 会自动执行 destroy-method。
- 基座启动时会部署所有模块,所以基座编码时,一定要向所有模块兼容,否则基座会发布失败。如果遇到无法绕过的不兼容变更(一般是在模块拆分过程中会有比较多的基座与模块不兼容变更),
请参见基座与模块不兼容发布。
知识点
模块瘦身 (重要)
模块与模块、模块与基座通信 (重要)
模块测试 (重要)
模块复用基座拦截器
模块复用基座数据源
基座与模块间类委托加载原理介绍
模块多application.properties配置
2 - 4.3.2 模块瘦身
为什么要瘦身
Koupleless 底层借助 SOFAArk 框架,实现了模块之间、模块和基座之间的类隔离。模块启动时会初始化各种对象,会优先使用模块的类加载器去加载构建产物 FatJar 中的 class、resource 和 Jar 包,找不到的类会委托基座的类加载器去查找。

基于这套类委托的加载机制,让基座和模块共用的 class、resource 和 Jar 包通通下沉到基座中,可以让模块构建产物非常小,从而模块消耗的内存非常少,启动也能非常快。
其次,模块启动后 Spring 上下文中会创建很多对象,如果启用了模块热卸载,可能无法完全回收,安装次数过多会造成 Old 区、Metaspace 区开销大,触发频繁 FullGC,所以需要控制单模块包大小 < 5MB。这样不替换或重启基座也能热部署热卸载数百次。
所谓模块瘦身,就是让基座已经有的 Jar 依赖不参与模块打包构建,从而实现上述两个好处:
- 提高模块安装的速度,减少模块包大小,减少启动依赖,控制模块安装耗时 < 30秒,甚至 < 5秒
- 在热部署热卸载场景下,不替换或重启基座也能热部署热卸载数百次
瘦身原则
构建 ark-biz jar 包的原则是,在保证模块功能的前提下,将框架、中间件等通用的包尽量放置到基座中,模块中复用基座的包,这样打出的 ark-biz jar 会更加轻量。
在不同场景下,复杂应用可以选择不同的方式瘦身。
场景及相应的瘦身方式
场景一:基座和模块协作紧密,如中台模式 / 共库模式
在基座和模块协作紧密的情况下,模块应该在开发时就感知基座的部分facade类和基座正使用的依赖版本,并按需引入需要的依赖。 模块打包时,仅打包两种依赖:基座没有的依赖,模块和基座版本不一致的依赖。
因此,需要让基座:
- 统一管控模块依赖版本,让模块开发时就知道基座有哪些依赖,风险前置,而且模块开发者按需引入部分依赖,无需指定版本。
需要让模块:
- 打包时,仅打包基座没有的依赖、和基座版本不一致的依赖,降低模块瘦身成本
步骤一 打包“基座-dependencies-starter”
目标
该步骤将打出 “基座依赖-starter”,用于统一管控模块依赖版本。
基座bootstrap pom增加配置
注意:以下配置中的 dependencyArtifactId 需要修改,一般为${baseAppName}-dependencies-starter
<build>
<plugins>
    <plugin>
        <groupId>com.alipay.sofa.koupleless</groupId>
        <artifactId>koupleless-base-build-plugin</artifactId>
        <!--        koupleless.runtime.version >= 1.3.0 -->
        <version>${koupleless.runtime.version}</version>
        <configuration>
            <!--生成 starter 的 artifactId(groupId和基座一致),这里需要修改!!-->
            <dependencyArtifactId>${baseAppName}-dependencies-starter</dependencyArtifactId>
            <!--生成jar的版本号-->
            <dependencyVersion>0.0.1-SNAPSHOT</dependencyVersion>
            <!-- 调试用,改成 true 即可看到打包中间产物 -->
            <cleanAfterPackageDependencies>false</cleanAfterPackageDependencies>
        </configuration>
    </plugin>
  </plugins>
</build>
本地测试
- 打包基座 dependency-starter jar:在基座根目录执行命令:
mvn com.alipay.sofa.koupleless:koupleless-base-build-plugin::packageDependency -f ${基座 bootstrap pom 对于基座根目录的相对路径}
构建出来的 pom 在 outputs 目录下,也会自动安装至本地的 maven 仓库。
注意,该步骤不会将 “基座依赖-starter” 上传至 maven 仓库。欢迎后续讨论补充 “上传至 maven 仓库” 的方案。
步骤二 模块修改打包插件和 parent
目标
- 模块开发时,将步骤一中的 “基座-dependencies-starter” 作为模块项目的 parent,统一管理依赖版本;
- 修改模块打包插件,模块打包时只将“基座没有的依赖”、“与基座版本不一致的依赖”打包进模块,而不用手动配置“provided”,自动实现模块瘦身。
模块根目录的 pom 中配置 parent:
<parent>
   <groupId>com.alipay</groupId>
   <artifactId>${baseAppName}-dependencies-starter</artifactId>
   <version>0.0.1-SNAPSHOT</version>
</parent>
模块打包的 pom 中配置 plugin:
<build>
   <plugins>
       <plugin>
           <groupId>com.alipay.sofa</groupId>
           <artifactId>sofa-ark-maven-plugin</artifactId>
           <!--           since ${sofa.ark.version} >= 2.2.13    -->
           <version>${sofa.ark.version}</version>
           <executions>
               <execution>
                   <id>default-cli</id>
                   <goals>
                       <goal>repackage</goal>
                   </goals>
               </execution>
           </executions>
           <configuration>
               <!-- 配置 “基座-dependencies-starter” 的标识,规范为:'${groupId}:${artifactId}':'version' -->
               <baseDependencyParentIdentity>com.alipay:${baseAppName}-dependencies-starter:0.0.1-SNAPSHOT</baseDependencyParentIdentity>
           </configuration>
       </plugin>
   </plugins>
</build>
步骤三 配置模块依赖白名单
对于部分依赖,即使模块和基座使用的依赖版本一致,但模块打包时也需要保留该依赖,即需要配置模块瘦身依赖白名单。
配置方式:在「模块项目根目录/conf/ark/bootstrap.properties」 或 「模块项目根目录/conf/ark/bootstrap.yml」中增加需要保留的依赖,如果该文件不存在,可自行新增目录和文件。以下提供了3个不同级别的配置,可根据实际情况进行添加。
# includes config ${groupId}:${artifactId}, split by ','
includes=org.apache.commons:commons-lang3,commons-beanutils:commons-beanutils
# includeGroupIds config ${groupId}, split by ','
includeGroupIds=org.springframework
# includeArtifactIds config ${artifactId}, split by ','
includeArtifactIds=sofa-ark-spi
# includes config ${groupId}:${artifactId}
includes:
  - org.apache.commons:commons-lang3
  - commons-beanutils:commons-beanutils
# includeGroupIds config ${groupId}
includeGroupIds:
  - org.springframework
# includeArtifactIds config ${artifactId}
includeArtifactIds:
  - sofa-ark-spi
步骤四 打包构建,并检查瘦身是否成功
执行 mvn clean package 打包构建出模块 ark-biz jar 包即可,您可以明显看出瘦身后的 ark-biz jar 包大小差异,也可以查看 ark-biz jar 包中 lib 文件夹中是否已经没有要排除的依赖了。
场景二:基座和模块协作松散,如多应用合并部署节省资源
在基座和模块协作松散的情况下,模块不应该在开发时感知基座正使用的依赖版本,因此模块更需要注重模块瘦身的低成本接入,可以配置模块打包需要排除的依赖。
方式一:SOFAArk 配置文件排包
步骤一
SOFAArk 模块瘦身会读取两处配置文件:
- “模块项目根目录/conf/ark/bootstrap.properties”,比如:my-module/conf/ark/bootstrap.properties
- “模块项目根目录/conf/ark/bootstrap.yml”,比如:my-module/conf/ark/bootstrap.yml
配置方式
bootstrap.properties (推荐)
在「模块项目根目录/conf/ark/bootstrap.properties」中按照如下格式配置需要下沉到基座的框架和中间件常用包,比如:
# excludes config ${groupId}:{artifactId}:{version}, split by ','
excludes=org.apache.commons:commons-lang3,commons-beanutils:commons-beanutils
# excludeGroupIds config ${groupId}, split by ','
excludeGroupIds=org.springframework
# excludeArtifactIds config ${artifactId}, split by ','
excludeArtifactIds=sofa-ark-spi
bootstrap.yml (推荐)
在「模块项目根目录/conf/ark/bootstrap.yml」中按照如下格式配置需要下沉到基座的框架和中间件常用包,比如:
# excludes 中配置 ${groupId}:{artifactId}:{version}, 不同依赖以 - 隔开
# excludeGroupIds 中配置 ${groupId}, 不同依赖以 - 隔开
# excludeArtifactIds 中配置 ${artifactId}, 不同依赖以 - 隔开
excludes:
  - org.apache.commons:commons-lang3
  - commons-beanutils:commons-beanutils
excludeGroupIds:
  - org.springframework
excludeArtifactIds:
  - sofa-ark-spi
步骤二
升级模块打包插件 sofa-ark-maven-plugin 版本 >= 2.2.12
    <!-- 插件1:打包插件为 sofa-ark biz 打包插件,打包成 ark biz jar -->
    <plugin>
        <groupId>com.alipay.sofa</groupId>
        <artifactId>sofa-ark-maven-plugin</artifactId>
        <version>${sofa.ark.version}</version>
        <executions>
            <execution>
                <id>default-cli</id>
                <goals>
                    <goal>repackage</goal>
                </goals>
            </execution>
        </executions>
        <configuration>
            <skipArkExecutable>true</skipArkExecutable>
            <outputDirectory>./target</outputDirectory>
            <bizName>biz1</bizName>
            <webContextPath>biz1</webContextPath>
            <declaredMode>true</declaredMode>
        </configuration>
    </plugin>
步骤三
执行 mvn clean package 打包构建出模块 ark-biz jar 包即可,您可以明显看出瘦身后的 ark-biz jar 包大小差异,也可以查看 ark-biz jar 包中 lib 文件夹中是否已经没有要排除的依赖了。
您可点击此处查看完整模块瘦身样例工程。
3 - 4.3.3 模块启动
模块启动参数
模块有两种部署方式:静态合并部署和热部署。
静态合并部署模块不支持配置启动参数。模块大部分的启动参数可以放在模块配置(application.properties)中,如配置 profile 时:将启动参数中的 –spring.profiles.active=dev,配置为 application.properties 中的 spring.profiles.active=true。
热部署模块支持配置启动参数。如:使用 arklet 通过 web 请求安装模块时,可以配置启动参数和环境变量:
curl --location --request POST 'localhost:1238/installBiz' \
--header 'Content-Type: application/json' \
--data '{
    "bizName": "${Module Name}",
    "bizVersion": "${Module Version}",
    "bizUrl": "file:///path/to/ark/biz/jar/target/xx-xxxx-ark-biz.jar",
    "args": ["--spring.profiles.active=dev"],
    "env": {
        "XXX": "YYY"
    }
}'
模块启动加速
模块启动加速的设计思路
模块启动加速的总体思路是:
- 基座提前启动好服务,这个只需要基座提前引入依赖即可
- 模块通过各种方式复用基座的服务,可以通过如下的方式复用基座服务包括,具体使用哪种方式需要根据实际情况分析,有疑问可以社区群里交流:
- 通过类 static 变量的共享达到复用
- 通过基座封装一些服务的接口 api,模块直接调用这些 api 来复用基座的服务。
- 通过注解的方式获取基座对象的代理,Koupleless 提供的 @AutowiredFromBase 、@AutowiredFromBiz、SpringServiceFinder 工具类 ,dubbo 或者 SOFARpc 的一些支持 jvm service 调用的注解。
- 通过跨模块查找对象的方式,直接获取基座对象,如 Koupleless 提供的 SpringBeanFinder 工具类
这里隐含了一个问题,那就是模块为了能顺利调用基座服务,需要使用一些模型类,所以模块一般都需要将该服务对应的依赖引入进来,这导致模块启动的时候会扫描到这些服务的配置,从而再次初始化这些服务,这会导致模块启动一些不需要的服务,并且启动变慢,内存消耗增加。所以要让模块启动加速实际上要完成三件事情:
- 基座提前启动好服务
- 模块禁止启动这些服务,这是本文要详细介绍的
- 模块复用基座服务
模块如何禁止启动部分服务
跳过 AutoConfiguration
Koupleless 1.1.0 版本开始,在 application.properties 里提供了如下的配置能力:
koupleless.module.autoconfigure.exclude=xxx,xxxx,xxx # 模块启动时不需要启动的服务 AutoConfiguration
koupleless.module.autoconfigure.include=xxx,xxx,xxx # 模块启动时需要启动的服务 AutoConfiguration,如果某个服务同时配置了 include 和 exclude,则会启动该服务
该配置可以在基座里配置,也可以在模块里配置。如果在基座里配置,则所有模块都会生效,如果在模块里配置,则只有该模块生效,并且模块里的配置会覆盖基座的配置。基座里的配置方式:
ark.common.env.share.keys=koupleless.module.autoconfigure.exclude,koupleless.module.autoconfigure.include,koupleless.module.initializer.skip
koupleless.module.autoconfigure.exclude=xxx,xxxx,xxx # 所有模块启动时不需要启动的服务 AutoConfiguration
koupleless.module.autoconfigure.include=xxx,xxx,xxx # 所有模块启动时需要启动的服务 AutoConfiguration,如果某个服务同时配置了 include 和 exclude,则会启动该服务
跳过 initializer
跳过启动的 initializer 目前只能在基座中配置
koupleless.module.initializer.skip=xxx,xxx,xxx # 模块启动时需要跳过的 initializer
benchmark
详细 benchmark 还待补充
4 - 4.3.4 模块与模块、模块与基座通信
基座与模块之间、模块与模块之间存在 spring 上下文隔离,互相的 bean 不会冲突、不可见。然而很多应用场景比如中台模式、独立模块模式等存在基座调用模块、模块调用基座、模块与模块互相调用的场景。 当前支持3种方式调用,@AutowiredFromBiz, @AutowiredFromBase, SpringServiceFinder 方法调用,注意三个方式使用的情况不同。
Spring 环境
模块里引入依赖
<dependency>
    <groupId>com.alipay.sofa.koupleless</groupId>
    <artifactId>koupleless-app-starter</artifactId>
    <version>${koupleless.runtime.version}</version>
    <scope>provided</scope>
</dependency>
基座调用模块
只能使用 SpringServiceFinder
@RestController
public class SampleController {

    @RequestMapping(value = "/", method = RequestMethod.GET)
    public String hello() {

        Provider studentProvider = SpringServiceFinder.getModuleService("biz", "0.0.1-SNAPSHOT",
                "studentProvider", Provider.class);
        Result result = studentProvider.provide(new Param());

        Provider teacherProvider = SpringServiceFinder.getModuleService("biz", "0.0.1-SNAPSHOT",
                "teacherProvider", Provider.class);
        Result result1 = teacherProvider.provide(new Param());

        Map<String, Provider> providerMap = SpringServiceFinder.listModuleServices("biz", "0.0.1-SNAPSHOT",
                Provider.class);
        for (String beanName : providerMap.keySet()) {
            Result result2 = providerMap.get(beanName).provide(new Param());
        }

        return "hello to ark master biz";
    }
}
模块调用基座
方式一:注解 @AutowiredFromBase
@RestController
public class SampleController {

    @AutowiredFromBase(name = "sampleServiceImplNew")
    private SampleService sampleServiceImplNew;

    @AutowiredFromBase(name = "sampleServiceImpl")
    private SampleService sampleServiceImpl;

    @AutowiredFromBase
    private List<SampleService> sampleServiceList;

    @AutowiredFromBase
    private Map<String, SampleService> sampleServiceMap;

    @AutowiredFromBase
    private AppService appService;

    @RequestMapping(value = "/", method = RequestMethod.GET)
    public String hello() {

        sampleServiceImplNew.service();

        sampleServiceImpl.service();

        for (SampleService sampleService : sampleServiceList) {
            sampleService.service();
        }

        for (String beanName : sampleServiceMap.keySet()) {
            sampleServiceMap.get(beanName).service();
        }

        appService.getAppName();

        return "hello to ark2 dynamic deploy";
    }
}
方式二:编程API SpringServiceFinder
@RestController
public class SampleController {

    @RequestMapping(value = "/", method = RequestMethod.GET)
    public String hello() {

        SampleService sampleServiceImplFromFinder = SpringServiceFinder.getBaseService("sampleServiceImpl", SampleService.class);
        String result = sampleServiceImplFromFinder.service();
        System.out.println(result);

        Map<String, SampleService> sampleServiceMapFromFinder = SpringServiceFinder.listBaseServices(SampleService.class);
        for (String beanName : sampleServiceMapFromFinder.keySet()) {
            String result1 = sampleServiceMapFromFinder.get(beanName).service();
            System.out.println(result1);
        }

        return "hello to ark2 dynamic deploy";
    }
}
模块调用模块
参考模块调用基座,注解使用 @AutowiredFromBiz 和 编程API支持 SpringServiceFinder。
方式一:注解 @AutowiredFromBiz
@RestController
public class SampleController {

    @AutowiredFromBiz(bizName = "biz", bizVersion = "0.0.1-SNAPSHOT", name = "studentProvider")
    private Provider studentProvider;

    @AutowiredFromBiz(bizName = "biz", name = "teacherProvider")
    private Provider teacherProvider;

    @AutowiredFromBiz(bizName = "biz", bizVersion = "0.0.1-SNAPSHOT")
    private List<Provider> providers;

    @RequestMapping(value = "/", method = RequestMethod.GET)
    public String hello() {

        Result provide = studentProvider.provide(new Param());

        Result provide1 = teacherProvider.provide(new Param());

        for (Provider provider : providers) {
            Result provide2 = provider.provide(new Param());
        }

        return "hello to ark2 dynamic deploy";
    }
}
方式二:编程API SpringServiceFinder
@RestController
public class SampleController {

    @RequestMapping(value = "/", method = RequestMethod.GET)
    public String hello() {

        Provider teacherProvider1 = SpringServiceFinder.getModuleService("biz", "0.0.1-SNAPSHOT", "teacherProvider", Provider.class);
        Result result1 = teacherProvider1.provide(new Param());

        Map<String, Provider> providerMap = SpringServiceFinder.listModuleServices("biz", "0.0.1-SNAPSHOT", Provider.class);
        for (String beanName : providerMap.keySet()) {
            Result result2 = providerMap.get(beanName).provide(new Param());
        }

        return "hello to ark2 dynamic deploy";
    }
}
SOFABoot 环境
5 - 4.3.5 模块本地开发与调试
Arkctl 工具安装
Arkctl 模块安装主要提供自动打包和部署能力,包括调用 mvn 命令自动构建模块为 jar 包,调用 arklet 提供的 api 接口进行完成部署。ArkCtl 安装方式可以参照文档:arkctl 安装 的本地环境开发验证小节。
安装方法一: 使用 golang 工具链
- 在 golang 官网 下载对应的 golang 版本,版本需要在 1.21 以上。
- 执行
go install github.com/koupleless/arkctl@v0.2.1命令,安装 arkctl 工具。
安装方式二: 下载二进制文件
- 根据实际运行操作系统,下载 arkctl 。
- 将对应的二进制解压并放到合适的系统变量 PATH 所在的目录里。
- 在基座和模块已经改造完成后,启动好基座后,可以使用 arkctl 快速完成构建与部署,将模块部署到基座中。
Linux/Mac 如何找到 PATH 的值?
终端执行
echo $PATH
# 选择一个目录,将 arkctl 放到该目录下
Windows 下如何找到 PATH 的值?
按 Windows + R 键,输入 cmd,然后按 Enter 打开命令提示符。在命令提示符窗口中,输入以下命令并按 Enter:
echo %PATH%
注意,在 Windows 环境下,如果开启 Windows Defender,浏览器下载二进制时可能会误报,提示如下:

报错原因可参考 [go官方文档](https://go.dev/doc/faq#virus) 。此报错可以忽略,放心下载。
由于 Arkctl 部署其实是调用 API 的方式来完成的,如果不想使用命令行工具,也可以直接使用 Arklet API 接口 完成部署操作。当然我们也提供了 telnet 的方式来部署模块,详细可查看这里
本地快速部署
你可以使用 arkctl 工具快速地进行模块的构建和部署,提高本地调试和研发效率。
场景 1:模块 jar 包构建 + 部署到本地运行的基座中。
准备:
- 在本地启动一个基座。
- 打开一个模块项目仓库。
执行命令:
# 需要在仓库的根目录下执行。
# 比如,如果是 maven 项目,需要在根 pom.xml 所在的目录下执行。
arkctl deploy
命令执行完成后即部署成功,用户可以进行相关的模块功能调试验证。
场景 2:部署一个本地构建好的 jar 包到本地运行的基座中。
准备:
- 在本地启动一个基座。
- 准备一个构建好的 jar 包。
执行命令:
arkctl deploy /path/to/your/pre/built/bundle-biz.jar
命令执行完成后即部署成功,用户可以进行相关的模块功能调试验证。
场景 3: 部署一个本地还未构建的 jar 包到本地运行的基座中。
准备:
- 在本地启动一个基座
执行命令:
arkctl deploy ./path/to/your/biz/
注意该命令适用于模块可以独立构建的(可以在biz目录里成功执行 mvn package 等命令),则该命令会自动构建该模块,并部署到基座中。
场景 4: 在多模块的 Maven 项目中,在 Root 构建并部署子模块的 jar 包。
准备:
- 在本地启动一个基座。
- 打开一个多模块 Maven 项目仓库。
执行命令:
# 需要在仓库的根目录下执行。
# 比如,如果是 maven 项目,需要在根 pom.xml 所在的目录下执行。
arkctl deploy --sub ./path/to/your/sub/module
命令执行完成后即部署成功,用户可以进行相关的模块功能调试验证。
场景 5: 模块 jar 包构建 + 部署到远程运行的 k8s 基座中。
准备:
- 在远程已经运行起来的基座 pod。
- 打开一个模块项目仓库。
- 本地需要有具备 exec 权限的 k8s 证书以及 kubectl 命令行工具。
执行命令:
# 需要在仓库的根目录下执行。
# 比如,如果是 maven 项目,需要在根 pom.xml 所在的目录下执行。
arkctl deploy --pod {namespace}/{podName}
命令执行完成后即部署成功,用户可以进行相关的模块功能调试验证。
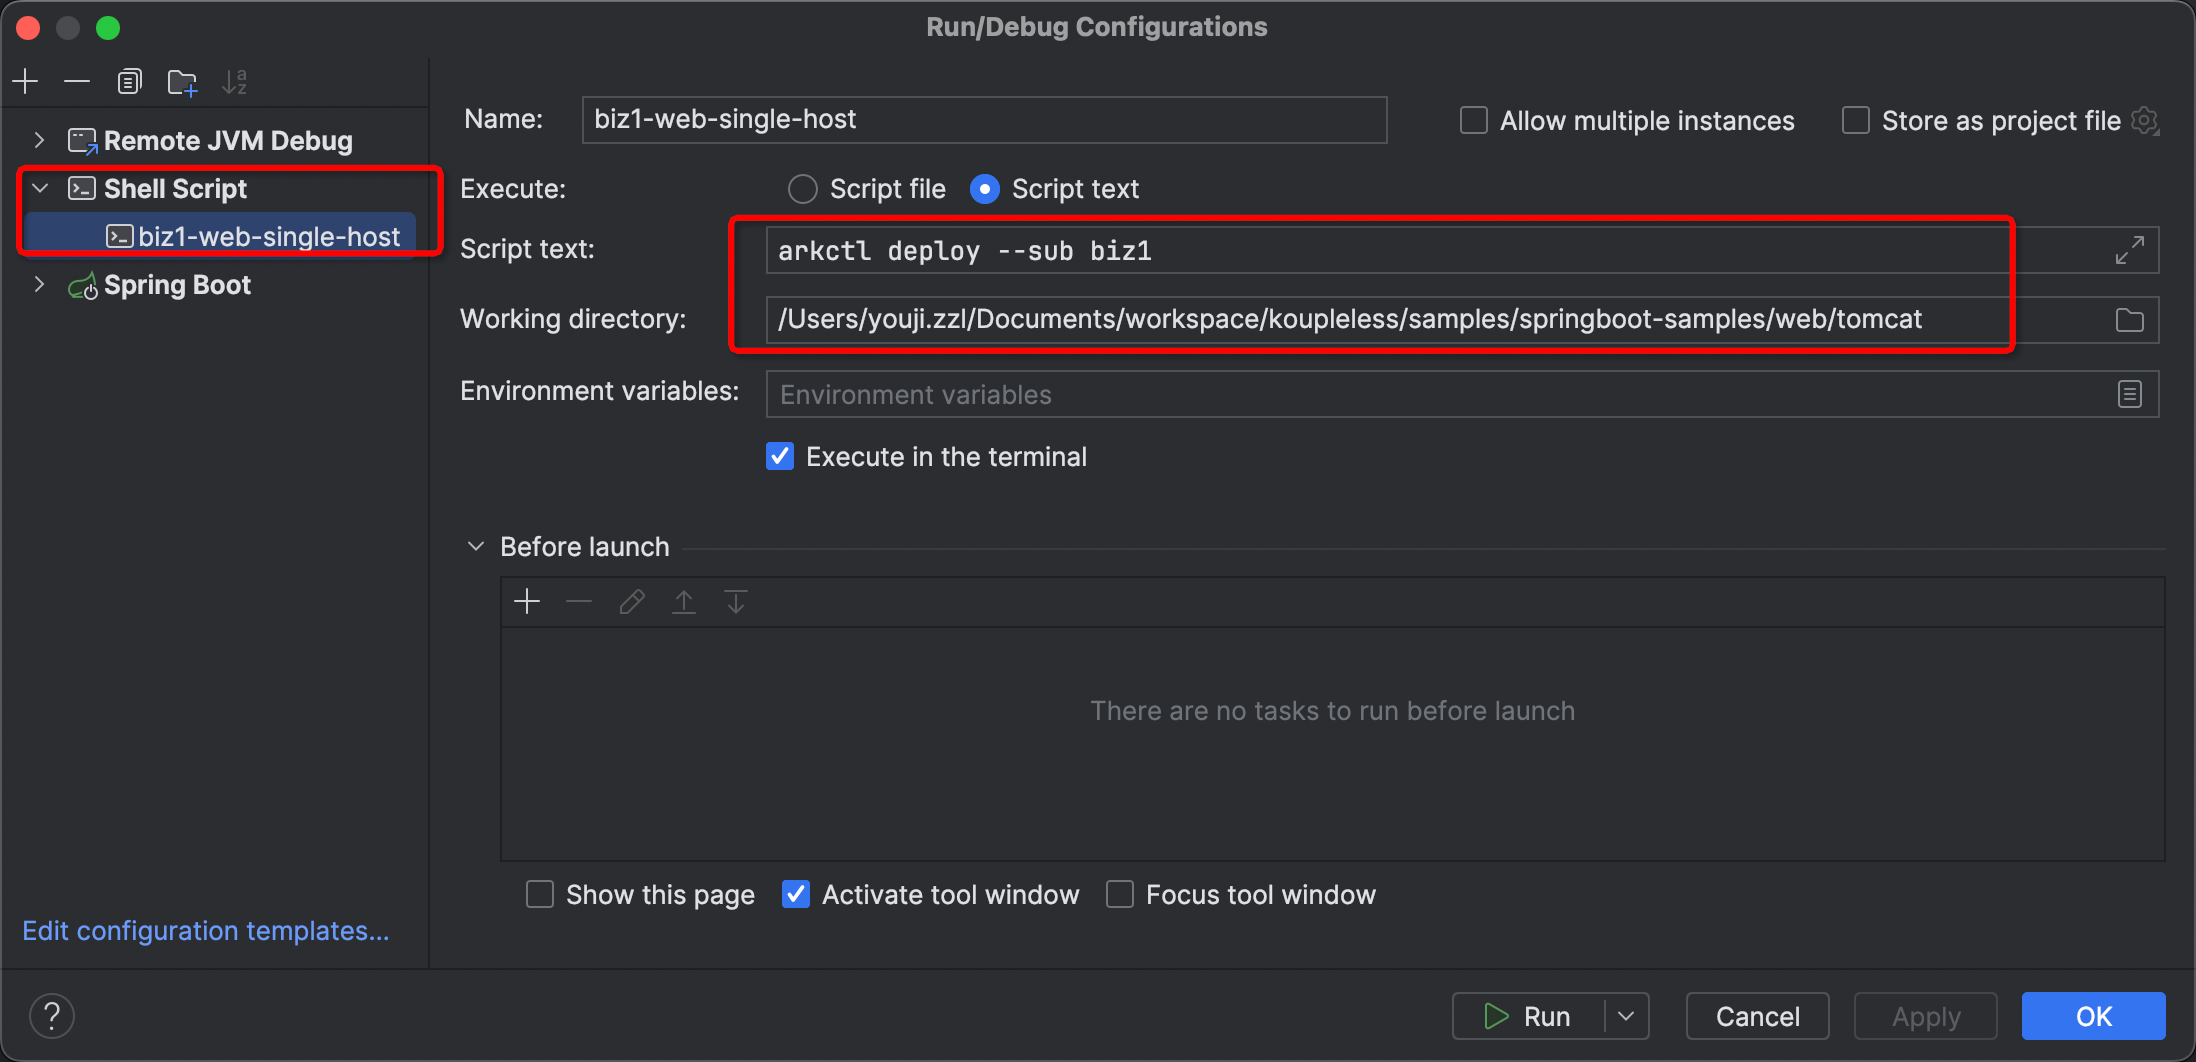
场景 6: 如何更快的使用该命令
可以在 IDEA 里新建一个 Shell Script,配置好运行的目录,然后输入 arkctl 相应的命令,如下图即可。
模块本地调试
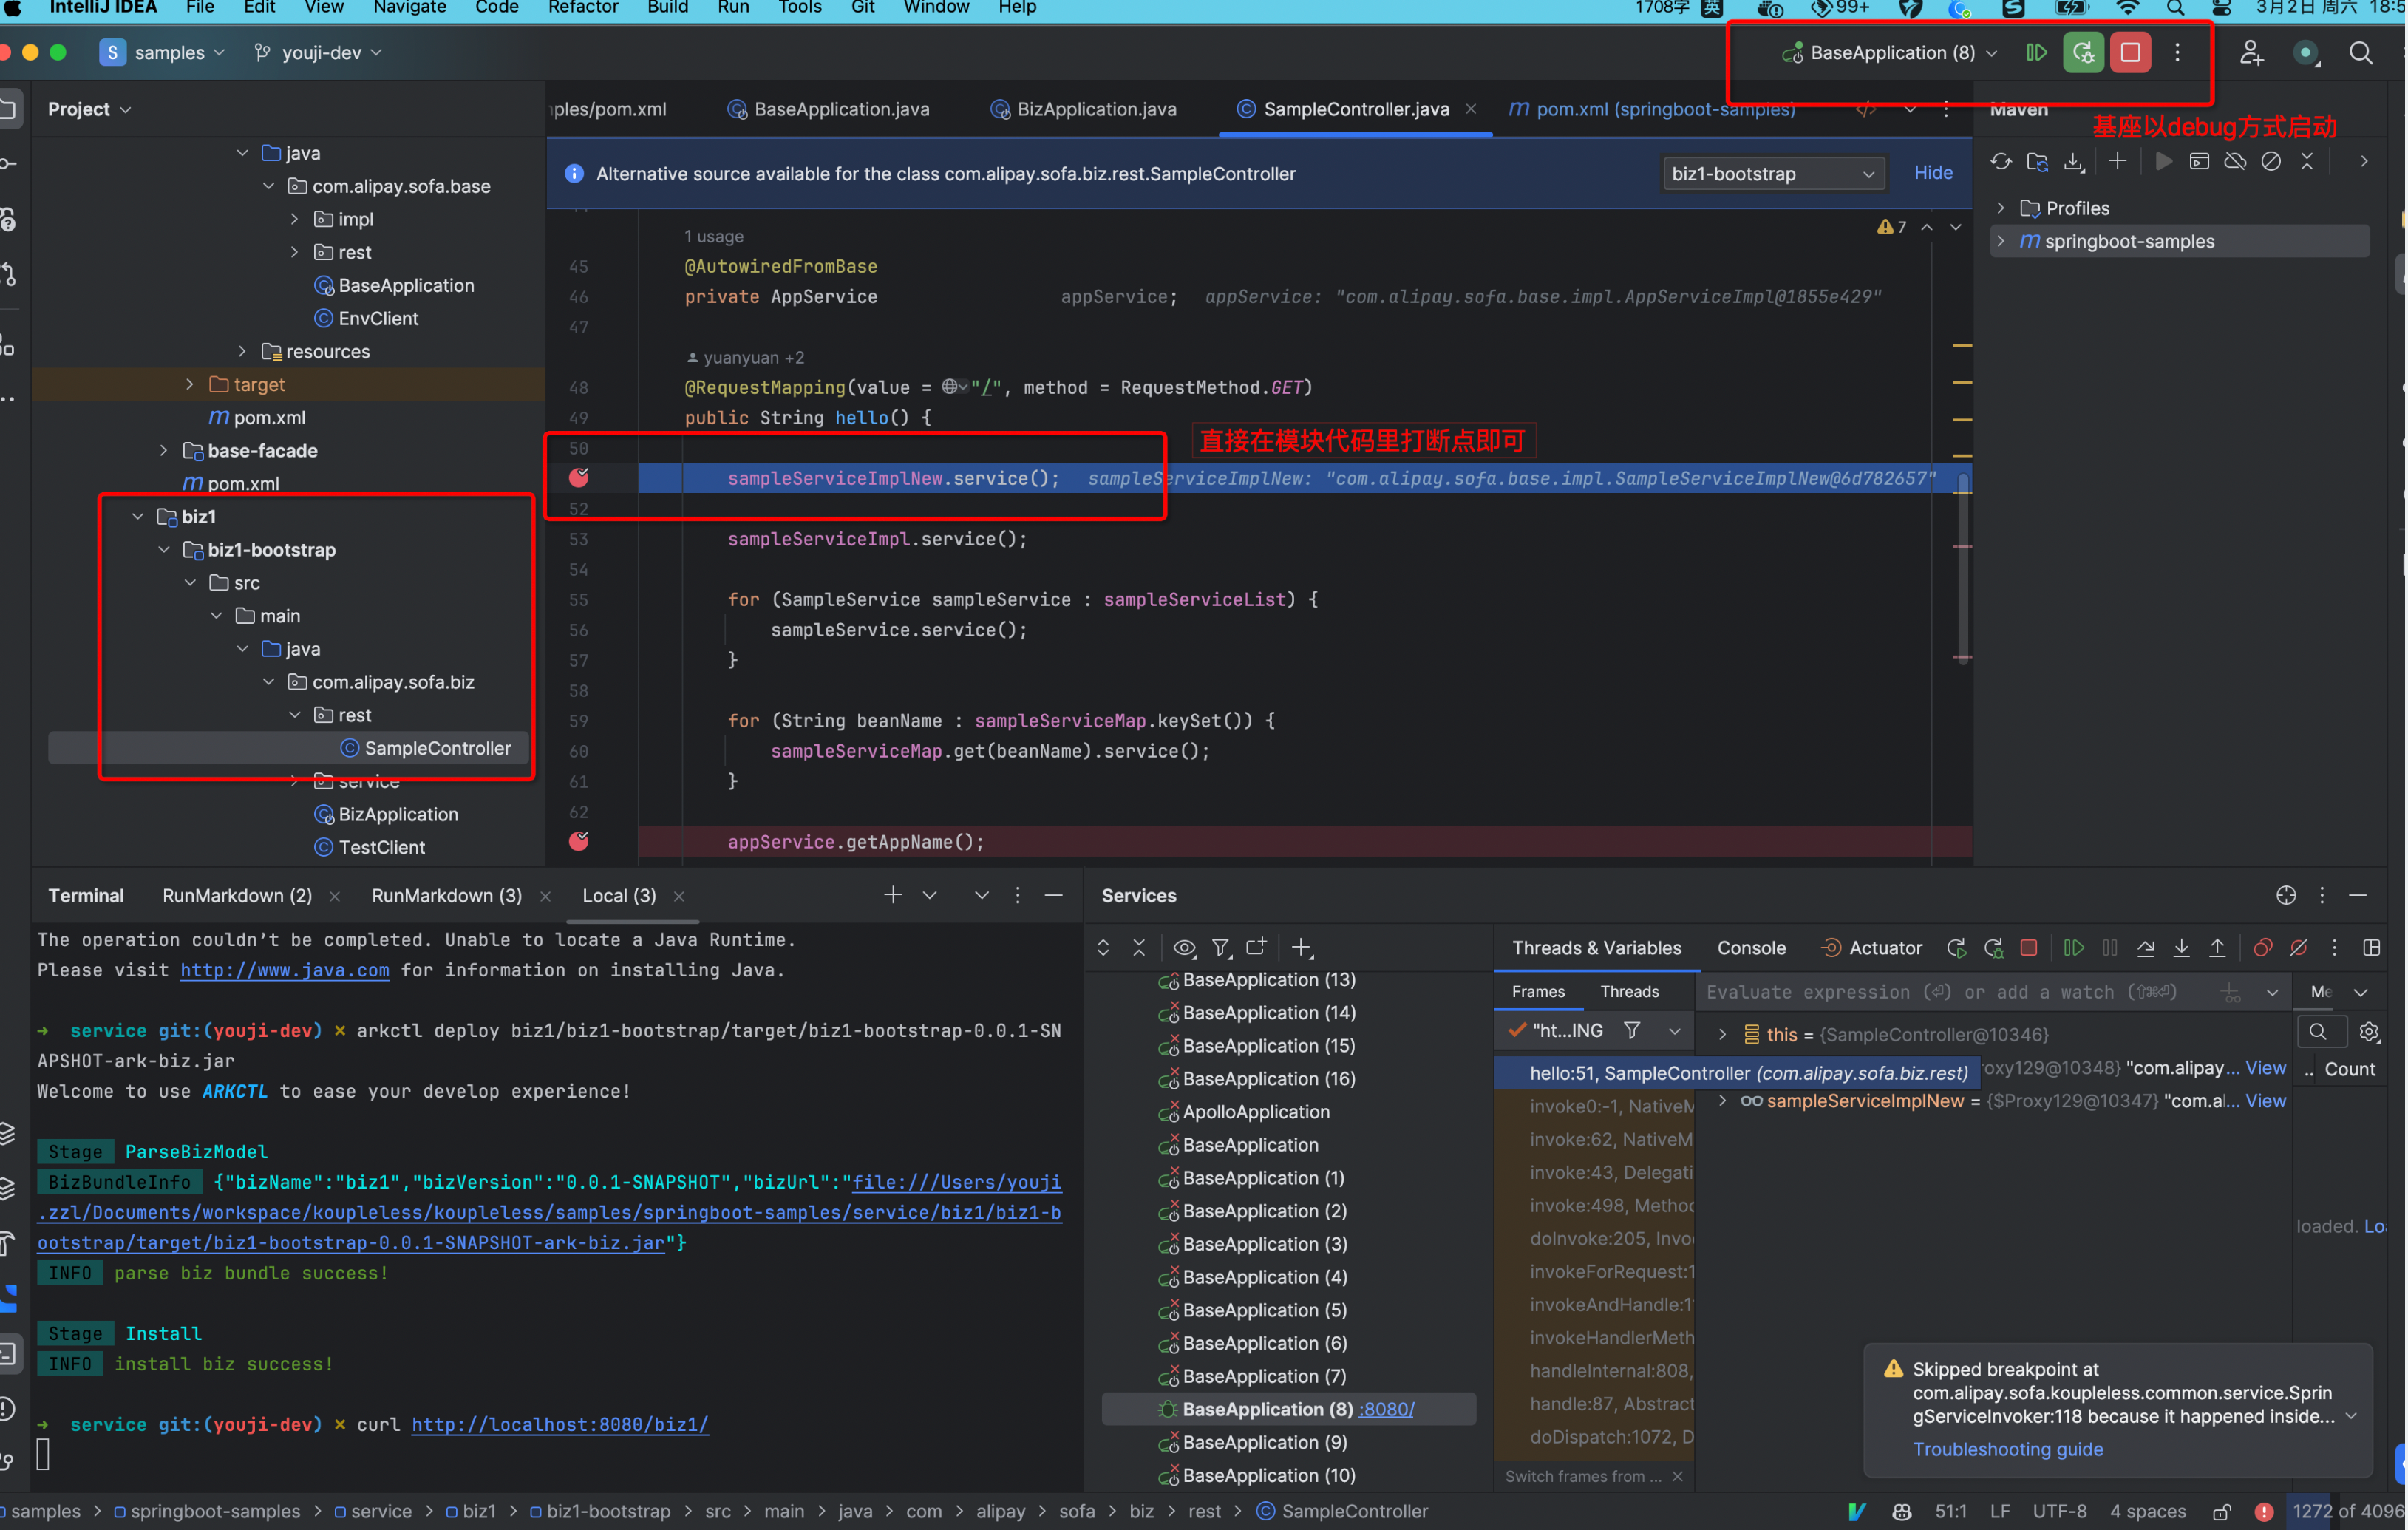
模块与基座出于同一个 IDEA 工程中
因为 IDEA 工程里能看到模块代码,模块调试与普通调试没有区别。直接在模块代码里打断点,基座通过 debug 方式启动即可。
模块与基座在不同 IDEA 工程中
- 基座启动参数里增加 debug 配置
-agentlib:jdwp=transport=dt_socket,server=y,suspend=n,address=8000,然后启动基座 - 模块添加 remote jvm debug, 设置 host 为 localhost
-agentlib:jdwp=transport=dt_socket,server=y,suspend=n,address=8000 - 模块里打断点
- 这时候安装模块后就可以调试了
查看部署状态
场景 1: 查询当前基座中已经部署的模块。
准备:
- 在本地启动一个基座。
执行命令:
arkctl status
场景 2: 查询远程 k8s 环境基座中已经部署的模块。
准备:
- 在远程 k8s 环境启动一个基座。
- 确保本地有 kube 证书以及有关权限。
执行命令:
arkctl status --pod {namespace}/{name}
通过 arthas 查看运行时模块状态与信息
获取所有 Biz 信息
vmtool -x 1 --action getInstances --className com.alipay.sofa.ark.container.model.BizModel --limit 100

获取特定 Biz 信息
# 请替换 ${bizName}
vmtool -x 1 --action getInstances --className com.alipay.sofa.ark.container.model.BizModel --limit 100 | grep ${bizName}  -A 4

获取特定 BizClassLoader 对应的 Biz 信息
# 请替换 ${BizClassLoaderHashCode}
vmtool -x 1 --action getInstances --className com.alipay.sofa.ark.container.model.BizModel --limit 100 | grep ${BizClassLoaderHashCode}  -B 1 -A 3
如:
6 - 4.3.6 复用基座数据源
使用场景
建议数据源下沉到基座,模块中尽可能复用基座数据源,避免模块在安装卸载过程中反复创建、销毁数据源连接,导致模块发布运维会变慢,同时也会额外消耗内存。 如果对模块的启动时间和内存占用不太关心的,可以不用复用基座数据源,直接在模块中创建数据源,那么模块按照普通应用方式定义数据源即可无需参考本文。
SpringBoot 解法
在模块的代码中写个 MybatisConfig 类即可,这样事务模板都是复用基座的,只有 Mybatis 的 SqlSessionFactoryBean 需要新创建。
参考 demo:/koupleless/samples/springboot-samples/db/mybatis/biz1
通过SpringBeanFinder.getBaseBean获取到基座的 Bean 对象,然后注册成模块的 Bean:
@Configuration
@MapperScan(basePackages = "com.alipay.sofa.biz1.mapper", sqlSessionFactoryRef = "mysqlSqlFactory")
@EnableTransactionManagement
public class MybatisConfig {

    //tips:不要初始化一个基座的DataSource,当模块被卸载的是,基座数据源会被销毁,transactionManager,transactionTemplate,mysqlSqlFactory被销毁没有问题

    @Bean(name = "transactionManager")
    public PlatformTransactionManager platformTransactionManager() {
        return (PlatformTransactionManager) getBaseBean("transactionManager");
    }

    @Bean(name = "transactionTemplate")
    public TransactionTemplate transactionTemplate() {
        return (TransactionTemplate) getBaseBean("transactionTemplate");
    }

    @Bean(name = "mysqlSqlFactory")
    public SqlSessionFactoryBean mysqlSqlFactory() throws IOException {
        //数据源不能申明成模块spring上下文中的bean,因为模块卸载时会触发close方法

        DataSource dataSource = (DataSource) getBaseBean("dataSource");
        SqlSessionFactoryBean mysqlSqlFactory = new SqlSessionFactoryBean();
        mysqlSqlFactory.setDataSource(dataSource);
        mysqlSqlFactory.setMapperLocations(new PathMatchingResourcePatternResolver()
                .getResources("classpath:mappers/*.xml"));
        return mysqlSqlFactory;
    }
}
SOFABoot 解法
如果 SOFABoot 基座没有开启多 bundle(Package 里没有 MANIFEST.MF 文件),则解法和上文 SpringBoot 完全一致。
如果有 MANIFEST.MF 文件,需要调用BaseAppUtils.getBeanOfBundle获取基座的 Bean,其中BASE_DAL_BUNDLE_NAME 为 MANIFEST.MF 里面的Module-Name:

@Configuration
@MapperScan(basePackages = "com.alipay.koupleless.dal.dao", sqlSessionFactoryRef = "mysqlSqlFactory")
@EnableTransactionManagement
public class MybatisConfig {

    // 注意:不要初始化一个基座的 DataSource,会导致模块被热卸载的时候,基座的数据源被销毁,不符合预期。
    // 但是 transactionManager,transactionTemplate,mysqlSqlFactory 这些资源被销毁没有问题

    private static final String BASE_DAL_BUNDLE_NAME = "com.alipay.koupleless.dal"

    @Bean(name = "transactionManager")
    public PlatformTransactionManager platformTransactionManager() {
        return (PlatformTransactionManager) BaseAppUtils.getBeanOfBundle("transactionManager",BASE_DAL_BUNDLE_NAME);
    }

    @Bean(name = "transactionTemplate")
    public TransactionTemplate transactionTemplate() {
        return (TransactionTemplate) BaseAppUtils.getBeanOfBundle("transactionTemplate",BASE_DAL_BUNDLE_NAME);
    }

    @Bean(name = "mysqlSqlFactory")
    public SqlSessionFactoryBean mysqlSqlFactory() throws IOException {
        //数据源不能申明成模块spring上下文中的bean,因为模块卸载时会触发close方法
        ZdalDataSource dataSource = (ZdalDataSource) BaseAppUtils.getBeanOfBundle("dataSource",BASE_DAL_BUNDLE_NAME);
        SqlSessionFactoryBean mysqlSqlFactory = new SqlSessionFactoryBean();
        mysqlSqlFactory.setDataSource(dataSource);
        mysqlSqlFactory.setMapperLocations(new PathMatchingResourcePatternResolver()
                .getResources("classpath:mapper/*.xml"));
        return mysqlSqlFactory;
    }
}
7 - 4.3.7 复用基座拦截器
诉求
基座中会定义很多 Aspect 切面(Spring 拦截器),你可能希望复用到模块中,但是模块和基座的 Spring 上下文是隔离的,就导致 Aspect 切面不会在模块中生效。
解法
为原有的切面类创建一个代理对象,让模块能调用到这个代理对象,然后模块通过 AutoConfiguration 注解初始化出这个代理对象。完整步骤和示例代码,可以查看 aop samples 工程,具体改动如下:
步骤 1:
基座代码定义一个接口,定义切面的执行方法。这个接口需要对模块可见(在模块里引用相关依赖):
public interface AnnotionService {
    Object doAround(ProceedingJoinPoint joinPoint) throws Throwable;
}
步骤 2:
在基座中编写切面的具体实现,这个实现类需要加上 @SofaService 注解(SOFABoot)或者 @SpringService 注解(SpringBoot,建设中):
@Service
@SofaService(uniqueId = "facadeAroundHandler")
public class FacadeAroundHandler implements AnnotionService {

    private final static Logger LOG = LoggerConst.MY_LOGGER;

    public Object doAround(ProceedingJoinPoint joinPoint) throws Throwable {
        log.info("开始执行")
        joinPoint.proceed();
        log.info("执行完成")
    }
}
步骤 3:
在模块里使用 @Aspect 注解实现一个 Aspect,SOFABoot 通过 @SofaReference 注入基座上的 FacadeAroundHandler。如果是 SpringBoot,则使用 @AutowiredFromBase 注入基座上的 FacadeAroundHandler
注意:这里不要声明成一个 Bean,不要加 @Component 或者 @Service 注解,主需要 @Aspect 注解。
//注意,这里不必申明成一个bean,不要加@Component或者@Service
@Aspect
public class FacadeAroundAspect {

    // 如果是 SOFABoot,则使用 @SofaReference,如果是 SpringBoot,则使用 @AutowiredFromBase
    @SofaReference(uniqueId = "facadeAroundHandler")
    //@AutowiredFromBase
    private AnnotionService facadeAroundHandler;

    @Pointcut("@annotation(com.alipay.linglongmng.presentation.mvc.interceptor.FacadeAround)")
    public void facadeAroundPointcut() {
    }

    @Around("facadeAroundPointcut()")
    public Object doAround(ProceedingJoinPoint joinPoint) throws Throwable {
        return facadeAroundHandler.doAround(joinPoint);
    }
}
步骤 4:
使用 @Configuration 注解写个 Configuration 配置类,把模块需要的 aspectj 对象都声明成 Spring Bean。
注意:这个 Configuration 类需要对模块可见,相关 Spring Jar 依赖需要以
@Configuration
public class MngAspectConfiguration {
    @Bean
    public FacadeAroundAspect facadeAroundAspect() {
        return new FacadeAroundAspect();
    }
    @Bean
    public EnvRouteAspect envRouteAspect() {
        return new EnvRouteAspect();
    }
    @Bean
    public FacadeAroundAspect facadeAroundAspect() {
        return new FacadeAroundAspect();
    }

}
步骤 5:
模块代码中显示的依赖步骤 4 创建的 Configuration 配置类 MngAspectConfiguration。
@SpringBootApplication
@ImportResource("classpath*:META-INF/spring/*.xml")
@ImportAutoConfiguration(value = {MngAspectConfiguration.class})
public class ModuleBootstrapApplication {
    public static void main(String[] args) {
        SpringApplicationBuilder builder = new SpringApplicationBuilder(ModuleBootstrapApplication.class)
        	.web(WebApplicationType.NONE);
        builder.build().run(args);
    }
}
8 - 4.3.8 线程池使用
背景
当多个模块或模块和基座共用一个线程池时,由于线程池执行任务使用的线程 Classloader 可能和创建该任务时使用的 Classloader 不一致,从而导致线程池执行任务时出现 ClassNotFound 异常。
因此,当多个模块或模块和基座共用一个线程池时,为了保持线程池执行任务时使用的 Classloader 和创建该任务时使用的 Classloader 一致,我们需要对线程池做一些修改。
⚠️注意:各模块使用各自的线程池,不会有此问题。
java常用的线程池使用方式有4种:
- 直接创建线程任务,提交到线程池中,如:Runnable, Callable, ForkJoinTask
- 自定义ThreadPoolExecutor,并提交到 ThreadPoolExecutor
- 通过 Executors 创建线程池,并提交到 ExecutorService, ScheduledExecutorService, ForkJoinPool
- SpringBoot 用户提交到 ThreadPoolTaskExecutor, SchedulerThreadPoolTaskExecutor
本文将介绍每一种方式在 Koupleless 上的使用方式。
使用方式
1. 直接创建线程任务,提交到线程池中
原来的方式:
threadPool.execute(new Runnable(){
    public void run() {
        //do something
    }
});


threadPool.execute(new Callable<String>(){
public String call() {
        //do something
        return "mock";
 }
});
如果保持 threadPool 不变,则需要将 Runnable 包装成 KouplelessRunnable,将 Callable 包装成 KouplelessCallable,如下:
// Runnable
// wrap方法
threadPool.execute(KouplelessRunnable.wrap(new Runnable(){
    public void run() {
        //do something
    }
});

// 或者直接new KouplelessRunnable
threadPool.execute(new KouplelessRunnable(){
    public void run() {
        //do something
    }
});

// Runnable
// wrap方法
threadPool.execute(KouplelessCallable.wrap(new Callable<String>(){
    public String call() {
        //do something
        return "mock";
    }
});

// 或者直接new KouplelessRunnable
threadPool.execute(new KouplelessCallable<String>(){
    public String call() {
        //do something
        return "mock";
    }
});
2. 自定义ThreadPoolExecutor
原来的方式:
ThreadPoolExecutor threadPool = new ThreadPoolExecutor(5, 5, 0L, TimeUnit.MILLISECONDS, new LinkedBlockingQueue<Runnable>());

threadPool.execute(new Runnable(){
    public void run() {
        //do something
    }
});


threadPool.execute(new Callable<String>(){
public String call() {
        //do something
        return "mock";
 }
});
如果要保持 Runnable 和 Callable 不变,则有两种改造方式:
- 将 threadPool 修改为 KouplelessThreadPoolExecutor
- 或者使用 kouplelessExecutorService。
首先,举例第一种改造方式:将 threadPool 修改为 KouplelessThreadPoolExecutor。如下:
// 将 ThreadPoolExecutor 修改为 KouplelessThreadPoolExecutor
ThreadPoolExecutor threadPool = new KouplelessThreadPoolExecutor(5, 5, 0L, TimeUnit.MILLISECONDS, new LinkedBlockingQueue<Runnable>());

threadPool.execute(new Runnable(){
    public void run() {
        //do something
    }
});


threadPool.execute(new Callable<String>(){
public String call() {
        //do something
        return "mock";
 }
});
然后,举例第二种改造方式:使用 kouplelessExecutorService。如下:
// 使用 KouplelessExecutorService
ExecutorService executor        = new KouplelessExecutorService(new ThreadPoolExecutor(5, 5, 0L, TimeUnit.MILLISECONDS, new LinkedBlockingQueue<Runnable>()));

// 用 executor 执行任务
executor.execute(new Runnable(){
    public void run() {
        //do something
    }
});
executor.execute(new Callable<String>(){
public String call() {
        //do something
        return "mock";
 }
});
3. 使用二方包中的 ThreadPoolExecutor 或 ScheduledThreadPoolExecutor
原来的方式:
ThreadPoolExecutorA executorService = new ThreadPoolExecutorA();

executorService.execute(new Runnable(){
    public void run() {
        //do something
    }
});


executorService.execute(new Callable<String>(){
public String call() {
        //do something
        return "mock";
 }
});

ScheduledThreadPoolExecutorA scheduledExecutorService = new ScheduledThreadPoolExecutorA();

scheduledExecutorService.execute(new Runnable(){
    public void run() {
        //do something
    }
});

scheduledExecutorService.execute(new Callable<String>(){
    public String call() {
        //do something
        return "mock";
    }
});
如果要保持 Runnable 和 Callable 不变,则需要使用 kouplelessExecutorService, kouplelessScheduledExecutorService,如下:
// 使用 KouplelessExecutorService
ExecutorService executor        = new KouplelessExecutorService(new ThreadPoolExecutorA());

// 用 executor 执行任务
executor.execute(new Runnable(){
    public void run() {
        //do something
    }
});
executor.execute(new Callable<String>(){
    public String call() {
        //do something
    return "mock";
    }
});


// 使用 KouplelessScheduledExecutorService
ScheduledExecutorService scheduledExecutor = new KouplelessScheduledExecutorService(new ScheduledThreadPoolExecutorA());

// 用 scheduledExecutor 执行任务
scheduledExecutor.execute(new Runnable(){
    public void run() {
        //do something
    }
});
scheduledExecutor.execute(new Callable<String>(){
    public String call() {
        //do something
        return "mock";
    }
});
4. 通过 Executors 创建线程池
原来的方式:
ExecutorService executorService = Executors.newFixedThreadPool(6);

executorService.execute(new Runnable(){
    public void run() {
        //do something
    }
});


executorService.execute(new Callable<String>(){
public String call() {
        //do something
        return "mock";
 }
});

ScheduledExecutorService scheduledExecutorService = Executors.newSingleThreadScheduledExecutor();

scheduledExecutorService.execute(new Runnable(){
    public void run() {
        //do something
    }
});

scheduledExecutorService.execute(new Callable<String>(){
    public String call() {
        //do something
        return "mock";
    }
});
如果要保持 Runnable 和 Callable 不变,则需要使用 kouplelessExecutorService, kouplelessScheduledExecutorService,如下:
// 使用 KouplelessExecutorService
ExecutorService executor        = new KouplelessExecutorService(Executors.newFixedThreadPool(6));

// 用 executor 执行任务
executor.execute(new Runnable(){
    public void run() {
        //do something
    }
});
executor.execute(new Callable<String>(){
    public String call() {
        //do something
    return "mock";
    }
});

// 使用 KouplelessScheduledExecutorService
ScheduledExecutorService scheduledExecutor = new KouplelessScheduledExecutorService(Executors.newSingleThreadScheduledExecutor());

// 用 scheduledExecutor 执行任务
scheduledExecutor.execute(new Runnable(){
    public void run() {
        //do something
    }
});
scheduledExecutor.execute(new Callable<String>(){
    public String call() {
        //do something
        return "mock";
    }
});
5. SpringBoot 用户提交到 ThreadPoolTaskExecutor, SchedulerThreadPoolTaskExecutor
由于 koupeless 已经对 springboot(2.3.0-2.7.x) 的 ThreadPoolTaskExecutor 和 SchedulerThreadPoolTaskExecutor 做了适配,所以可以直接使用。
@Autowired
private ThreadPoolTaskExecutor threadPoolTaskExecutor;

@Autowired
private SchedulerThreadPoolTaskExecutor schedulerThreadPoolTaskExecutor;

threadPoolTaskExecutor.execute(new Runnable(){
    public void run() {
        //do something
    }
});

schedulerThreadPoolTaskExecutor.execute(new Runnable(){
    public void run() {
        //do something
    }
});
9 - 4.3.9 模块多配置
为什么要多配置
在不同场合下,一份模块代码会部署到不同的应用中,但需要使用不同的配置。
怎么使用
步骤一:在不同场合下,给一份模块代码打包时,配置不同的 bizName,如:biz1, biz2
<plugin>
    <groupId>com.alipay.sofa</groupId>
    <artifactId>sofa-ark-maven-plugin</artifactId>
    <version>${sofa.ark.version}</version>
    <executions>
        <execution>
            <id>default-cli</id>
            <goals>
                <goal>repackage</goal>
            </goals>
        </execution>
    </executions>
    <configuration>
        <!-- 不同场合配置不同的bizName,如:biz1, biz2 -->
        <bizName>biz1</bizName>
        <!-- ... 其它属性 -->
    </configuration>
</plugin>
步骤二:在模块的 resources 目录下,新增文件。其中 config, biz1 和 biz2 为文件夹:
config/biz1/application.properties
config/biz2/application.properties
步骤三:用不同的 bizName(biz1,biz2),打包出两个不同的 ark-biz 文件:
biz1-0.0.1-SNAPSHOT-ark-biz.jar
biz2-0.0.1-SNAPSHOT-ark-biz.jar
步骤四:在不同场合下,安装不同的 ark-biz 模块。模块启动时,将根据不同的 bizName 读取不同的配置文件:
config/biz1/application.properties
config/biz2/application.properties
原理
模块启动时,根据模块名称与 spring.profiles.active 字段,读取以下文件为属性源:
- config/${bizName}/application-${profile}.properties
- config/${bizName}/application.properties
如果未设置 spring.profiles.active,则读取以下文件为属性源:
- config/${bizName}/application.properties
10 - 4.3.10 多模块集成测试
English | 简体中文
为什么我们需要集成测试框架?
如果没有集成测试框架,在验证 koupleless 模块逻辑时,开发者的验证步骤是繁琐的,需要做如下步骤:
- 启动一个基座进程。
- 构建模块 jar 包。
- 安装模块。
- 调用模块的 http 接口(或其他方法)验证逻辑。
如果逻辑不符合预期,开发者需要重复上述步骤, 这样的验证流程是非常低效的。 为了提高开发者的验证效率,我们决定提供 koupleless 集成测试框架,让开发者能够在一个进程内同时启动基座和模块。
集成测试框架
原理
集成测试框架通过增强基座的类加载器和模块的类加载行为,来模拟多模块部署的场景。 具体的源代码可以参照 koupleless-test-suite
如何使用
以 webflux-samples 为例子。webflux-samples 的项目结构如下:
我们新建一个 maven module:
- webflux-integration-test: 集成测试模块
首先该 module 需要添加集成测试框架依赖:
<dependency>
    <groupId>com.alipay.sofa.koupleless</groupId>
    <artifactId>koupleless-test-suite</artifactId>
    <version>${koupleless.runtime.version}</version>
</dependency>
然后我们需要添加基座和模块的依赖:
<!-- 基座依赖 -->
<dependency>
    <groupId>com.alipay.sofa.web.webflux</groupId>
    <artifactId>demowebflux</artifactId>
    <version>0.0.1-SNAPSHOT</version>
    <classifier>lib</classifier>
</dependency>
        <!-- 模块依赖 -->
<dependency>
<groupId>com.alipay.sofa.web.webflux</groupId>
<artifactId>bizwebflux</artifactId>
<version>0.0.1-SNAPSHOT</version>
</dependency>
接着,我们需要编写集成测试用例:
    public static void setUp() {
    TestMultiSpringApplication multiApp = new TestMultiSpringApplication(
            MultiSpringTestConfig
                    .builder()
                    .baseConfig(
                            BaseSpringTestConfig
                                    .builder()
                                    // 传入基座的启动类。
                                    .mainClass(DemoWebfluxApplication.class)
                                    .build()
                    )
                    .bizConfigs(
                            Lists.newArrayList(
                                    BizSpringTestConfig
                                            .builder()
                                            .bizName("biz")
                                            // 传入模块的启动类。
                                            .mainClass(BizWebfluxApplication.class)
                                            .build()))
                    .build());
    multiApp.run();
}
最后,在 IDEA 里启动测试,我们会发现基座和模块的 Spring
容器都启动了。这样我们就可以在一个进程内验证多模块的逻辑。
如此,我们就完成了一个集成测试用例。
总结
通过上面的实验,我们验证了可以通过 koupleless 集成测试框架,来快速验证多模块的逻辑,提高开发者的验证效率。
11 - 4.3.11 静态合并部署
介绍
SOFAArk 提供了静态合并部署能力,Base 包(基座应用) 在启动时,可以启动已经构建完成的 Biz 包(模块应用),默认获取模块的方式为:本地目录、本地文件URL、远程URL。
此外,SOFAArk 还提供了静态合并部署的扩展接口,开发者可以自定义获取 Biz 包(模块应用) 的方式。
使用方式
步骤一:模块应用打包成 Ark Biz
如果开发者希望自己应用的 Ark Biz 包能够被其他应用直接当成 Jar 包依赖,进而运行在同一个 SOFAArk 容器之上,那么就需要打包发布 Ark Biz 包,详见 Ark Biz 介绍。 Ark Biz 包使用 Maven 插件 sofa-ark-maven-plugin 打包生成。
<build>
    <plugin>
        <groupId>com.alipay.sofa</groupId>
        <artifactId>sofa-ark-maven-plugin</artifactId>
        <version>${sofa.ark.version}</version>
        <executions>
            <execution>
                <id>default-cli</id>
                <goals>
                    <goal>repackage</goal>
                </goals>
            </execution>
        </executions>
        <configuration>
            <!--                默认100,数值越大越后面安装,koupleless runtime 版本大于等于 1.2.2             -->
            <priority>200</priority>
        </configuration>
    </plugin>
</build>
步骤二:基座获取需要合并部署的 Ark Biz
要求:
- jdk8
- sofa.ark.version >= 2.2.12
- koupleless.runtime.version >= 1.2.3
- jdk17/jdk21
- sofa.ark.version >= 3.1.5
- koupleless.runtime.version >= 2.1.4
方式一:使用官方默认获取方式,支持本地目录、本地文件URL、远程URL
1. 基座配置本地目录、本地文件URL、远程URL
开发者需要在基座的 ark 配置文件中(conf/ark/bootstrap.properties 或 conf/ark/bootstrap.yml)指定需要合并部署的 Ark Biz 包,支持:
- 本地目录
- 本地文件URL(windows 系统为
file:\\, linux 系统为file://) - 远程URL(支持
http://,https://)
其中,本地文件URL、远程URL 配置在 integrateBizURLs 字段中,本地目录配置在 integrateLocalDirs 字段中。
配置方式如下:
integrateBizURLs=file://${xxx}/koupleless_samples/springboot-samples/service/biz1/biz1-bootstrap/target/biz1-bootstrap-0.0.1-SNAPSHOT-ark-biz.jar,\
  file://${xxx}/koupleless_samples/springboot-samples/service/biz2/biz2-bootstrap/target/biz2-bootstrap-0.0.1-SNAPSHOT-ark-biz.jar,\
  https://oss.xxxxx/biz2-bootstrap-0.0.1-SNAPSHOT-ark-biz.jar
integrateLocalDirs=/home/${xxx}/sofa-ark/biz,\
  /home/${xxx}/sofa-ark/biz2
或
integrateBizURLs:
  - file://${xxx}/springboot-samples/service/biz2/biz2-bootstrap/target/biz2-bootstrap-0.0.1-SNAPSHOT-ark-biz.jar
  - file://${xxx}/koupleless_samples/springboot-samples/service/biz2/biz2-bootstrap/target/biz2-bootstrap-0.0.1-SNAPSHOT-ark-biz.jar
integrateLocalDirs:
  - /home/${xxx}/sofa-ark/biz
  - /home/${xxx}/sofa-ark/biz2
2. 基座配置打包插件目标 integrate-biz
基座 bootstrap 的 pom 中给 koupleless-base-build-plugin 添加
<plugin>
    <groupId>com.alipay.sofa.koupleless</groupId>
    <artifactId>koupleless-base-build-plugin</artifactId>
    <version>${koupleless.runtime.version}</version>
    <executions>
        <execution>
            <goals>
                <goal>add-patch</goal>
<!--                用于静态合并部署-->
                <goal>integrate-biz</goal>
            </goals>
        </execution>
    </executions>
</plugin>
执行打包后,如果自行解压打包的 jar 文件,可以在 classPath/SOFA-ARK/biz 中看到指定的模块 ark-biz 包。
方式二:使用自定义获取方式
1. Ark 扩展机制原理
2. 实现 AddBizToStaticDeployHook 接口
基座/基座二方包中,实现 AddBizToStaticDeployHook 接口,以 AddBizInResourcesHook 为例,如下:
@Extension("add-biz-in-resources-to-deploy")
public class AddBizInResourcesHook implements AddBizToStaticDeployHook {
    @Override
    public List<BizArchive> getStaticBizToAdd() throws Exception {
        List<BizArchive> archives = new ArrayList<>();
        // ...
        archives.addAll(getBizArchiveFromResources());
        return archives;
    }

    protected List<BizArchive> getBizArchiveFromResources() throws Exception {
        // ... 读取资源中的Ark Biz包
        return archives;
    }
}
3. 配置 spi
在 resources 目录下添加 /META-INF/services/sofa-ark/ 目录,再在 /META-INF/services/sofa-ark/ 添加一个 名为 com.alipay.sofa.ark.spi.service.biz.AddBizToStaticDeployHook 的文件,文件里面内容为 hook 类的全限定名:
com.alipay.sofa.ark.support.common.AddBizInResourcesHook
重新打包基座。
步骤三:启动基座
JVM 添加参数,配置: -Dsofa.ark.embed.static.biz.enable=true, 或者在基座 main 方法里增加这行代码 ArkConfigs.setEmbedStaticBizEnable(true);
12 - 4.3.12 各版本兼容性关系表与适配验证的组件列表
框架自身各版本兼容性关系
用户可根据实际 jdk 和 springboot 版本按需引入 Koupleless 版本
| JDK | SpringBoot | SOFA-ARK | Koupleless |
|---|---|---|---|
| 1.8 | 2.x | 2.x.x | 1.x.x |
| 17 | 3.0.x, 3.1.x | 3.0.7(no update anymore) | 2.0.4(no update anymore) |
| 17 & 21 | 3.2.x and above | 3.1.x | 2.1.x |
koupleless 的 sdk 最新版本请查看 https://github.com/koupleless/runtime/releases
各组件兼容性报告
在 Koupleless 模块中,官方目前支持并兼容常见的中间件客户端。
注意,这里 “已经支持” 需要在基座 POM
中引入相关客户端依赖(强烈建议使用 SpringBoot Starter 方式引入相关依赖),同时在模块 POM 中也引入相关依赖并设置 *
| 中间件客户端 | 版本号 | 备注 |
|---|---|---|
| JDK | 8.x 17.x | 已经支持 |
| SpringBoot | >= 2.3.0 或 3.x | 已经支持 JDK17 + SpringBoot3.x 基座和模块完整使用样例可参见此处 |
| SpringBoot Cloud | >= 2.7.x | 已经支持 基座和模块完整使用样例可参见此处 |
| SOFABoot | >= 3.9.0 或 4.x | 已经支持 |
| JMX | N/A | 已经支持 需要给基座加 -Dspring.jmx.default-domain=${spring.application.name} 启动参数 |
| log4j2 | 任意 | 已经支持。在基座和模块引入 log4j2,并额外引入依赖: <dependency> <groupId>com.alipay.sofa.koupleless</groupId> <artifactId>koupleless-adapter-log4j2</artifactId> <version>${最新版 Koupleless 版本}</version> <scope>provided</scope> <!– 模块需要 provided –> </dependency> 基座和模块完整使用样例参见此处 |
| slf4j-api | 1.x 且 >= 1.7 | 已经支持 |
| tomcat | 7.x、8.x、9.x、10.x 及以上均可 | 已经支持 基座和模块完整使用样例可参见此处 |
| netty | 4.x | 已经支持 基座和模块完整使用样例可参见此处 |
| sofarpc | >= 5.8.6 | 已经支持 |
| dubbo | 3.x | 已经支持 基座和模块完整使用样例及注意事项可参见此处 |
| grpc | 1.x 且 >= 1.42 | 已经支持 基座和模块完整使用样例及注意事项可参见此处 |
| 模块独立 system.properties | koupleless 已支持 | 参考这个 PR |
| 模块独立 env | koupleless 已支持 | 参考这个 PR |
| protobuf-java | 3.x 且 >= 3.17 | 已经支持 基座和模块完整使用样例及注意事项可参见此处 |
| apollo | 1.x 且 >= 1.6.0 | 已经支持 基座和模块完整使用样例及注意事项可参见此处 |
| nacos | 2.1.x | 已经支持 基座和模块完整使用样例及注意事项可参见此处 |
| kafka-client | >= 2.8.0 或 >= 3.4.0 | 已经支持 基座和模块完整使用样例可参见此处 |
| rocketmq | 4.x 且 >= 4.3.0 | 已经支持 基座和模块完整使用样例可参见此处 |
| jedis | 3.x | 已经支持 基座和模块完整使用样例可参见此处 |
| xxl-job | 2.x 且 >= 2.1.0 | 已经支持 需要在模块里声明为 compile 依赖独立使用 |
| mybatis | >= 2.2.2 或 >= 3.5.12 | 已经支持 基座和模块完整使用样例可参见此处 |
| druid | 1.x | 已经支持 基座和模块完整使用样例可参见此处 |
| mysql-connector-java | 8.x | 已经支持 基座和模块完整使用样例可参见此处 |
| postgresql | 42.x 且 >= 42.3.8 | 已经支持 |
| mongodb | 4.6.1 | 已经支持 基座和模块完整使用样例可参见此处 |
| hibernate | 5.x 且 >= 5.6.15 | 已经支持 |
| j2cache | 任意 | 已经支持 需要在模块里声明为 compile 依赖独立使用 |
| opentracing | 0.x 且 >= 0.32.0 | 已经支持 |
| elasticsearch | 7.x 且 >= 7.6.2 | 已经支持 |
| jaspyt | 1.x 且 >= 1.9.3 | 已经支持 |
| OKHttp | - | 已经支持 需要放在基座里,请使用模块自动瘦身能力 |
| io.kubernetes:client | 10.x 且 >= 10.0.0 | 已经支持 |
| net.java.dev.jna | 5.x 且 >= 5.12.1 | 已经支持 |
| prometheus | - | 待验证支持 |
| skywalking | - | 官方不支持一个进程多个 service_name,通过每个模块打印日志到独立目录才实现 tracing 的隔离,可参考 logging 的 samples |
| 宝蓝德 | 9.5.5.004 | 已经支持,请查看这里 |
| 东方通 | 7.0.E.6_P7 | 已经支持,请查看这里 |
13 - 4.3.13 Koupleless 配置
打包构建阶段
基座打包插件配置
插件参数配置
完整的 koupleless-base-build-plugin 插件配置模板如下:
<plugin>
  <groupId>com.alipay.sofa.koupleless</groupId>
  <artifactId>koupleless-base-build-plugin</artifactId>
  <version>${koupleless.runtime.version}</version>
  <executions>
    <execution>
      <goals>
        <goal>add-patch</goal>
        <!-- 用于静态合并部署-->
        <goal>integrate-biz</goal>
      </goals>
    </execution>
  </executions>
  <configuration>
      <!--基座打包存放目录,默认为工程 build 目录-->
      <outputDirectory>./target</outputDirectory>

      <!--打包 starter 的 groupId,默认为工程的 groupId-->
      <dependencyGroupId>${groupId}</dependencyGroupId>

      <!--打包 starter 的 artifactId-->
      <dependencyArtifactId>${baseAppName}-dependencies-starter</dependencyArtifactId>

      <!--打包 starter 的版本号-->
      <dependencyVersion>0.0.1-SNAPSHOT</dependencyVersion>

      <!-- 调试用,改成 true 即可看到打包 starter 的中间产物 -->
      <cleanAfterPackageDependencies>false</cleanAfterPackageDependencies>
  </configuration>
</plugin>
静态合并部署的配置
开发者需要在基座的 ark 配置文件中(conf/ark/bootstrap.properties 或 conf/ark/bootstrap.yml)指定需要合并部署的 Ark Biz 包,支持:
- 本地目录
- 本地文件URL(windows 系统为
file:\\, linux 系统为file://) - 远程URL(支持
http://,https://)
其中,本地文件URL、远程URL 配置在 integrateBizURLs 字段中,本地目录配置在 integrateLocalDirs 字段中。
配置方式如下:
integrateBizURLs=file://${xxx}/koupleless_samples/springboot-samples/service/biz1/biz1-bootstrap/target/biz1-bootstrap-0.0.1-SNAPSHOT-ark-biz.jar,\
  file://${xxx}/koupleless_samples/springboot-samples/service/biz2/biz2-bootstrap/target/biz2-bootstrap-0.0.1-SNAPSHOT-ark-biz.jar,\
  https://oss.xxxxx/biz2-bootstrap-0.0.1-SNAPSHOT-ark-biz.jar
integrateLocalDirs=/home/${xxx}/sofa-ark/biz,\
  /home/${xxx}/sofa-ark/biz2
或
integrateBizURLs:
  - file://${xxx}/springboot-samples/service/biz2/biz2-bootstrap/target/biz2-bootstrap-0.0.1-SNAPSHOT-ark-biz.jar
  - file://${xxx}/koupleless_samples/springboot-samples/service/biz2/biz2-bootstrap/target/biz2-bootstrap-0.0.1-SNAPSHOT-ark-biz.jar
integrateLocalDirs:
  - /home/${xxx}/sofa-ark/biz
  - /home/${xxx}/sofa-ark/biz2
模块打包插件配置
插件参数配置
完整的 sofa-ark-maven-plguin 插件配置模板如下:
<plugins>
    <plugin>
        <groupId>com.alipay.sofa</groupId>
        <artifactId>sofa-ark-maven-plugin</artifactId>
        <version>${sofa.ark.version}</version>
        <executions>
            <execution>
                <id>default-cli</id>
                <goals>
                    <goal>repackage</goal>
                </goals>
                <configuration>
                    <!--ark 包和 ark biz 的打包存放目录,默认为工程 build 目录-->
                    <outputDirectory>./target</outputDirectory>

                    <!--设置应用的根目录,用于读取 ${base.dir}/conf/ark/bootstrap.application 配置文件,默认为 ${project.basedir}-->
                    <baseDir>./</baseDir>

                    <!--生成 ark 包文件名称,默认为 ${artifactId}-->
                    <finalName>demo-ark</finalName>

                    <!--是否跳过执行 goal:repackage,默认为false-->
                    <skip>false</skip>

                    <!--是否打包、安装和发布 ark biz,详细参考 Ark Biz 文档,默认为false-->
                    <attach>true</attach>

                    <!--设置 ark 包的 classifier,默认为空-->
                    <arkClassifier>ark</arkClassifier>

                    <!--设置 ark biz 的 classifier,默认为 ark-biz-->
                    <bizClassifier>ark-biz</bizClassifier>

                    <!--设置 ark biz 的 biz name,默认为 ${artifactId}-->
                    <bizName>demo-ark</bizName>

                    <!--设置 ark biz 的 biz version,默认为 ${artifactId}-->
                    <bizVersion>0.0.1</bizVersion>

                    <!--设置 ark biz 的 启动优先级,值越小优先级越高,${artifactId}-->
                    <priority>100</priority>

                    <!--设置 ark biz 的启动入口,默认会搜索被打 org.springframework.boot.autoconfigure.SpringBootApplication 注解且含有 main 方法的入口类-->
                    <mainClass>com.alipay.sofa.xx.xx.MainEntry</mainClass>

                    <!--设置是否将 scope=provided 的依赖打包,默认为 false-->
                    <packageProvided>false</packageProvided>

                    <!--设置是否生成 Biz 包,默认为true-->
                    <keepArkBizJar>true</keepArkBizJar>

                    <!--针对 Web 应用,设置 context path,默认为 /,模块应该配置自己的 webContextPath,如:biz1 -->
                    <webContextPath>/</webContextPath>

                    <!--打包 ark biz 时,排除指定的包依赖;格式为: ${groupId:artifactId} 或者 ${groupId:artifactId:classifier}-->
                    <excludes>
                        <exclude>org.apache.commons:commons-lang3</exclude>
                    </excludes>

                    <!--打包 ark biz 时,排除和指定 groupId 相同的包依赖-->
                    <excludeGroupIds>
                        <excludeGroupId>org.springframework</excludeGroupId>
                    </excludeGroupIds>

                    <!--打包 ark biz 时,排除和指定 artifactId 相同的包依赖-->
                    <excludeArtifactIds>
                        <excludeArtifactId>sofa-ark-spi</excludeArtifactId>
                    </excludeArtifactIds>

                    <!--打包 ark biz 时,配置不从 ark plugin 索引的类;默认情况下,ark biz 会优先索引所有 ark plugin 的导出类,
                    添加该配置后,ark biz 将只在ark biz内部加载该类,不再优先委托 ark plugin 加载-->
                    <denyImportClasses>
                        <class>com.alipay.sofa.SampleClass1</class>
                        <class>com.alipay.sofa.SampleClass2</class>
                    </denyImportClasses>

                    <!--对应 denyImportClasses 配置,可以配置包级别-->
                    <denyImportPackages>
                        <package>com.alipay.sofa</package>
                        <package>org.springframework.*</package>
                    </denyImportPackages>

                    <!--打包 ark biz 时,配置不从 ark plugin 索引的资源;默认情况下,ark biz 会优先索引所有 ark plugin 的导出资源,
                    添加该配置后,ark biz 将只在ark biz内部寻找该资源,不在从 ark plugin 查找-->
                    <denyImportResources>
                        <resource>META-INF/spring/test1.xml</resource>
                        <resource>META-INF/spring/test2.xml</resource>
                    </denyImportResources>

                     <!--ark biz 仅能找到自己在pom 中声明过的依赖,默认为 false-->
                    <declaredMode>true</declaredMode>

                    <!--打包 ark biz 时,仅打包基座没有的依赖、模块与基座不同版本的依赖。该参数用于指定“基座的依赖管理”标识,“基座的依赖管理”需要作为模块 pom 的 parent ,以 ${groupId}:${artifactId}:${version} 标识 -->
                    <baseDependencyParentIdentity>${groupId}:${artifactId}:${version}</baseDependencyParentIdentity>
                </configuration>
            </execution>
        </executions>
    </plugin>
</plugins>
模块瘦身配置
SOFAArk 模块瘦身会读取两处配置文件:
- “模块项目根目录/conf/ark/bootstrap.properties”,比如:my-module/conf/ark/bootstrap.properties
- “模块项目根目录/conf/ark/bootstrap.yml”,比如:my-module/conf/ark/bootstrap.yml
bootstrap.properties
在「模块项目根目录/conf/ark/bootstrap.properties」中按照如下格式配置需要下沉到基座的框架和中间件常用包,比如:
# excludes config ${groupId}:{artifactId}:{version}, split by ','
excludes=org.apache.commons:commons-lang3,commons-beanutils:commons-beanutils
# excludeGroupIds config ${groupId}, split by ','
excludeGroupIds=org.springframework
# excludeArtifactIds config ${artifactId}, split by ','
excludeArtifactIds=sofa-ark-spi
bootstrap.yml
在「模块项目根目录/conf/ark/bootstrap.yml」中按照如下格式配置需要下沉到基座的框架和中间件常用包,比如:
# excludes 中配置 ${groupId}:{artifactId}:{version}, 不同依赖以 - 隔开
# excludeGroupIds 中配置 ${groupId}, 不同依赖以 - 隔开
# excludeArtifactIds 中配置 ${artifactId}, 不同依赖以 - 隔开
excludes:
  - org.apache.commons:commons-lang3
  - commons-beanutils:commons-beanutils
excludeGroupIds:
  - org.springframework
excludeArtifactIds:
  - sofa-ark-spi
对于部分依赖,即使模块和基座使用的依赖版本一致,但模块打包时也需要保留该依赖,即需要配置模块瘦身依赖白名单。
配置方式:在「模块项目根目录/conf/ark/bootstrap.properties」 或 「模块项目根目录/conf/ark/bootstrap.yml」中增加需要保留的依赖,如果该文件不存在,可自行新增目录和文件。
bootstrap.properties
# includes config ${groupId}:${artifactId}, split by ','
includes=org.apache.commons:commons-lang3,commons-beanutils:commons-beanutils
# includeGroupIds config ${groupId}, split by ','
includeGroupIds=org.springframework
# includeArtifactIds config ${artifactId}, split by ','
includeArtifactIds=sofa-ark-spi
bootstrap.yml
# includes config ${groupId}:${artifactId}
includes:
  - org.apache.commons:commons-lang3
  - commons-beanutils:commons-beanutils
# includeGroupIds config ${groupId}
includeGroupIds:
  - org.springframework
# includeArtifactIds config ${artifactId}
includeArtifactIds:
  - sofa-ark-spi
declaredMode 白名单配置
在 declaredMode 下,限制只有模块里声明过的依赖才可以委托给基座加载。 但在一些特殊场景下,即使模块没有声明过某个依赖,但仍需要查找到基座中该依赖中的资源/类。此时,可以在模块的 ark 配置文件中(conf/ark/bootstrap.properties 或 conf/ark/bootstrap.yml) 配置 declaredMode 白名单。
bootstrap.properties
# declared libraries whitelist config {groupId:artifactId}, split by ','
declared.libraries.whitelist=com.ark:ark-common,com.biz:biz-common
bootstrap.yml
# declared libraries whitelist config {groupId:artifactId}

declared:
  libraries:
    whitelist:
      - com.ark.yml:ark-common-yml
开发阶段
Arklet 配置
端口配置
基座启动时,在JVM参数中配置端口,默认为 1238
-Dkoupleless.arklet.http.port=XXXX
模块运行时配置
健康检查配置
基座的 application.properties 配置:
# 或者不配置 management.endpoints.web.exposure.include
management.endpoints.web.exposure.include=health
# 如果需要展示所有信息,则配置以下内容
management.endpoint.health.show-components=always
management.endpoint.health.show-details=always
# 不忽略模块启动状态
koupleless.healthcheck.base.readiness.withAllBizReadiness=true
Web Gateway 配置
在传统应用拆出模块时,由于每个模块都有自己的 webContextPath,上游调用方需要修改请求路径。为了避免修改,可以在 application.properties 或 application.yaml 中配置 Web Gateway 转发规则,让上游调用方无需修改。
在配置上,可以配置三种策略:
- 域名匹配:指定
符合HostA的请求转发到模块A - 路径匹配:指定
符合PathA的请求转发到模块A的特定PathB - 域名和路径同时匹配:指定
符合HostA且PathA的请求转发到模块A的特定PathB
application.yaml 配置样例如下:
koupleless:
  web:
    gateway:
      forwards:
# host in [a.xxx,b.xxx,c.xxx] path /${anyPath} --forward to--> biz1/${anyPath}
        - contextPath: biz1
        - hosts:
            - a
            - b
            - c
# /idx2/** -> /biz2/**, /t2/** -> /biz2/timestamp/**
        - contextPath: biz2
        - paths:
            - from: /idx2
            - to: /
            - from: /t2
            - to: /timestamp
# /idx1/** -> /biz1/**, /t1/** -> /biz1/timestamp/**
        - contextPath: biz1
        - paths:
            - from: /idx1
            - to: /
            - from: /t1
            - to: /timestamp
application.properties 配置样例如下:
# host in [a.xxx,b.xxx,c.xxx] path /${anyPath} --forward to--> biz1/${anyPath}
koupleless.web.gateway.forwards[0].contextPath=biz1
koupleless.web.gateway.forwards[0].hosts[0]=a
koupleless.web.gateway.forwards[0].hosts[1]=b
koupleless.web.gateway.forwards[0].hosts[2]=c
# /idx2/** -> /biz2/**, /t2/** -> /biz2/timestamp/**
koupleless.web.gateway.forwards[1].contextPath=biz2
koupleless.web.gateway.forwards[1].paths[0].from=/idx2
koupleless.web.gateway.forwards[1].paths[0].to=/
koupleless.web.gateway.forwards[1].paths[1].from=/t2
koupleless.web.gateway.forwards[1].paths[1].to=/timestamp
# /idx1/** -> /biz1/**, /t1/** -> /biz1/timestamp/**
koupleless.web.gateway.forwards[2].contextPath=biz1
koupleless.web.gateway.forwards[2].paths[0].from=/idx1
koupleless.web.gateway.forwards[2].paths[0].to=/
koupleless.web.gateway.forwards[2].paths[1].from=/t1
koupleless.web.gateway.forwards[2].paths[1].to=/timestamp
此外,当 koupleless 满足以下版本,模块可以在自己的 application.properties 或 application.yaml 中配置转发规则:
- jdk8: koupleless.runtime.version >= 1.3.3
- jdk17: koupleless.runtime.version >= 2.1.8