This is the multi-page printable view of this section. Click here to print.
6.5 Technical Principles
- 1: 6.5.1 SOFAArk Technical Documentation
- 2: 6.5.2 Arklet Architecture and Api Design
- 3: 6.5.3 Runtime Adaptation or Best Practices for Multi-Module Deployment
- 3.1: 6.5.3.1 Koupleless Multi-Application Governance Patch Management
- 3.2: 6.5.3.2 Koupleless Third-party Package Patch Guide
- 3.3: 6.5.3.2 Introduction to Multi-Module Integration Testing Framework
- 3.4: 6.5.3.3 Adapting to Multi-Module with Dubbo 2.7
- 3.5: 6.5.3.4 Best Practices for Multi-Module with ehcache
- 3.6: 6.5.3.5 Logback's adaptation for multi-module environments
- 3.7: 6.5.3.6 log4j2 Multi-Module Adaptation
- 3.8: 6.5.3.7 Module Use Bes
- 3.9: 6.5.3.8 Module Using Dubbo
- 3.10: 6.5.3.10 Introduction to the Principle of Class Delegation Loading between Foundation and Modules
- 3.11: 6.3.5.11 What happens if a module independently introduces part of the SpringBoot framework?
- 4: 6.5.4 Module Split Tool
1 - 6.5.1 SOFAArk Technical Documentation
SOFAArk 2.0 Introduction
Ark Container Startup Process
Ark Container Plugin Mechanism
Ark Container Class Loading Mechanism
Packaging Plugin Source Code Analysis
Startup Process Source Code Analysis
Dynamic Hot Deployment Source Code Analysis
Class Delegation Loading Source Code Analysis
Multi-Web Application Merge Deployment Source Code Analysis
2 - 6.5.2 Arklet Architecture and Api Design
English | 简体中文
Overview
Arklet provides an operational interface for delivery of SofaArk bases and modules. With Arklet, the release and operation of Ark Biz can be easily and flexibly operated.
Arklet is internally constructed by ArkletComponent
- ApiClient: The core components responsible for interacting with the outside world
- CommandService: Arklet exposes capability instruction definition and extension
- OperationService: Ark Biz interacts with SofaArk to add, delete, modify, and encapsulate basic capabilities
- HealthService: Based on health and stability, base, Biz, system and other indicators are calculated
The collaboration between them is shown in the figure

Of course, you can also extend Arklet’s component capabilities by implementing the ArkletComponent interface
Command Extension
The Arklet exposes the instruction API externally and handles the instruction internally through a CommandHandler mapped from each API.
CommandHandler related extensions belong to the unified management of the CommandService component
You can customize extension commands by inheriting AbstractCommandHandler
Build-in Command API
All of the following instruction apis access the arklet using the POST(application/json) request format
The http protocol is enabled and the default port is 1238
You can set
koupleless.arklet.http.portJVM startup parameters override the default port
Query the supported commands
- URL: 127.0.0.1:1238/help
- input sample:
{}
- output sample:
{
    "code":"SUCCESS",
    "data":[
        {
            "desc":"query all ark biz(including master biz)",
            "id":"queryAllBiz"
        },
        {
            "desc":"list all supported commands",
            "id":"help"
        },
        {
            "desc":"uninstall one ark biz",
            "id":"uninstallBiz"
        },
        {
            "desc":"switch one ark biz",
            "id":"switchBiz"
        },
        {
            "desc":"install one ark biz",
            "id":"installBiz"
        }
    ]
}
Install a biz
- URL: 127.0.0.1:1238/installBiz
- input sample:
{
    "bizName": "test",
    "bizVersion": "1.0.0",
    // local path should start with file://, alse support remote url which can be downloaded
    "bizUrl": "file:///Users/jaimezhang/workspace/github/sofa-ark-dynamic-guides/dynamic-provider/target/dynamic-provider-1.0.0-ark-biz.jar"
}
- output sample(success):
{
  "code":"SUCCESS",
  "data":{
    "bizInfos":[
      {
        "bizName":"dynamic-provider",
        "bizState":"ACTIVATED",
        "bizVersion":"1.0.0",
        "declaredMode":true,
        "identity":"dynamic-provider:1.0.0",
        "mainClass":"io.sofastack.dynamic.provider.ProviderApplication",
        "priority":100,
        "webContextPath":"provider"
      }
    ],
    "code":"SUCCESS",
    "message":"Install Biz: dynamic-provider:1.0.0 success, cost: 1092 ms, started at: 16:07:47,769"
  }
}
- output sample(failed):
{
  "code":"FAILED",
  "data":{
    "code":"REPEAT_BIZ",
    "message":"Biz: dynamic-provider:1.0.0 has been installed or registered."
  }
}
Uninstall a biz
- URL: 127.0.0.1:1238/uninstallBiz
- input sample:
{
    "bizName":"dynamic-provider",
    "bizVersion":"1.0.0"
}
- output sample(success):
{
  "code":"SUCCESS"
}
- output sample(failed):
{
  "code":"FAILED",
  "data":{
    "code":"NOT_FOUND_BIZ",
    "message":"Uninstall biz: test:1.0.0 not found."
  }
}
Switch a biz
- URL: 127.0.0.1:1238/switchBiz
- input sample:
{
    "bizName":"dynamic-provider",
    "bizVersion":"1.0.0"
}
- output sample:
{
  "code":"SUCCESS"
}
Query all Biz
- URL: 127.0.0.1:1238/queryAllBiz
- input sample:
{}
- output sample:
{
  "code":"SUCCESS",
  "data":[
    {
      "bizName":"dynamic-provider",
      "bizState":"ACTIVATED",
      "bizVersion":"1.0.0",
      "mainClass":"io.sofastack.dynamic.provider.ProviderApplication",
      "webContextPath":"provider"
    },
    {
      "bizName":"stock-mng",
      "bizState":"ACTIVATED",
      "bizVersion":"1.0.0",
      "mainClass":"embed main",
      "webContextPath":"/"
    }
  ]
}
Query Health
- URL: 127.0.0.1:1238/health
Query All Health Info
- input sample:
{}
- output sample:
{
  "code": "SUCCESS",
  "data": {
    "healthData": {
      "jvm": {
        "max non heap memory(M)": -9.5367431640625E-7,
        "java version": "1.8.0_331",
        "max memory(M)": 885.5,
        "max heap memory(M)": 885.5,
        "used heap memory(M)": 137.14127349853516,
        "used non heap memory(M)": 62.54662322998047,
        "loaded class count": 10063,
        "init non heap memory(M)": 2.4375,
        "total memory(M)": 174.5,
        "free memory(M)": 37.358726501464844,
        "unload class count": 0,
        "total class count": 10063,
        "committed heap memory(M)": 174.5,
        "java home": "****\\jre",
        "init heap memory(M)": 64.0,
        "committed non heap memory(M)": 66.203125,
        "run time(s)": 34.432
      },
      "cpu": {
        "count": 4,
        "total used (%)": 131749.0,
        "type": "****",
        "user used (%)": 9.926451054656962,
        "free (%)": 81.46475495070172,
        "system used (%)": 6.249762806548817
      },
      "masterBizInfo": {
        "webContextPath": "/",
        "bizName": "bookstore-manager",
        "bizState": "ACTIVATED",
        "bizVersion": "1.0.0"
      },
      "pluginListInfo": [
        {
          "artifactId": "web-ark-plugin",
          "groupId": "com.alipay.sofa",
          "pluginActivator": "com.alipay.sofa.ark.web.embed.WebPluginActivator",
          "pluginName": "web-ark-plugin",
          "pluginUrl": "file:/****/2.2.3-SNAPSHOT/web-ark-plugin-2.2.3-20230901.090402-2.jar!/",
          "pluginVersion": "2.2.3-SNAPSHOT"
        },
        {
          "artifactId": "runtime-sofa-boot-plugin",
          "groupId": "com.alipay.sofa",
          "pluginActivator": "com.alipay.sofa.runtime.ark.plugin.SofaRuntimeActivator",
          "pluginName": "runtime-sofa-boot-plugin",
          "pluginUrl": "file:/****/runtime-sofa-boot-plugin-3.11.0.jar!/",
          "pluginVersion": "3.11.0"
        }
      ],
      "masterBizHealth": {
        "readinessState": "ACCEPTING_TRAFFIC"
      },
      "bizListInfo": [
        {
          "bizName": "bookstore-manager",
          "bizState": "ACTIVATED",
          "bizVersion": "1.0.0",
          "webContextPath": "/"
        }
      ]
    }
  }
}
Query System Health Info
- input sample:
{
  "type": "system",
  // [OPTIONAL] if metrics is null -> query all system health info
  "metrics": ["cpu", "jvm"]
}
- output sample:
{
  "code": "SUCCESS",
  "data": {
    "healthData": {
      "jvm": {...},
      "cpu": {...},
//      "masterBizHealth": {...}
    }
  }
}
Query Biz Health Info
- input sample:
{
  "type": "biz",
  // [OPTIONAL] if moduleName is null and moduleVersion is null -> query all biz
  "moduleName": "bookstore-manager",
  // [OPTIONAL] if moduleVersion is null -> query all biz named moduleName
  "moduleVersion": "1.0.0"
}
- output sample:
{
  "code": "SUCCESS",
  "data": {
    "healthData": {
      "bizInfo": {
        "bizName": "bookstore-manager",
        "bizState": "ACTIVATED",
        "bizVersion": "1.0.0",
        "webContextPath": "/"
      }
//      "bizListInfo": [
//        {
//          "bizName": "bookstore-manager",
//          "bizState": "ACTIVATED",
//          "bizVersion": "1.0.0",
//          "webContextPath": "/"
//        }
//      ]
    }
  }
}
Query Plugin Health Info
- input sample:
{
  "type": "plugin",
  // [OPTIONAL] if moduleName is null -> query all biz
  "moduleName": "web-ark-plugin"
}
- output sample:
{
  "code": "SUCCESS",
  "data": {
    "healthData": {
      "pluginListInfo": [
        {
          "artifactId": "web-ark-plugin",
          "groupId": "com.alipay.sofa",
          "pluginActivator": "com.alipay.sofa.ark.web.embed.WebPluginActivator",
          "pluginName": "web-ark-plugin",
          "pluginUrl": "file:/****/web-ark-plugin-2.2.3-20230901.090402-2.jar!/",
          "pluginVersion": "2.2.3-SNAPSHOT"
        }
      ]
    }
  }
}
Query Health Using Endpoint
use endpoint for k8s module to get helath info
default config
- endpoints exposure include:
* - endpoints base path:
/ - endpoints sever port:
8080
http code result
HEALTHY(200): get health if all health indicator is healthyUNHEALTHY(400): get health once a health indicator is unhealthyENDPOINT_NOT_FOUND(404): endpoint path or params not foundENDPOINT_PROCESS_INTERNAL_ERROR(500): get health process throw an error
query all health info
- url: 127.0.0.1:8080/arkletHealth
- method: GET
- output sample
{
    "healthy": true,
    "code": 200,
    "codeType": "HEALTHY",
    "data": {
        "jvm": {...},
        "masterBizHealth": {...},
        "cpu": {...},
        "masterBizInfo": {...},
        "bizListInfo": [...],
        "pluginListInfo": [...]
    }
}
query all biz/plugin health info
- url: 127.0.0.1:8080/arkletHealth/{moduleType} (moduleType must in [‘biz’, ‘plugin’])
- method: GET
- output sample
{
   "healthy": true,
   "code": 200,
   "codeType": "HEALTHY",
   "data": {
       "bizListInfo": [...],
       // "pluginListInfo": [...]
   }
}
query single biz/plugin health info
- url: 127.0.0.1:8080/arkletHealth/{moduleType}/moduleName/moduleVersion (moduleType must in [‘biz’, ‘plugin’])
- method: GET
- output sample
{
   "healthy": true,
   "code": 200,
   "codeType": "HEALTHY",
   "data": {
       "bizInfo": {...},
       // "pluginInfo": {...}
   }
}
3 - 6.5.3 Runtime Adaptation or Best Practices for Multi-Module Deployment
3.1 - 6.5.3.1 Koupleless Multi-Application Governance Patch Management
Why Koupleless Needs Multi-Application Governance Patching?
Koupleless is a multi-application architecture, and traditional middleware may only consider scenarios for a single application. Therefore, in some cases, it is incompatible with multi-application coexistence, leading to problems such as shared variable contamination, classloader loading exceptions, and unexpected class judgments. Thus, when using Koupleless middleware, we need to patch some potential issues, covering the original middleware implementation, allowing open-source middleware to be compatible with the multi-application mode.
Research on Multi-Application Governance Patching Solutions for Koupleless
In multi-application compatibility governance, we not only consider production deployment but also need to consider compatibility with local user development (IDEA click Debug), compatibility with unit testing (e.g., @SpringbootTest), and more.
Below is a comparison table of different solutions.
Solution Comparison
| Solution Name | Access Cost | Maintainability | Deployment Compatibility | IDE Compatibility | Unit Testing Compatibility |
|---|---|---|---|---|---|
| A: Place the patch package dependency at the beginning of maven dependency to ensure that the patch class is loaded first by the classLoader. | Low. Users only need to control the order of Maven dependencies. | Low Users need to ensure that the relevant dependencies are at the front, and the classpath is not manually passed during startup. | Compatible✅ | Compatible✅ | Compatible✅ |
| B: Modify the indexing file order of spring boot build artifacts using maven plugins. | Low. Just need to add a package cycle maven plugin, user perception is low. | Medium Users need to ensure that the classpath is not manually passed during startup. | Compatible✅ | Not compatible❌ JetBrains cannot be compatible, JetBrains will build the CLI command line by itself to pass the classpath according to the order of Maven dependencies, which may lead to suboptimal loading order of the adapter. | Not compatible❌ Unit tests do not go through the repackage cycle and do not depend on the classpath.idx file. |
| C: Add a custom spring boot jarlaunch starter to control the classLoader loading behavior through the starter. | High. Users need to modify their own base startup logic to use Koupleless’ custom jarlaunch. | High Custom jarlaunch can control the code loading order through hooks. | Compatible✅ | Compatible✅ But IDE needs to be configured to use custom jarlaunch. | Not compatible❌ Because unit tests do not go through the jarlaunch logic. |
| D: Enhance the base classloader to ensure priority searching and loading of patch classes. | High. Users need to initialize enhanced code, and this mode also has an impact on the sofa-ark recognition logic of the master biz, and needs to be refactored to support. | High The base classloader can programmatically control the loading order of dependencies. | Compatible✅ | Compatible✅ | Compatible✅ |
| E: Configure the maven plugin to copy patch class code to the current project, and the files in the current project will be loaded first. | High. Maven’s current copy plugin cannot use wildcards, so adding an adapter requires additional configuration. | High As long as users configure it, they can ensure that dependencies are loaded first (because the classes of the local project are loaded first). | Compatible✅ | Compatible✅ | Not compatible❌ Because unit tests do not go through the package cycle, and the maven copy plugin takes effect during the package cycle. |
Conclusion
Overall, it is not possible to achieve user 0 perception access completely, and each method requires minor business refactoring. Among many solutions, A and D can achieve full compatibility. However, the A solution does not require business code changes, nor does it intrude into runtime logic. It only requires users to add the following dependency at the beginning of the maven dependency:
<dependency>
  <groupId>com.alipay.koupleless</groupId>
  <artifactId>koupleless-base-starter</artifactId>
  <version>${koupleless.runtime.version}</version>
  <type>pom</type>
</dependency>
Therefore, we will adopt solution A.
If you have more ideas or input, welcome to discuss them with the open-source community!
3.2 - 6.5.3.2 Koupleless Third-party Package Patch Guide
Principle of Koupleless Third-party Package Patches
Koupleless is an architecture designed for multiple applications, whereas traditional middleware might only consider a single application scenario. Therefore, in some behaviors, it cannot accommodate the coexistence of multiple applications, leading to issues such as shared variable pollution, classLoader loading anomalies, and unexpected class judgments.
Therefore, when using Koupleless middleware, we need to apply patches to some potential issues, overriding the original middleware implementation, so that open-source middleware can also be compatible with a multi-application model.
‼️ Version Requirements: koupleless-base-build-plugin
- jdk8: >= 1.3.3
- jdk17: >= 2.2.8
Currently, the principle of Koupleless third-party package patches taking effect is:
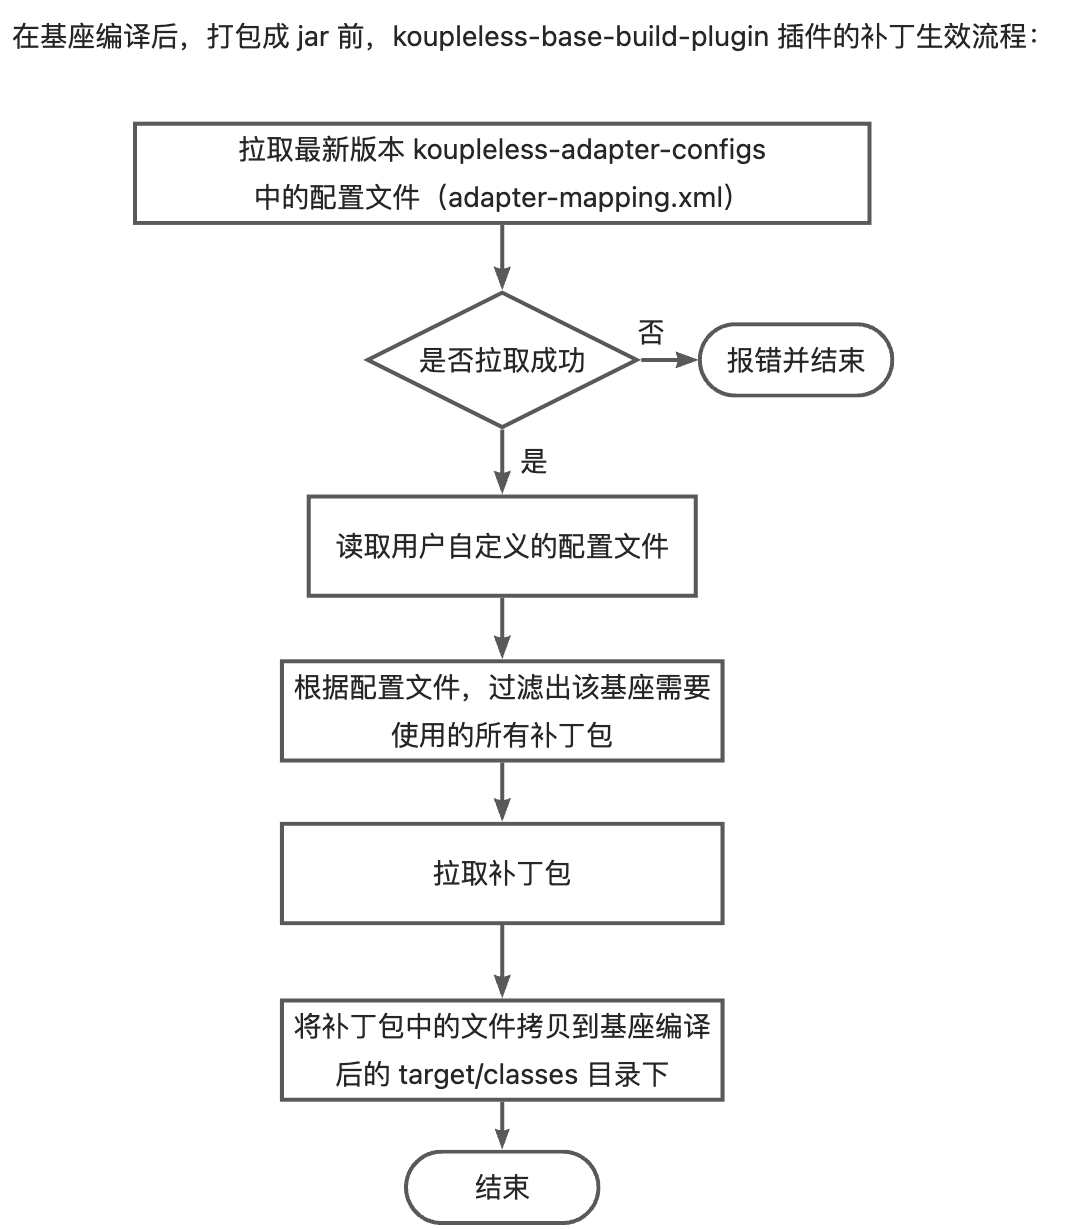
- After the base compilation and before packaging, the koupleless-base-build-plugin plugin will obtain the adapter configuration file, which describes the
middleware dependencies within the version rangethat use the patch packages, for example:
version: 1.2.3
adapterMappings:
  - matcher:
      groupId: org.springframework.boot
      artifactId: spring-boot
      versionRange: "[2.5.1,2.7.14]"
    adapter:
      artifactId: koupleless-adapter-spring-boot-logback-2.7.14
      groupId: com.alipay.sofa.koupleless
The meaning of this configuration file is: When the base depends on org.springframework.boot:spring-boot versions within the range [2.5.1, 2.7.14], then use the koupleless-adapter-spring-boot-logback-2.7.14 patch package version 1.2.3.
- Obtain all dependencies used by the base, filter out all the patch packages required by the base according to the adapter configuration file;
- Pull the patch packages and copy the files from the patch packages to the target/classes directory after the base compilation.
There are two types of adapter configuration files:
- Configuration files managed by Koupleless: During packaging, the koupleless-base-build-plugin plugin will attempt to pull the latest version of the adapter configuration file; if the pull fails, it will throw error and terminate. Currently, the open-source third-party package patches managed by Koupleless are in the koupleless-adapter repository, with over 20 patch packages available.
- User-defined configuration files: Users can add their own adapter configuration files to the base, and these configuration files will take effect alongside the general configuration files managed by Koupleless.
How to Develop Open-source Third-party Package Patches
👏 Welcome everyone to contribute to the development of open-source third-party package patches:
- Develop patch code files: Copy the files that need to be patched, modify the code to make it suitable for a multi-application scenario.
- Confirm the version range of the dependency package where the patch takes effect (i.e., within this version range, the code files of the open-source package are completely identical), for example, for org.springframework.boot:spring-boot versions within the range [2.5.1, 2.7.14], the
org.springframework.boot.logging.logback.LogbackLoggingSystemfile is the same. - In the koupleless-adapter repository, create a patch package module, such as
koupleless-adapter-spring-boot-logback-2.7.14, and overwrite the files that need to be patched in this module, for example,org.springframework.boot.logging.logback.LogbackLoggingSystem. - In the root directory of
koupleless-adapter-spring-boot-logback-2.7.14, create aconf/adapter-mappings.yamlfile to describe the matching rules for the patch to take effect, and complete unit tests. - Submit a PR
For example, the code for the koupleless-adapter-spring-boot-logback-2.7.14 patch package can be found at koupleless-adapter-spring-boot-logback-2.7.14.
How to Develop Internal Second-party Package Patches
- Develop patch code files: Copy the files that need to be patched, modify the code to make it suitable for a multi-application scenario.
- Confirm the version range of the dependency package where the patch takes effect (i.e., within this version range, the code files of the second-party package are completely identical), for example, for yyy:xxx versions within the range [2.5.1, 2.7.14], the
yyy.xxx.CustomSystemfile is the same. - Develop a patch package, such as
koupleless-adapter-xxx-2.1.0, and overwrite the files that need to be patched in this package, for example,com.xxx.YYY, and package and release it as a jar file. - Add the dependency configuration for the patch package in the base’s
conf/ark/adapter-mapping.yaml. For example:
adapterMappings:
- matcher:
      groupId: yyy
      artifactId: xxx
      versionRange: "[2.5.1,2.7.14]"
  adapter:
      artifactId: koupleless-adapter-xxx-2.1.0
      groupId: yyy
      version: 1.0.0
3.3 - 6.5.3.2 Introduction to Multi-Module Integration Testing Framework
This article focuses on the design concepts, implementation details, and usage of the multi-module integration testing framework.
Why Do We Need a Multi-Module Integration Testing Framework?
Assuming there is no integration testing framework, when developers want to verify whether the deployment process of multiple modules behaves correctly, they need to follow these steps:
- Build the base and JAR packages for all modules.
- Start the base process.
- Install the module JAR packages into the base.
- Invoke HTTP/RPC interfaces.
- Verify whether the returned results are correct.
Although the above workflow appears simple, developers face several challenges:
- Constantly switching back and forth between the command line and the code.
- If the validation results are incorrect, they need to repeatedly modify the code and rebuild + remote debug.
- If the app only provides internal methods, they must modify the code to expose interfaces via HTTP/RPC to validate the behavior of the multi-module deployment.
These challenges lead to low efficiency and an unfriendly experience for developers. Therefore, we need an integration testing framework to provide a one-stop validation experience.
What Problems Should the Integration Testing Framework Solve?
The integration testing framework needs to simulate the behavior of multi-module deployment in the same process with a single start. It should also allow developers to directly call code from the modules/base to verify module behavior.
The framework needs to solve the following technical problems:
- Simulate the startup of the base Spring Boot application.
- Simulate the startup of module Spring Boot applications, supporting loading modules directly from dependencies instead of JAR packages.
- Simulate the loading of Ark plugins.
- Ensure compatibility with Maven’s testing commands.
By default, Sofa-ark loads modules through executable JAR packages and Ark plugins. Therefore, developers would need to rebuild JAR packages or publish to repositories during each validation, reducing validation efficiency. The framework needs to intercept the corresponding loading behavior and load modules directly from Maven dependencies to simulate multi-module deployment.
The code that accomplishes these tasks includes:
- TestBizClassLoader: Simulates loading the biz module and is a derived class of the original BizClassLoader, solving the problem of loading classes on demand to different ClassLoaders within the same JAR package.
- TestBiz: Simulates starting the biz module and is a derived class of the original Biz, encapsulating the logic for initializing TestBizClassLoader.
- TestBootstrap: Initializes ArkContainer and loads Ark plugins.
- TestClassLoaderHook: Controls the loading order of resources via a hook mechanism. For instance, application.properties in the biz JAR package will be loaded first.
- BaseClassLoader: Simulates normal base ClassLoader behavior and is compatible with testing frameworks like Surefire.
- TestMultiSpringApplication: Simulates the startup behavior of multi-module Spring Boot applications.
How to Use the Integration Testing Framework?
Start Both Base and Module Spring Boot Applications in the Same Process
Sample code is as follows:
public void demo() {
    new TestMultiSpringApplication(MultiSpringTestConfig
            .builder()
            .baseConfig(BaseSpringTestConfig
                    .builder()
                    .mainClass(BaseApplication.class) // Base startup class
                    .build())
            .bizConfigs(Lists.newArrayList(
                    BizSpringTestConfig
                            .builder()
                            .bizName("biz1") // Name of module 1
                            .mainClass(Biz1Application.class) // Startup class of module 1
                            .build(),
                    BizSpringTestConfig
                            .builder()
                            .bizName("biz2") // Name of module 2
                            .mainClass(Biz2Application.class) // Startup class of module 2
                            .build()
            ))
            .build()
    ).run();
}
Write Assert Logic
You can retrieve module services using the following method:
public void getService() {
    StrategyService strategyService = SpringServiceFinder.
            getModuleService(
                    "biz1-web-single-host",
                    "0.0.1-SNAPSHOT",
                    "strategyServiceImpl",
                    StrategyService.class
            );
}
After obtaining the service, you can write assert logic.
Reference Use Cases
For more comprehensive use cases, you can refer to Tomcat Multi-Module Integration Testing Cases.
3.4 - 6.5.3.3 Adapting to Multi-Module with Dubbo 2.7
Why Adaptation is Needed
The native Dubbo 2.7 cannot support module publishing its own Dubbo services in multi-module scenarios, leading to a series of issues such as serialization and class loading exceptions during invocation.
Multi-Module Adaptation Solutions
Dubbo 2.7 Multi-Module Adaptation SDK will be included when building by koupleless-base-build-plugin, the adapter mainly from aspects such as class loading, service publishing, service unloading, service isolation, module-level service management, configuration management, serialization, etc.
1. AnnotatedBeanDefinitionRegistryUtils Unable to Load Module Classes Using the Base Classloader
com.alibaba.spring.util.AnnotatedBeanDefinitionRegistryUtils#isPresentBean
public static boolean isPresentBean(BeanDefinitionRegistry registry, Class<?> annotatedClass) {
    ...

    //        ClassLoader classLoader = annotatedClass.getClassLoader(); // Original logic
    ClassLoader classLoader = Thread.currentThread().getContextClassLoader();   // Changed to use tccl to load classes

    for (String beanName : beanNames) {
        BeanDefinition beanDefinition = registry.getBeanDefinition(beanName);
        if (beanDefinition instanceof AnnotatedBeanDefinition) {
            ...
            String className = annotationMetadata.getClassName();
            Class<?> targetClass = resolveClassName(className, classLoader);
            ...
        }
    }

    return present;
}
2. Module-Level Service and Configuration Resource Management
- com.alipay.sofa.koupleless.support.dubbo.ServerlessServiceRepository Replaces the Native org.apache.dubbo.rpc.model.ServiceRepository
The native service uses the interfaceName as the cache key. When both the base and the module publish services with the same interface but different groups, it cannot distinguish between them. Replacing the native service caching model, using the Interface Class type as the key, and using the path containing the group as the key to support scenarios where the base and the module publish services with the same interface but different groups.
private static ConcurrentMap<Class<?>, ServiceDescriptor> globalClassServices = new ConcurrentHashMap<>();

private static ConcurrentMap<String, ServiceDescriptor>   globalPathServices  = new ConcurrentHashMap<>();
com.alipay.sofa.koupleless.support.dubbo.ServerlessConfigManager Replaces the Native org.apache.dubbo.config.context.ConfigManager
Adds a classloader dimension key to the original config to isolate different configurations according to classloader in different modules.
final Map<ClassLoader, Map<String, Map<String, AbstractConfig>>> globalConfigsCache = new HashMap<>();

public void addConfig(AbstractConfig config, boolean unique) {
    ...
    write(() -> {
        Map<String, AbstractConfig> configsMap = getCurrentConfigsCache().computeIfAbsent(getTagName(config.getClass()), type -> newMap());
        addIfAbsent(config, configsMap, unique);
    });
}
private Map<String, Map<String, AbstractConfig>> getCurrentConfigsCache() {
    ClassLoader contextClassLoader = Thread.currentThread().getContextClassLoader();   // Based on the current thread classloader to isolate different configuration caches
    globalConfigsCache.computeIfAbsent(contextClassLoader, k -> new HashMap<>());
    return globalConfigsCache.get(contextClassLoader);
}
ServerlessServiceRepository and ServerlessConfigManager both depend on the dubbo ExtensionLoader’s extension mechanism to replace the original logic. For specific principles, please refer to org.apache.dubbo.common.extension.ExtensionLoader.createExtension.
3. Module-Level Service Install and Uninstall
override DubboBootstrapApplicationListener to prevent the original Dubbo module from starting or uninstalling when publishing or uninstalling services
- com.alipay.sofa.koupleless.support.dubbo.BizDubboBootstrapListener
The native Dubbo 2.7 only publishes Dubbo services after the base module is started. In the case of multi-modules, it cannot support module-level service publishing. Ark listens for module startup events using a listener and manually calls Dubbo to publish module-level services.
private void onContextRefreshedEvent(ContextRefreshedEvent event) {
  try {
      ReflectionUtils.getMethod(DubboBootstrap.class, "exportServices")
          .invoke(dubboBootstrap);
      ReflectionUtils.getMethod(DubboBootstrap.class, "referServices").invoke(dubboBootstrap);
  } catch (Exception e) {

  }
}
The original Dubbo 2.7 unexports all services in the JVM when a module is uninstalled, leading to the unexporting of services from the base and other modules after the module is uninstalled. Ark listens for the spring context closing event of the module and manually unexports Dubbo services of the current module, retaining Dubbo services of the base and other modules.
private void onContextClosedEvent(ContextClosedEvent event) {
        // DubboBootstrap.unexportServices unexports all services, only need to unexport services of the current biz
        Map<String, ServiceConfigBase<?>> exportedServices = ReflectionUtils.getField(dubboBootstrap, DubboBootstrap.class, "exportedServices");

        Set<String> bizUnexportServices = new HashSet<>();
        for (Map.Entry<String, ServiceConfigBase<?>> entry : exportedServices.entrySet()) {
            String serviceKey = entry.getKey();
            ServiceConfigBase<?> sc = entry.getValue();
            if (sc.getRef().getClass().getClassLoader() == Thread.currentThread().getContextClassLoader()) {   // Distinguish module services based on the classloader of ref service implementation
                bizUnexportServices.add(serviceKey);
                configManager.removeConfig(sc);   // Remove service configuration from configManager
                sc.unexport();   // Unexport service
                serviceRepository.unregisterService(sc.getUniqueServiceName());   // Remove from serviceRepository
            }
        }
        for (String service : bizUnexportServices) {
            exportedServices.remove(service);    // Remove service from DubboBootstrap
        }
    }
4. Service Routing
- com.alipay.sofa.koupleless.support.dubbo.ConsumerRedefinePathFilter
When invoking Dubbo services, the service model (including interface, param, return types, etc.) is obtained from the ServiceRepository based on the path to perform service invocation, parameter, and return value serialization. The original Dubbo 2.7 uses interfaceName as the path to find the service model, which cannot support the scenario where the base module and other modules publish services with the same interface. Ark adds group information to the path on the consumer side through a custom filter to facilitate correct service routing on the provider side.
public Result invoke(Invoker<?> invoker, Invocation invocation) throws RpcException {
  if (invocation instanceof RpcInvocation) {
      RpcInvocation rpcInvocation = (RpcInvocation) invocation;
      // Original path is interfaceName, such as com.alipay.sofa.rpc.dubbo27.model.DemoService
      // Modified path is serviceUniqueName, such as masterBiz/com.alipay.sofa.rpc.dubbo27.model.DemoService
      rpcInvocation.setAttachment("interface", rpcInvocation.getTargetServiceUniqueName());   // Original path is interfaceName, such as
  }
  return invoker.invoke(invocation);
}
5. Serialization
- org.apache.dubbo.common.serialize.java.JavaSerialization
- org.apache.dubbo.common.serialize.java.ClassLoaderJavaObjectInput
- org.apache.dubbo.common.serialize.java.ClassLoaderObjectInputStream
When obtaining the serialization tool JavaSerialization, use ClassLoaderJavaObjectInput instead of the original JavaObjectInput and pass provider-side service classloader information.
// org.apache.dubbo.common.serialize.java.JavaSerialization
public ObjectInput deserialize(URL url, InputStream is) throws IOException {
    return new ClassLoaderJavaObjectInput(new ClassLoaderObjectInputStream(null, is));   // Use ClassLoaderJavaObjectInput instead of the original JavaObjectInput, pass provider-side service classloader information
}

// org.apache.dubbo.common.serialize.java.ClassLoaderObjectInputStream
private ClassLoader classLoader;

public ClassLoaderObjectInputStream(final ClassLoader classLoader, final InputStream inputStream) {
  super(inputStream);
  this.classLoader = classLoader;
}
- org.apache.dubbo.rpc.protocol.dubbo.DecodeableRpcResult Client-side deserialization of return values
// patch begin
if (in instanceof ClassLoaderJavaObjectInput) {
   InputStream is = ((ClassLoaderJavaObjectInput) in).getInputStream();
   if (is instanceof ClassLoaderObjectInputStream) {
      ClassLoader cl = serviceDescriptor.getServiceInterfaceClass().getClassLoader();  // Set provider-side service classloader information to ClassLoaderObjectInputStream
      ((ClassLoaderObjectInputStream) is).setClassLoader(cl);
   }
}
// patch end
- org.apache.dubbo.rpc.protocol.dubbo.DecodeableRpcResult Client-side deserialization of return values
// patch begin
if (in instanceof ClassLoaderJavaObjectInput) {
   InputStream is = ((ClassLoaderJavaObjectInput) in).getInputStream();
   if (is instanceof ClassLoaderObjectInputStream) {
       ClassLoader cl = invocation.getInvoker().getInterface().getClassLoader(); // Set consumer-side service classloader information to ClassLoaderObjectInputStream
       ((ClassLoaderObjectInputStream) is).setClassLoader(cl);
   }
}
// patch end
Example of Using Dubbo 2.7 in a Multi-Module Environment
3.5 - 6.5.3.4 Best Practices for Multi-Module with ehcache
Why Best Practices are Needed
During CacheManager initialization, there are shared static variables causing issues when multiple applications use the same Ehcache name, resulting in cache overlap.
Requirements for Best Practices
- Base module must include Ehcache, and modules should reuse the base.
In Spring Boot, Ehcache initialization requires creating it through the EhCacheCacheConfiguration defined in Spring, which belongs to Spring and is usually placed in the base module.

During bean initialization, the condition check will lead to class verification,
 if net.sf.ehcache.CacheManager is found, it will use a Java native method to search for the net.sf.ehcache.CacheManager class in the ClassLoader where the class belongs. Therefore, the base module must include this dependency; otherwise, it will result in ClassNotFound errors.

- Modules should exclude the included Ehcache (set scope to provided or utilize automatic slimming capabilities).
When a module uses its own imported Ehcache, theoretically, it should avoid sharing static variables in the base CacheManager class, thus preventing potential errors. However, in our actual testing, during the module installation process, when initializing the EhCacheCacheManager, we encountered an issue where, during the creation of a new object, it required obtaining the CacheManager belonging to the class of the object, which in turn should be the base CacheManager. Importantly, we cannot include the CacheManager dependency in the module’s compilation, as it would lead to conflicts caused by a single class being imported by multiple different ClassLoaders.
When a module uses its own imported Ehcache, theoretically, it should avoid sharing static variables in the base CacheManager class, thus preventing potential errors. However, in our actual testing, during the module installation process, when initializing the EhCacheCacheManager, we encountered an issue where,

 during the creation of a new object, it required obtaining the CacheManager belonging to the class of the object, which in turn should be the base CacheManager. Importantly, we cannot include the CacheManager dependency in the module’s compilation, as it would lead to conflicts caused by a single class being imported by multiple different ClassLoaders.

Therefore, all loading should be delegated to the base module.
Best Practice Approach
- Delegate module Ehcache slimming to the base.
- If multiple modules have the same cacheName, modify cacheName to be different.
- If you don’t want to change the code to modify cache name, you can dynamically replace cacheName through packaging plugins.
 <plugin>
    <groupId>com.google.code.maven-replacer-plugin</groupId>
    <artifactId>replacer</artifactId>
    <version>1.5.3</version>
    <executions>
        <!-- Perform replacement before packaging -->
        <execution>
            <phase>prepare-package</phase>
            <goals>
                <goal>replace</goal>
            </goals>
        </execution>
    </executions>
    <configuration>
        <!-- Automatically recognize the project's target folder -->
        <basedir>${build.directory}</basedir>
        <!-- Directory rules for replacement files -->
        <includes>
            <include>classes/j2cache/*.properties</include>
        </includes>
        <replacements>
            <replacement>
                <token>ehcache.ehcache.name=f6-cache</token>
                <value>ehcache.ehcache.name=f6-${parent.artifactId}-cache</value>
            </replacement>

        </replacements>
    </configuration>
</plugin>
- Set the shared property of the FactoryBean to false.
@Bean
    public EhCacheManagerFactoryBean ehCacheManagerFactoryBean() {
        EhCacheManagerFactoryBean factoryBean = new EhCacheManagerFactoryBean();

        // Set the factoryBean's shared property to false
        factoryBean.setShared(true);
//        factoryBean.setShared(false);
        factoryBean.setCacheManagerName("biz1EhcacheCacheManager");
        factoryBean.setConfigLocation(new ClassPathResource("ehcache.xml"));
        return factoryBean;
    }
Otherwise, it will enter this logic, initializing the static variable instance of CacheManager. If this variable has a value, and if shared is true in the module, it will reuse the CacheManager’s instance, leading to errors.


Example of Best Practices
For an example project, pleaserefer to here
3.6 - 6.5.3.5 Logback's adaptation for multi-module environments
Why Adaptation is Needed
The native logback framework only provides a default logging context, making it impossible to isolate log configurations between different modules. Consequently, in scenarios involving deploying multiple modules together, modules can only utilize the logging configuration of the base application, causing inconvenience when logging from individual modules.
Multi-Module Adaptation Solution
Logback supports native extension ch.qos.logback.classic.selector.ContextSelector, which allows for a custom context selector. Ark provides a default implementation of ContextSelector to isolate LoggerContext for multiple modules (refer to com.alipay.sofa.ark.common.adapter.ArkLogbackContextSelector). Each module uses its independent LoggerContext, ensuring log configuration isolation.
During startup, the log configuration and context initialization are handled by Spring’s log system LogbackLoggingSystem.
Specify the context selector as com.alipay.sofa.ark.common.adapter.ArkLogbackContextSelector and add the JVM startup parameter:
-Dlogback.ContextSelector=com.alipay.sofa.ark.common.adapter.ArkLogbackContextSelector
When using SLF4J as the logging facade with logback as the logging implementation framework, during the base application startup, when the SLF4J static binding is first performed, the specific ContextSelector is initialized. If no custom context selector is specified, the DefaultContextSelector will be used. However, when we specify a context selector, the ArkLogbackContextSelector will be initialized as the context selector.
ch.qos.logback.classic.util.ContextSelectorStaticBinder.init
public void init(LoggerContext defaultLoggerContext, Object key) {
  ...

  String contextSelectorStr = OptionHelper.getSystemProperty(ClassicConstants.LOGBACK_CONTEXT_SELECTOR);
  if (contextSelectorStr == null) {
  contextSelector = new DefaultContextSelector(defaultLoggerContext);
  } else if (contextSelectorStr.equals("JNDI")) {
  // if jndi is specified, let's use the appropriate class
  contextSelector = new ContextJNDISelector(defaultLoggerContext);
  } else {
  contextSelector = dynamicalContextSelector(defaultLoggerContext, contextSelectorStr);
  }
}

static ContextSelector dynamicalContextSelector(LoggerContext defaultLoggerContext, String contextSelectorStr) {
  Class<?> contextSelectorClass = Loader.loadClass(contextSelectorStr);
  Constructor cons = contextSelectorClass.getConstructor(new Class[] { LoggerContext.class });
  return (ContextSelector) cons.newInstance(defaultLoggerContext);
}
In the ArkLogbackContextSelector, we utilize ClassLoader to differentiate between different modules and cache the LoggerContext of each module based on its ClassLoader
When obtaining the LoggerContext based on the ClassLoader, during the startup of the Spring environment, the logging context is initialized via the Spring logging system. This is achieved by calling org.springframework.boot.logging.logback.LogbackLoggingSystem.getLoggerContext, which returns the LoggerContext specific to each module using the custom context selector implemented by Ark, com.alipay.sofa.ark.common.adapter.ArkLogbackContextSelector.getLoggerContext().
public LoggerContext getLoggerContext() {
  ClassLoader classLoader = this.findClassLoader();
  if (classLoader == null) {
      return defaultLoggerContext;
  }
  return getContext(classLoader);
}
When obtaining the classloader, first, the thread’s context classloader is retrieved. If it is identified as the classloader of the module, it is returned directly. If the TCCL (thread context classloader) is not the classloader of the module, the call stack of the Class objects is traversed through the ClassContext. When encountering the classloader of the module in the call stack, it is returned directly. This approach is taken to accommodate scenarios where the TCCL is not guaranteed to be the classloader of the module. For example, when logging is performed in module code, and the current class is loaded by the module’s classloader itself, traversing the ClassContext allows us to eventually obtain the classloader of the module, ensuring the use of the module-specific LoggerContext.
private ClassLoader findClassLoader() {
  ClassLoader classLoader = Thread.currentThread().getContextClassLoader();
  if (classLoader != null && CONTAINER_CLASS_LOADER.equals(classLoader.getClass().getName())) {
      return null;
  }
  if (classLoader != null && BIZ_CLASS_LOADER.equals(classLoader.getClass().getName())) {
      return classLoader;
  }

  Class<?>[] context = new SecurityManager() {
      @Override
      public Class<?>[] getClassContext() {
          return super.getClassContext();
      }
  }.getClassContext();
  if (context == null || context.length == 0) {
      return null;
  }
  for (Class<?> cls : context) {
      if (cls.getClassLoader() != null
          && BIZ_CLASS_LOADER.equals(cls.getClassLoader().getClass().getName())) {
          return cls.getClassLoader();
      }
  }

  return null;
}
Once the appropriate ClassLoader is obtained, different LoggerContext instances are selected. All module contexts are cached in com.alipay.sofa.ark.common.adapter.ArkLogbackContextSelector.CLASS_LOADER_LOGGER_CONTEXT with the ClassLoader as the key.
private LoggerContext getContext(ClassLoader cls) {
  LoggerContext loggerContext = CLASS_LOADER_LOGGER_CONTEXT.get(cls);
  if (null == loggerContext) {
      synchronized (ArkLogbackContextSelector.class) {
          loggerContext = CLASS_LOADER_LOGGER_CONTEXT.get(cls);
          if (null == loggerContext) {
              loggerContext = new LoggerContext();
              loggerContext.setName(Integer.toHexString(System.identityHashCode(cls)));
              CLASS_LOADER_LOGGER_CONTEXT.put(cls, loggerContext);
          }
      }
  }
  return loggerContext;
}
Sample Usage of Multi-Module Logback
3.7 - 6.5.3.6 log4j2 Multi-Module Adaptation
Why Adaptation is Needed
In its native state, log4j2 does not provide individual log directories for modules in a multi-module environment. Instead, it logs uniformly to the base directory, which makes it challenging to isolate logs and corresponding monitoring for each module. The purpose of this adaptation is to enable each module to have its own independent log directory.
Initialization of log4j2 in Regular Applications
Before Spring starts, log4j2 initializes various logContexts and configurations using default values. During the Spring startup process, it listens for Spring events to finalize initialization. This process involves invoking the Log4j2LoggingSystem.initialize method via org.springframework.boot.context.logging.LoggingApplicationListener.

The method determines whether it has already been initialized based on the loggerContext.
Here, a problem arises in a multi-module environment.
The
getLoggerContextmethod retrieves theLoggerContextbased on the classLoader oforg.apache.logging.log4j.LogManager. Relying on the classLoader of a specific class to extract theLoggerContextcan be unstable in a multi-module setup. This instability arises because some classes in modules can be configured to delegate loading to the base, so when a module starts, it might obtain theLoggerContextfrom the base. Consequently, ifisAlreadyInitializedreturns true, the log4j2 logging for the module cannot be further configured based on user configuration files.
If it hasn’t been initialized yet, it enters super.initialize, which involves two tasks:
- Retrieving the log configuration file.
- Parsing the variable values in the log configuration file. Both of these tasks may encounter issues in a multi-module setup. Let’s first examine how these two steps are completed in a regular application.
Retrieving the Log Configuration File

You can see that the location corresponding to the log configuration file’s URL is obtained through ResourceUtils.getURL. Here, the URL is obtained by retrieving the current thread’s context ClassLoader, which works fine in a multi-module environment (since each module’s startup thread context is already its own ClassLoader).

Parsing Log Configuration Values
The configuration file contains various variables, such as these:

These variables are parsed in the specific implementation of org.apache.logging.log4j.core.lookup.AbstractLookup, including:
| Variable Syntax | Implementation Class | |
|---|---|---|
| ${bundle:application:logging.file.path} | org.apache.logging.log4j.core.lookup.ResourceBundleLookup | Locates application.properties based on the ClassLoader of ResourceBundleLookup and reads the values inside. |
| ${ctx:logging.file.path} | org.apache.logging.log4j.core.lookup.ContextMapLookup | Retrieves values stored in the LoggerContext ThreadContext. It’s necessary to set the values from application.properties into the ThreadContext. |
Based on the above analysis, configuring via bundle method might not be feasible in a multi-module setup because ResourceBundleLookup might only exist in the base module, leading to always obtaining application.properties from the base module. Consequently, the logging configuration path of the modules would be the same as that of the base module, causing all module logs to be logged into the base module. Therefore, it needs to be modified to use ContextMapLookup.
Expected Logging in a Multi-Module Consolidation Scenario
Both the base module and individual modules should be able to use independent logging configurations and values, completely isolated from each other. However, due to the potential issues identified in the analysis above, which could prevent module initialization, additional adaptation of log4j2 is required.
Multi-Module Adaptation Points
Ensure
getLoggerContext()can retrieve the LoggerContext of the module itself.
It’s necessary to adjust to use ContextMapLookup so that module logs can retrieve the module application name and be logged into the module directory.
a. Set the values of application.properties to ThreadContext when the module starts. b. During logging configuration, only use the ctx:xxx:xxx configuration format.
Module Refactoring Approach
3.8 - 6.5.3.7 Module Use Bes
koupleless-adapter-bes
koupleless-adapter-bes is used to adapt to the BaoLande (BES) container, the warehouse address is koupleless-adapter-bes (thanks to the community student Chen Jian for his contribution).
The project is currently only verified in BES 9.5.5.004 version, and other versions need to be verified by themselves, and necessary adjustments need to be made according to the same logic.
If multiple BIZ modules do not need to use the same port to publish services, only need to pay attention to the precautions mentioned in the installation dependency section below, and do not need to introduce the dependencies related to this project.
Quick Start
1. Install Dependencies
First, make sure that BES-related dependencies have been imported into the maven repository. (There is a key point here. Due to the conflicting package structure of BES’s dependency package with the recognition mechanism of the koupleless 2.2.9 project, users need to add the prefix sofa-ark- to the BES’s dependency package by themselves, and the specific recognition mechanism can refer to koupleless’ com.alipay.sofa.ark.container.model. BizModel class)
The reference import script is as follows:
mv XXX/BES-EMBED/bes-lite-spring-boot-2.x-starter-9.5.5.004.jar XXX/BES-EMBED/sofa-ark-bes-lite-spring-boot-2.x-starter-9.5.5.004.jar
mvn install:install-file -Dfile=XXX/BES-EMBED/sofa-ark-bes-lite-spring-boot-2.x-starter-9.5.5.004.jar -DgroupId=com.bes.besstarter -DartifactId=sofa-ark-bes-lite-spring-boot-2.x-starter -Dversion=9.5.5.004 -Dpackaging=jar
mvn install:install-file -Dfile=XXX/BES-EMBED/bes-gmssl-9.5.5.004.jar -DgroupId=com.bes.besstarter -DartifactId=bes-gmssl -Dversion=9.5.5.004 -Dpackaging=jar
mvn install:install-file -Dfile=XXX/BES-EMBED/bes-jdbcra-9.5.5.004.jar -DgroupId=com.bes.besstarter -DartifactId=bes-jdbcra -Dversion=9.5.5.004 -Dpackaging=jar
mvn install:install-file -Dfile=XXX/BES-EMBED/bes-websocket-9.5.5.004.jar -DgroupId=com.bes.besstarter -DartifactId=bes-websocket -Dversion=9.5.5.004 -Dpackaging=jar
2. Compile and Install the Project Plugin
Enter the bes9-web-adapter directory of the project and execute the mvn install command.
The project will install the “bes-web-ark-plugin” and “bes-sofa-ark-springboot-starter” two modules.
3. Use the Project Components
First, according to the koupleless documentation, upgrade the project to Koupleless Base
Then, replace the coordinates mentioned in the dependencies
<dependency>
    <groupId>com.alipay.sofa</groupId>
    <artifactId>web-ark-plugin</artifactId>
    <version>${sofa.ark.version}</version>
</dependency>
with the coordinates of this project
<dependency>
    <groupId>com.alipay.sofa</groupId>
    <artifactId>bes-web-ark-plugin</artifactId>
    <version>2.2.9</version>
</dependency>
<dependency>
   <groupId>com.alipay.sofa</groupId>
   <artifactId>bes-sofa-ark-springboot-starter</artifactId>
   <version>2.2.9</version>
</dependency>
Introduce BES-related dependencies (also need to exclude the dependency of tomcat). The reference dependence is as follows:
       <dependency>
            <groupId>org.springframework.boot</groupId>
            <artifactId>spring-boot-starter-web</artifactId>
            <exclusions>
                <exclusion>
                    <groupId>org.springframework.boot</groupId>
                    <artifactId>spring-boot-starter-tomcat</artifactId>
                </exclusion>
            </exclusions>
        </dependency>
        <dependency>
            <groupId>com.bes.besstarter</groupId>
            <artifactId>sofa-ark-bes-lite-spring-boot-starter</artifactId>
            <version>9.5.5.004</version>
        </dependency>
        <dependency>
            <groupId>com.bes.besstarter</groupId>
            <artifactId>bes-gmssl</artifactId>
            <version>9.5.5.004</version>
        </dependency>
        <dependency>
            <groupId>com.bes.besstarter</groupId>
            <artifactId>bes-jdbcra</artifactId>
            <version>9.5.5.004</version>
        </dependency>
        <dependency>
            <groupId>com.bes.besstarter</groupId>
            <artifactId>bes-websocket</artifactId>
            <version>9.5.5.004</version>
        </dependency>
4. Finished
After completing the above steps, you can start the project in Koupleless using BES.
3.9 - 6.5.3.8 Module Using Dubbo
Module Interceptor (Filter)
A module can use interceptors defined within itself or those defined on the base.
⚠️Note: Avoid naming module interceptors the same as those on the base. If the names are identical, the interceptors from the base will be used.
3.10 - 6.5.3.10 Introduction to the Principle of Class Delegation Loading between Foundation and Modules
Class Delegation Loading between Multiple Modules
The SOFAArk framework is based on a multi-ClassLoader universal class isolation solution, providing class isolation and application merge deployment capabilities. This document does not intend to introduce the principles and mechanismsof SOFAArk class isolation. Instead, it mainly introduces the current best practices of multi-ClassLoader.
The ClassLoader model between the foundation and modules deployed on the JVM at present is as shown in the figure below:
Current Class Delegation Loading Mechanism
The classes searched by a module during startup and runtime currently come from two sources: the module itself and the foundation. The ideal priority order of these two sources is to search from the module first, and if not found, then from the foundation. However, there are some exceptions currently:
- A whitelist is defined, and dependencies within the whitelist are forced to use dependencies in the foundation.
- The module can scan all classes in the foundation:
- Advantage: The module can introduce fewer dependencies.
- Disadvantage: The module will scan classes that do not exist in the module code, such as some AutoConfigurations. During initialization, errors may occur due to the inability to scan corresponding resources.
- The module cannot scan any resources in the foundation:
- Advantage: It will not initialize the same beans as the foundation repeatedly.
- Disadvantage: If the module needs resources from the foundation to start, errors will occur due to the inability to find resources unless the module is explicitly introduced (Maven dependency scope is not set to provided).
- When the module calls the foundation, some internal processes pass the class names from the module to the foundation. If the foundation directly searches for the classes passed by the module from the foundation ClassLoader, it will not find them. This is because delegation only allows the module to delegate to the foundation, and classes initiated from the foundation will not search the module again.
Points to Note When Using
When a module needs to upgrade the dependencies delegated to the foundation, the foundation needs to be upgraded first, and then the module can be upgraded.
Best Practices for Class Delegation
The principle of class delegation loading is that middleware-related dependencies need to be loaded and executed in the same ClassLoader. There are two best practices to achieve this:
Mandatory Delegation Loading
Since middleware-related dependencies generally need to be loaded and executed in the same ClassLoader, we will specify a whitelist of middleware dependency, forcing these dependencies to be delegated to the foundation for loading.
Usage
Add the configuration sofa.ark.plugin.export.class.enable=true to application.properties.
Advantages
Module developers do not need to be aware of which dependencies belong to the middleware that needs to be loaded by the same ClassLoader.
Disadvantages
The list of dependencies to be forcibly loaded in the whitelist needs to be maintained. If the list is missing, the foundation needs to be updated. Important upgrades require pushing all foundation upgrades.
Custom Delegation Loading
In the module’s pom, set the scope of the dependency to provided to actively specify which dependencies to delegate to the foundation for loading. By slimming down the module, duplicate dependencies with the foundation are delegated to the foundation for loading, and middleware dependencies are pre-deployed in the foundation (optional, although the module may not use them temporarily, they can be introduced in advance in case they are needed by subsequent modules without the need to redeploy the foundation). Here:
- The foundation tries to precipitate common logic and dependencies, especially those related to middleware named
xxx-alipay-sofa-boot-starter. - Pre-deploy some common dependencies in the foundation (optional).
- If the dependencies in the module are already defined in the foundation, the dependencies in the module should be delegated to the foundation as much as possible. This will make the module lighter (providing tools for automatic module slimming). There are two ways for the module to delegate to the foundation:
- Set the scope of the dependency to provided, and check whether there are other dependencies set to compile through
mvn dependency:tree, and all places where dependencies are referenced need to be set to provided. - Set
excludeGroupIdsorexcludeArtifactIdsin thesofa-ark-maven-pluginbiz packaging plugin.
- Set the scope of the dependency to provided, and check whether there are other dependencies set to compile through
            <plugin>
                <groupId>com.alipay.sofa</groupId>
                <artifactId>sofa-ark-maven-plugin</artifactId>
                <configuration>
                    <excludeGroupIds>io.netty,org.apache.commons,......</excludeGroupIds>
                    <excludeArtifactIds>validation-api,fastjson,hessian,slf4j-api,junit,velocity,......</excludeArtifactIds>
                    <declaredMode>true</declaredMode>
                </configuration>
            </plugin>
Using Method 2.b To ensure that all declarations are set to provided scope, it is recommended to use Method 2.b, where you only need to specify once.
- Only dependencies declared by the module can be delegated to the foundation for loading.
During module startup, the Spring framework has some scanning logic. If these scans are not restricted, they will search for all resources of both the module and the foundation, causing some modules to attempt to initialize functions they clearly do not need, resulting in errors. Since SOFAArk 2.0.3, the declaredMode of modules has been added to limit only dependencies declared within the module can be delegated to the foundation for loading. Simply add <declaredMode>true</declaredMode> to the module’s packaging plugin configurations.
Advantages
- No need to maintain a forced loading list for plugins. When some dependencies that need to be loaded by the same ClassLoader are not set for uniform loading, you can fix them by modifying the module without redeploying the foundation (unless the foundation does require it).
Disadvantages
- Strong dependency on slimming down modules.
Comparison and Summary
| Dependency Missing Investigation Cost | Repair Cost | Module Refactoring Cost | Maintenance Cost | |
|---|---|---|---|---|
| Forced Loading | Moderate | Update plugin, deploy foundation, high | Low | High |
| Custom Delegation | Moderate | Update module dependencies, update foundation if dependencies are insufficient and deploy, moderate | High | Low |
| Custom Delegation + Foundation Preloaded Dependencies + Module Slimming | Moderate | Update module dependencies, set to provided, low | Low | Low |
Conclusion: Recommend Custom Delegation Loading Method
- Module custom delegation loading + module slimming.
- Module enabling declaredMode.
- Preload dependencies in the base.
declaredMode Activation Procedure
Activation Conditions
The purpose of declaredMode is to enable modules to be deployed to the foundation. Therefore, before activation, ensure that the module can start locally successfully.
If it is a SOFABoot application and involves module calls to foundation services, local startup can be skipped by adding these two parameters to the module’s application.properties (SpringBoot applications do not need to care):
# If it is SOFABoot, then:
# Configure health check to skip JVM service check
com.alipay.sofa.boot.skip-jvm-reference-health-check=true
# Ignore unresolved placeholders
com.alipay.sofa.ignore.unresolvable.placeholders=true
Activation Method
Add the following configuration to the module’s packaging plugin:
Side Effects After Activation
If the dependencies delegated to the foundation by the module include published services, then the foundation and the module will publish two copies simultaneously.
3.11 - 6.3.5.11 What happens if a module independently introduces part of the SpringBoot framework?
Since the logic of multi-module runtime is introduced and loaded in the base, such as some Spring Listeners. If the module starts using its own SpringBoot entirely, there may be some class conversion or assignment judgment failures, for example:
CreateSpringFactoriesInstances

name = ‘com.alipay.sofa.ark.springboot.listener.ArkApplicationStartListener’, ClassUtils.forName gets the class from the base ClassLoader.
However, the type is loaded when the module starts, which means it is loaded using the module’s BizClassLoader.
At this point, performing an isAssignable check here will cause an error.
com.alipay.sofa.koupleless.plugin.spring.ServerlessApplicationListener is not assignable to interface org.springframework.context.ApplicationListener
So the module framework part needs to be delegated to the base to load.
4 - 6.5.4 Module Split Tool
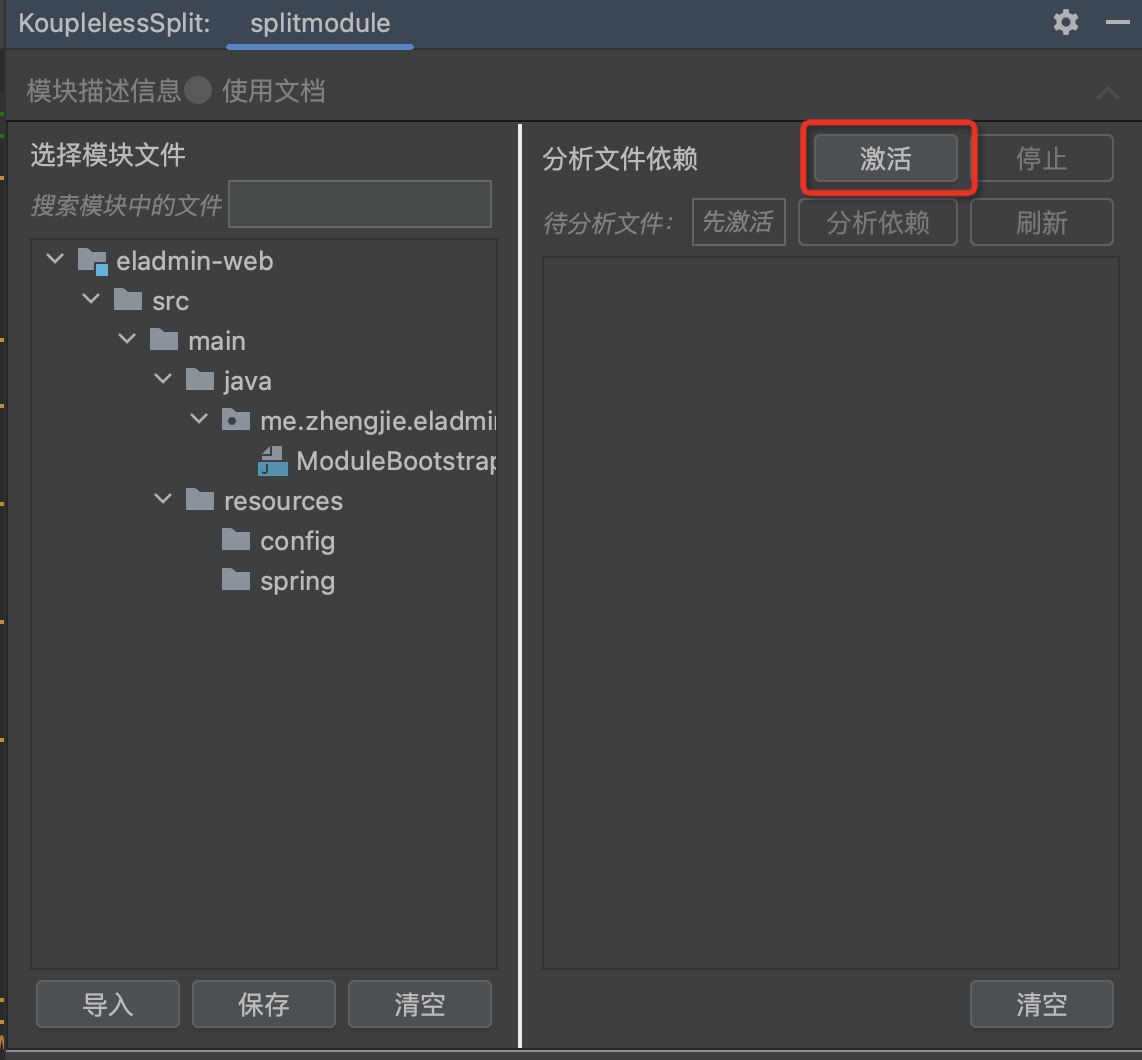
4.1 - 6.5.4.1 Semi-Automated Split Tool User Guide
Background
When extracting the Koupleless module from a large monolithic SpringBoot application, users face high learning and trial-and-error costs. Users need to analyze from the service entrance which classes to split into the module, then modify the module according to the Koupleless module coding method.
To reduce learning and trial-and-error costs, KouplelessIDE plugin provides semi-automated splitting capabilities: analyzing dependencies and automating modifications.
Quick Start
1. Install Plugin
Install the KouplelessIDE plugin from the IDEA plugin marketplace:

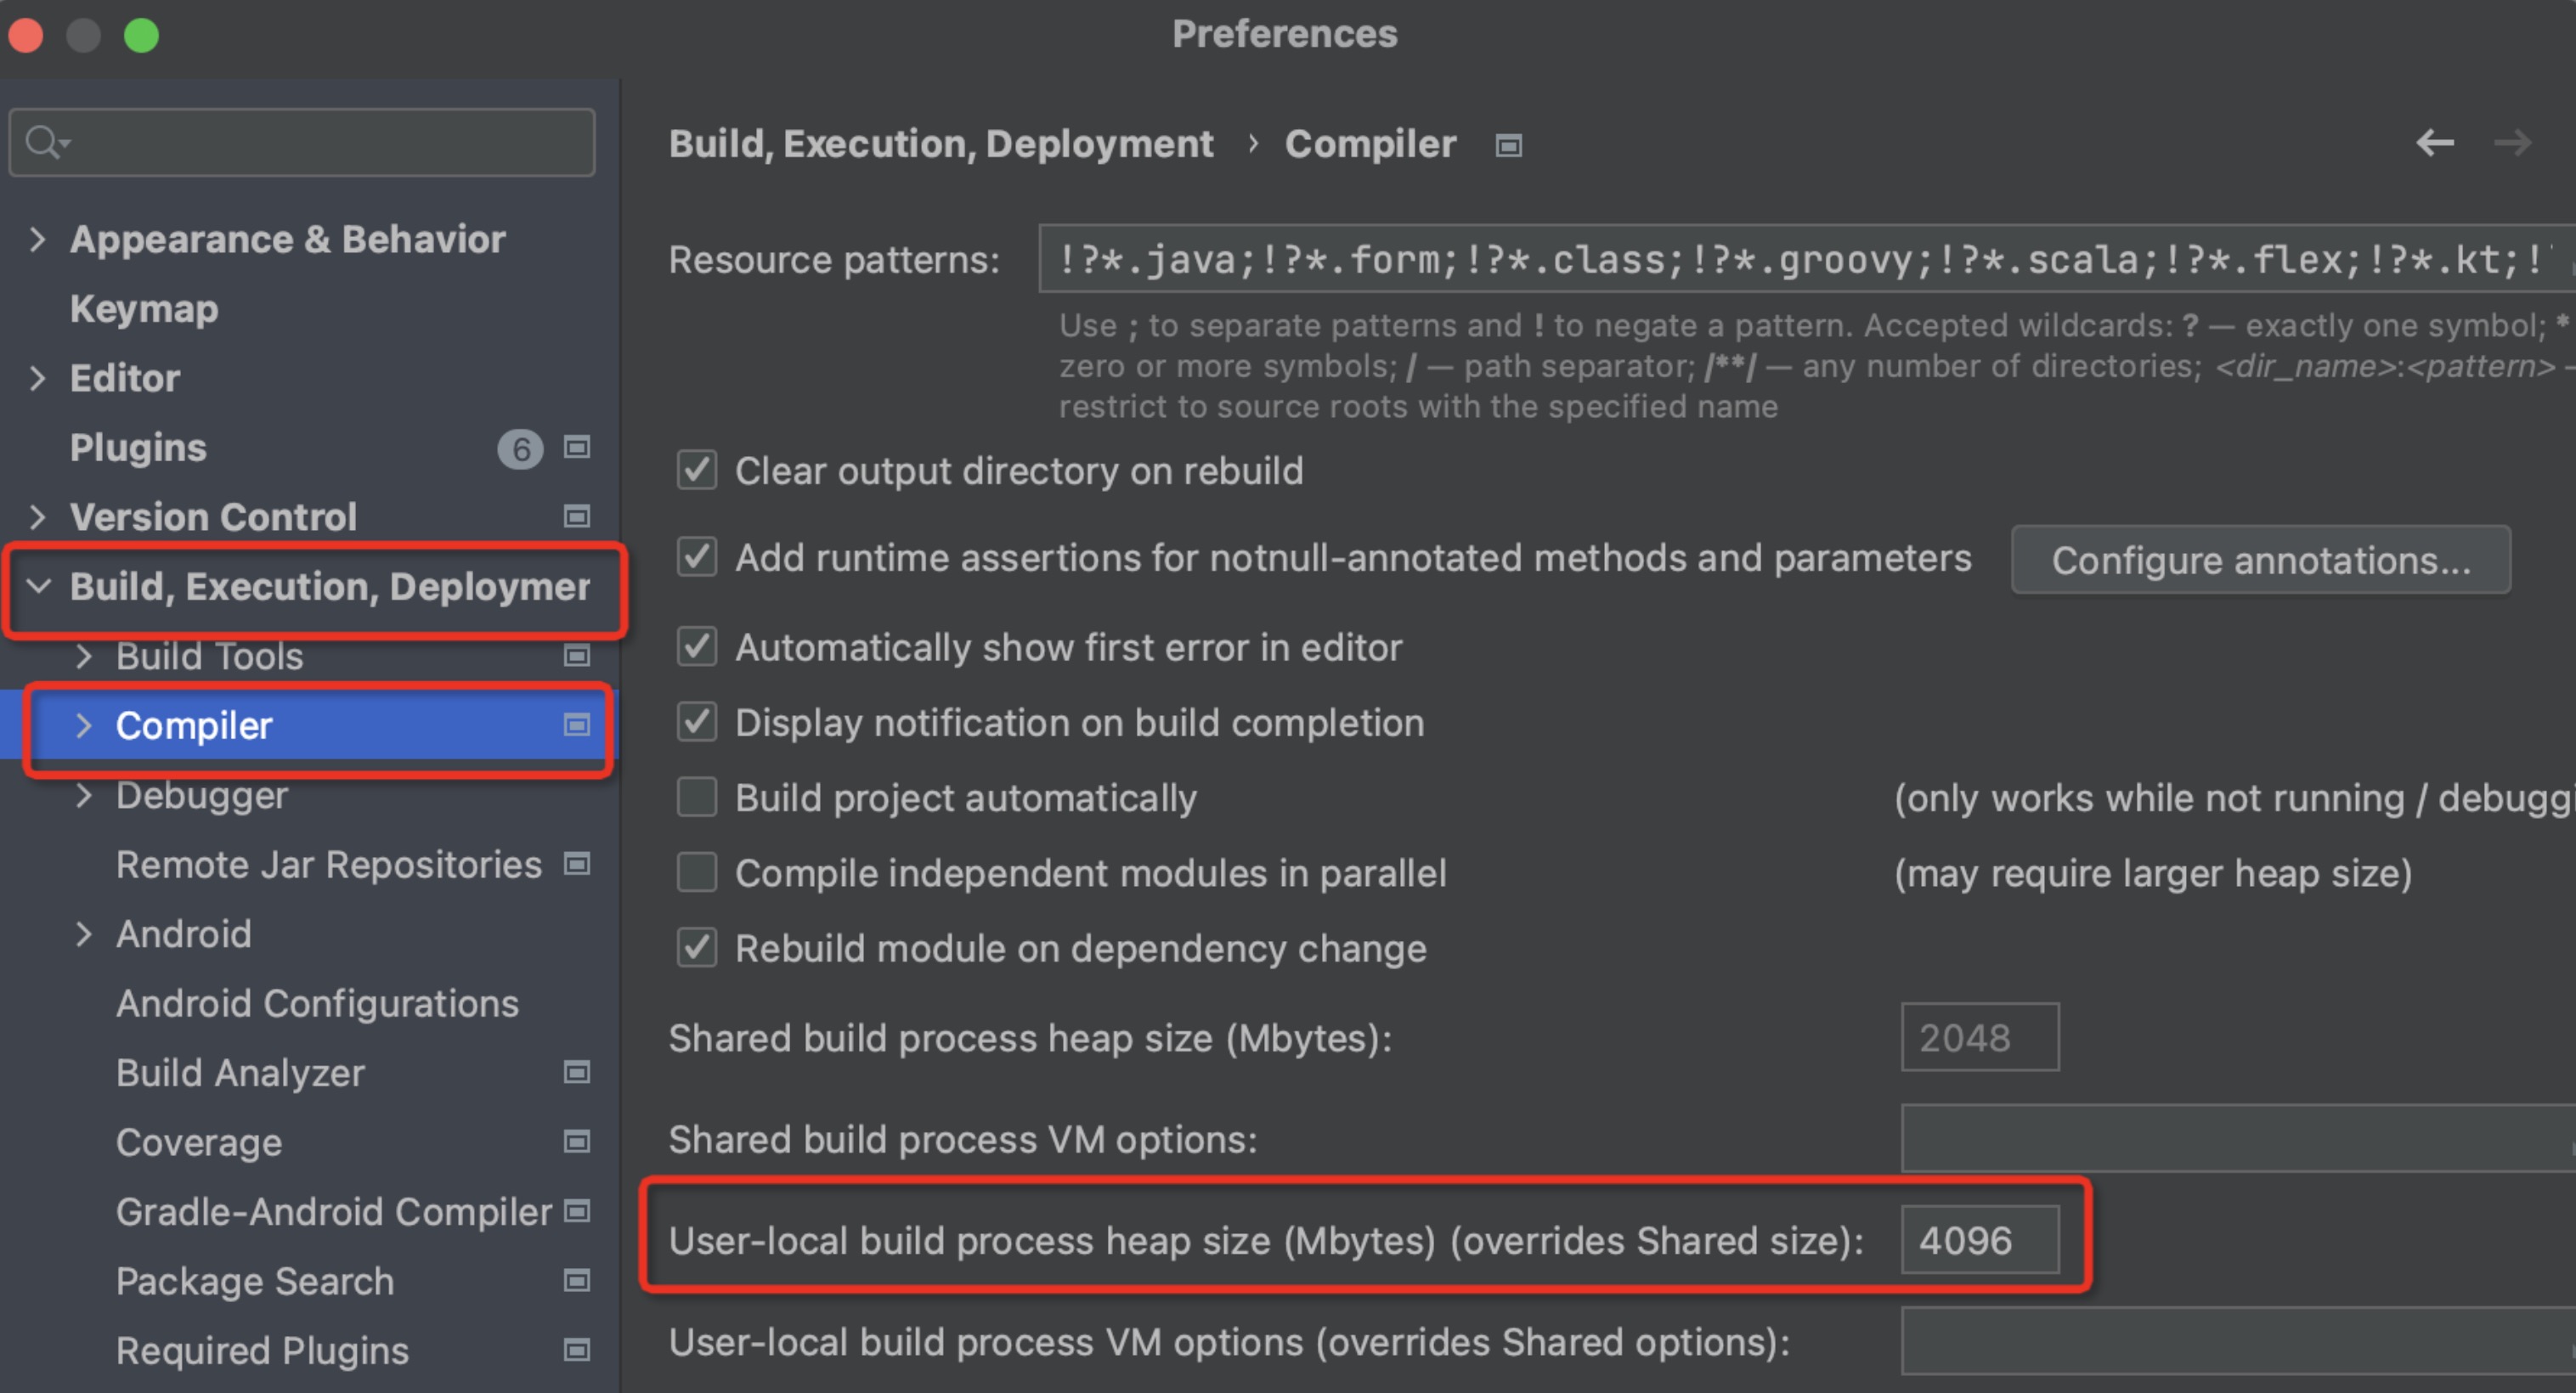
2. Configure IDEA
Ensure that IDEA -> Preferences -> Builder -> Compiler’s “User-local build process heap size” is at least 4096
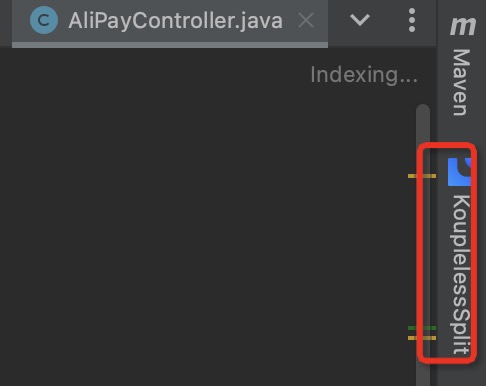
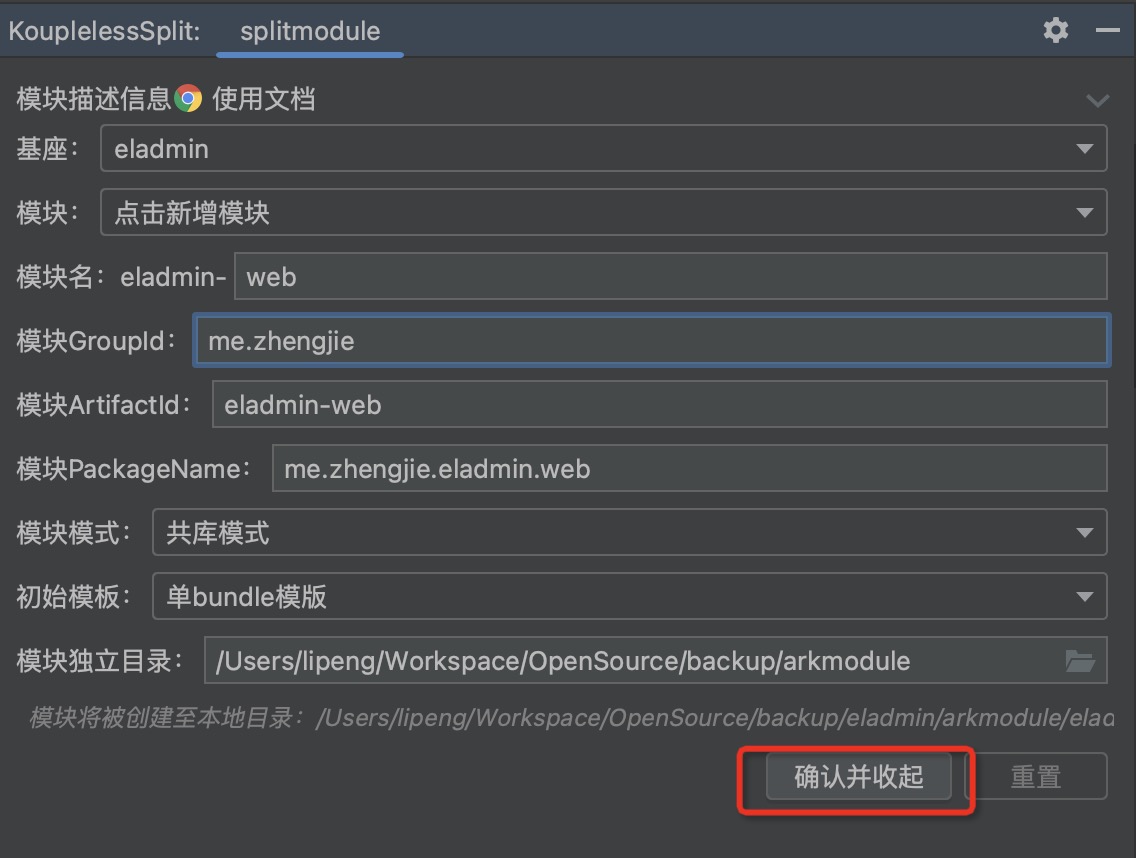
3. Select Module
Step one: Open the SpringBoot application that needs splitting with IDEA, on the right panel open ServerlessSplit
Step two: Select the splitting method as needed, click “Confirm and Collapse”
4. Dependency Analysis
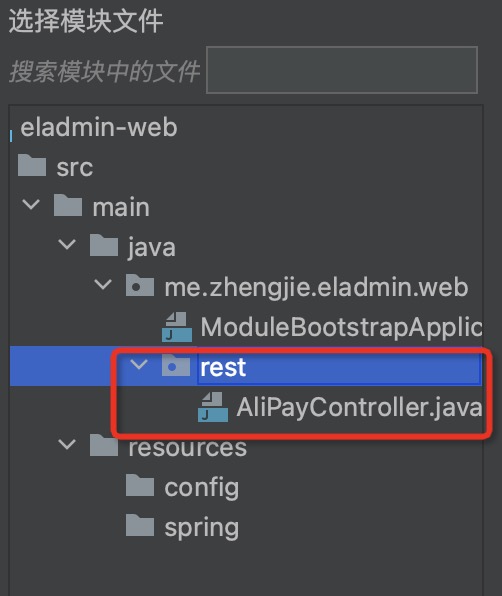
During splitting, it is necessary to analyze the dependencies between classes and Beans. The plugin allows for the visualization of dependency relationships, and it is up to the business side to decide whether a class should be split into a module.
Step one: Click to activate
Step two: Drag the service entry to the module, supporting cross-level dragging

Dragging result:
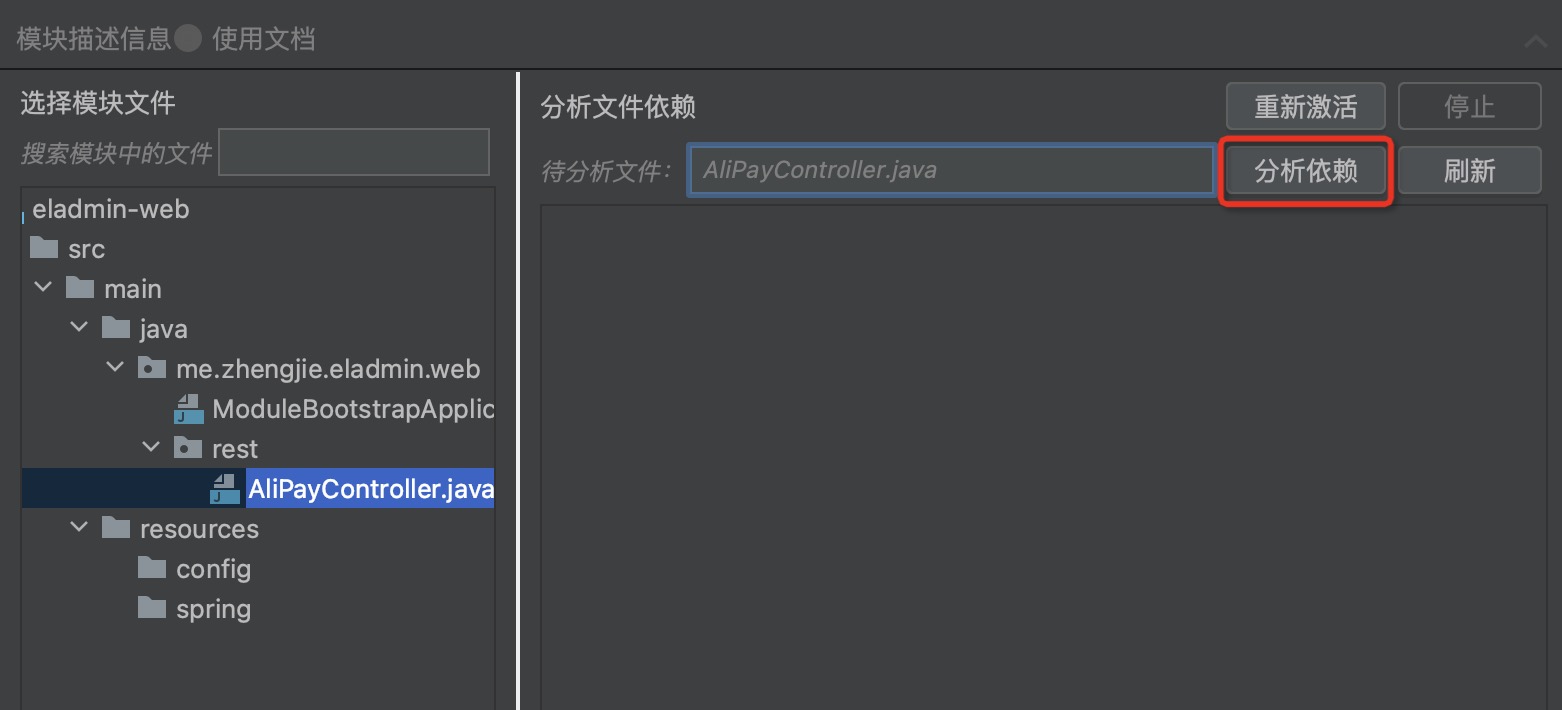
Step three: Drag the “Files for Analysis”, click to analyse dependencies, view Class/Bean dependencies as shown below:
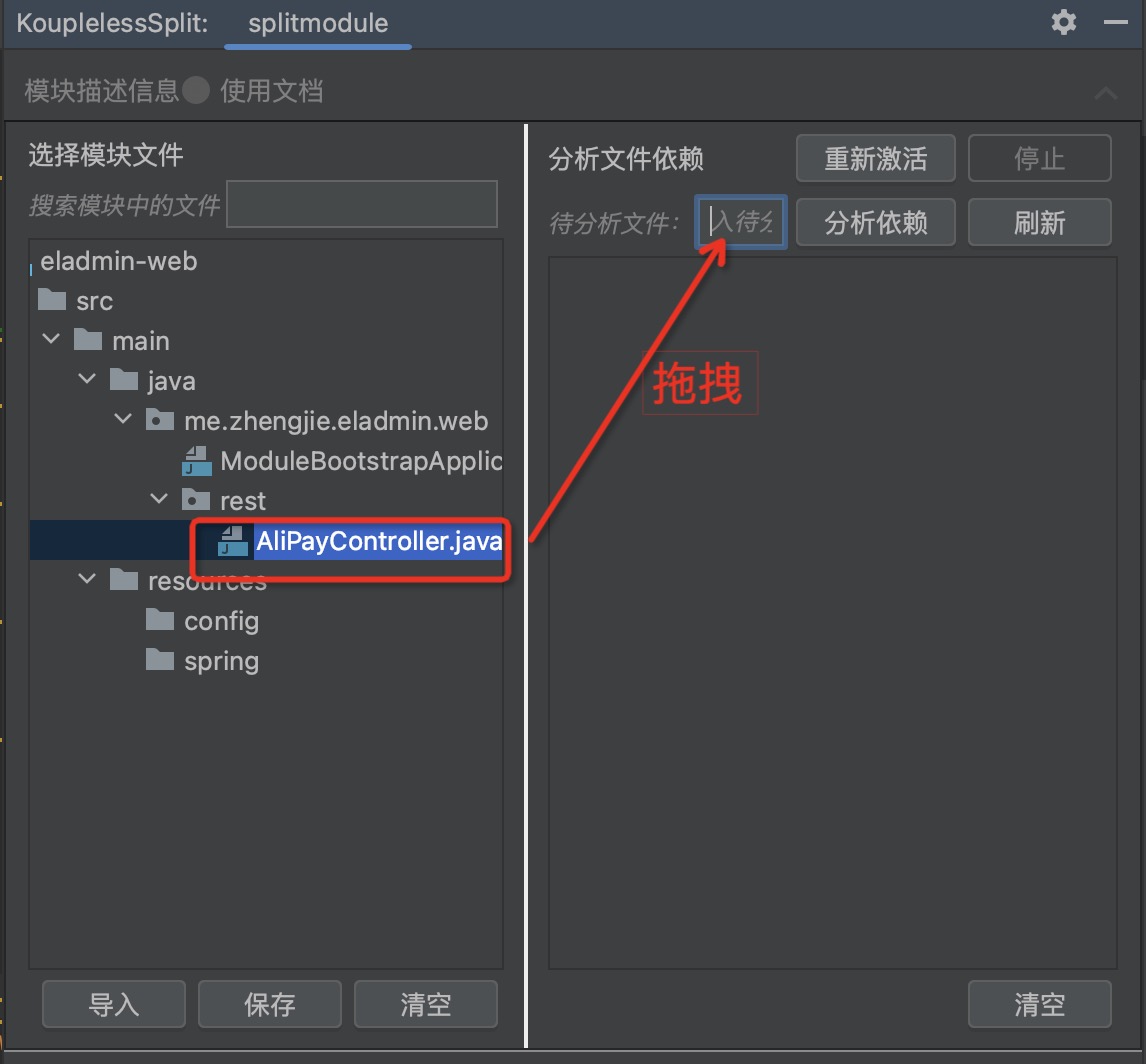

Where the icons represent:
| Icon | Meaning | Required Action |
|---|---|---|
| Already in module | No action required | |
 | Can be moved to module | Drag to module 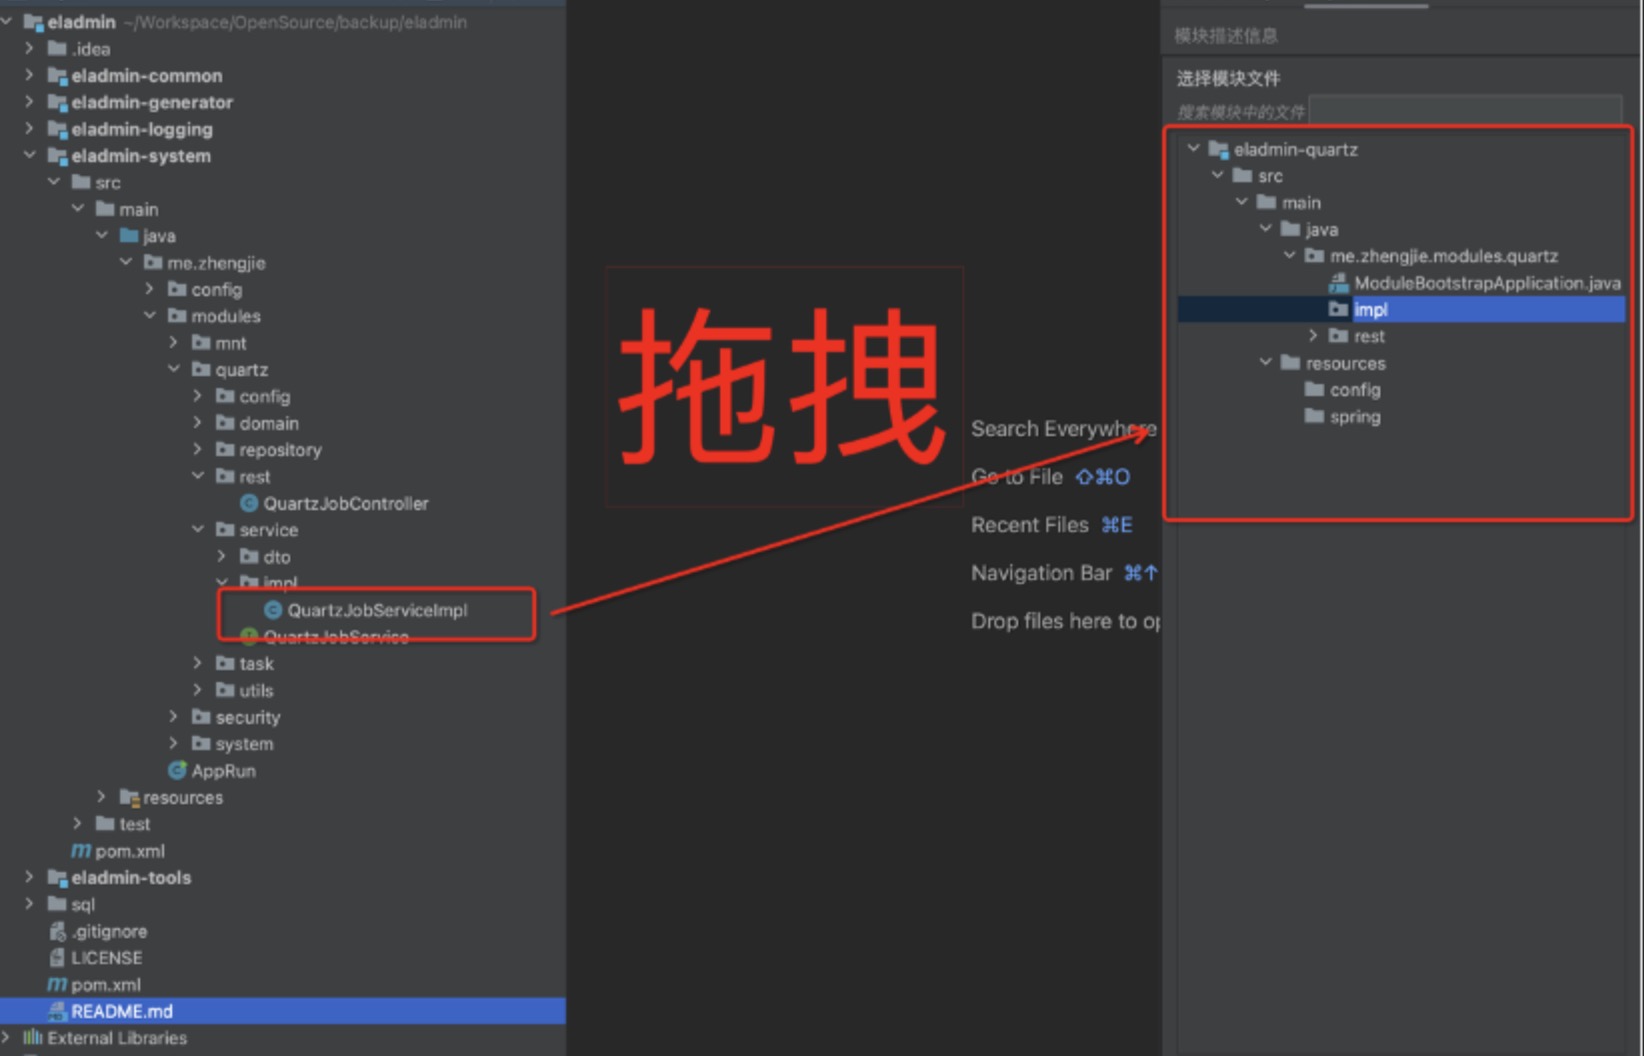 |
| Recommended to analyze dependency | Drag to analyze 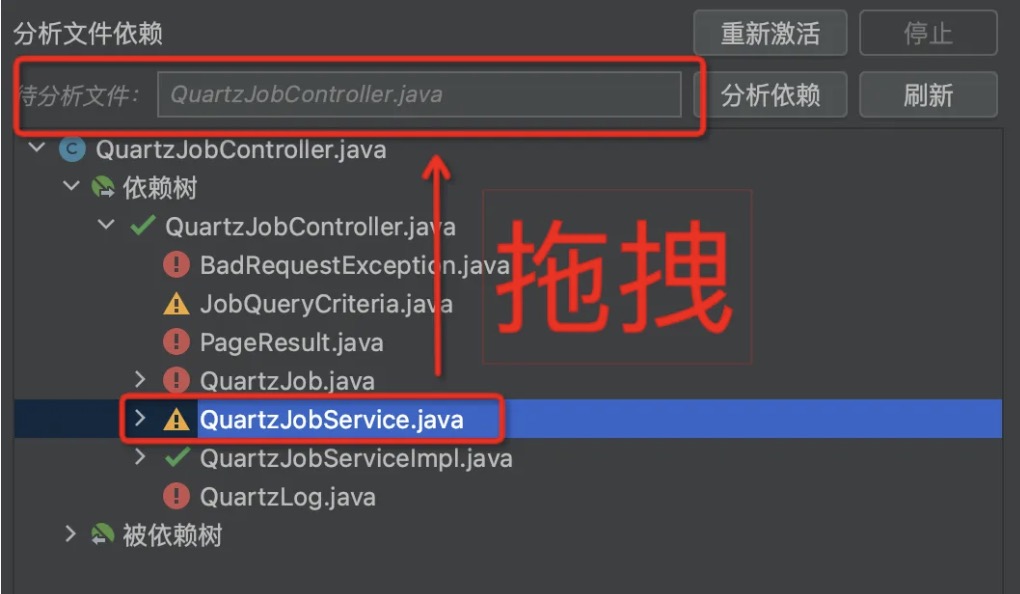 | |
| Should not be moved to module | Hover to view dependency details |
Step four: Follow the prompts, through dragging, stepwise analyze, import the necessary module files
5. Detection
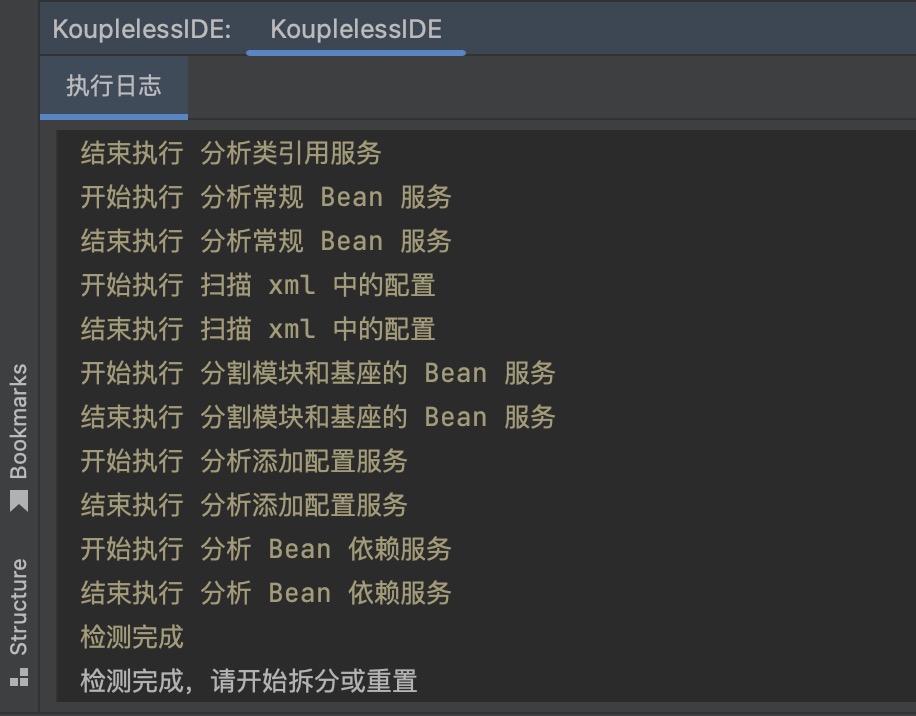
Click on “Preliminary Detection”, which will prompt the user about possible issues with this split, and which middleware might require manual intervention.
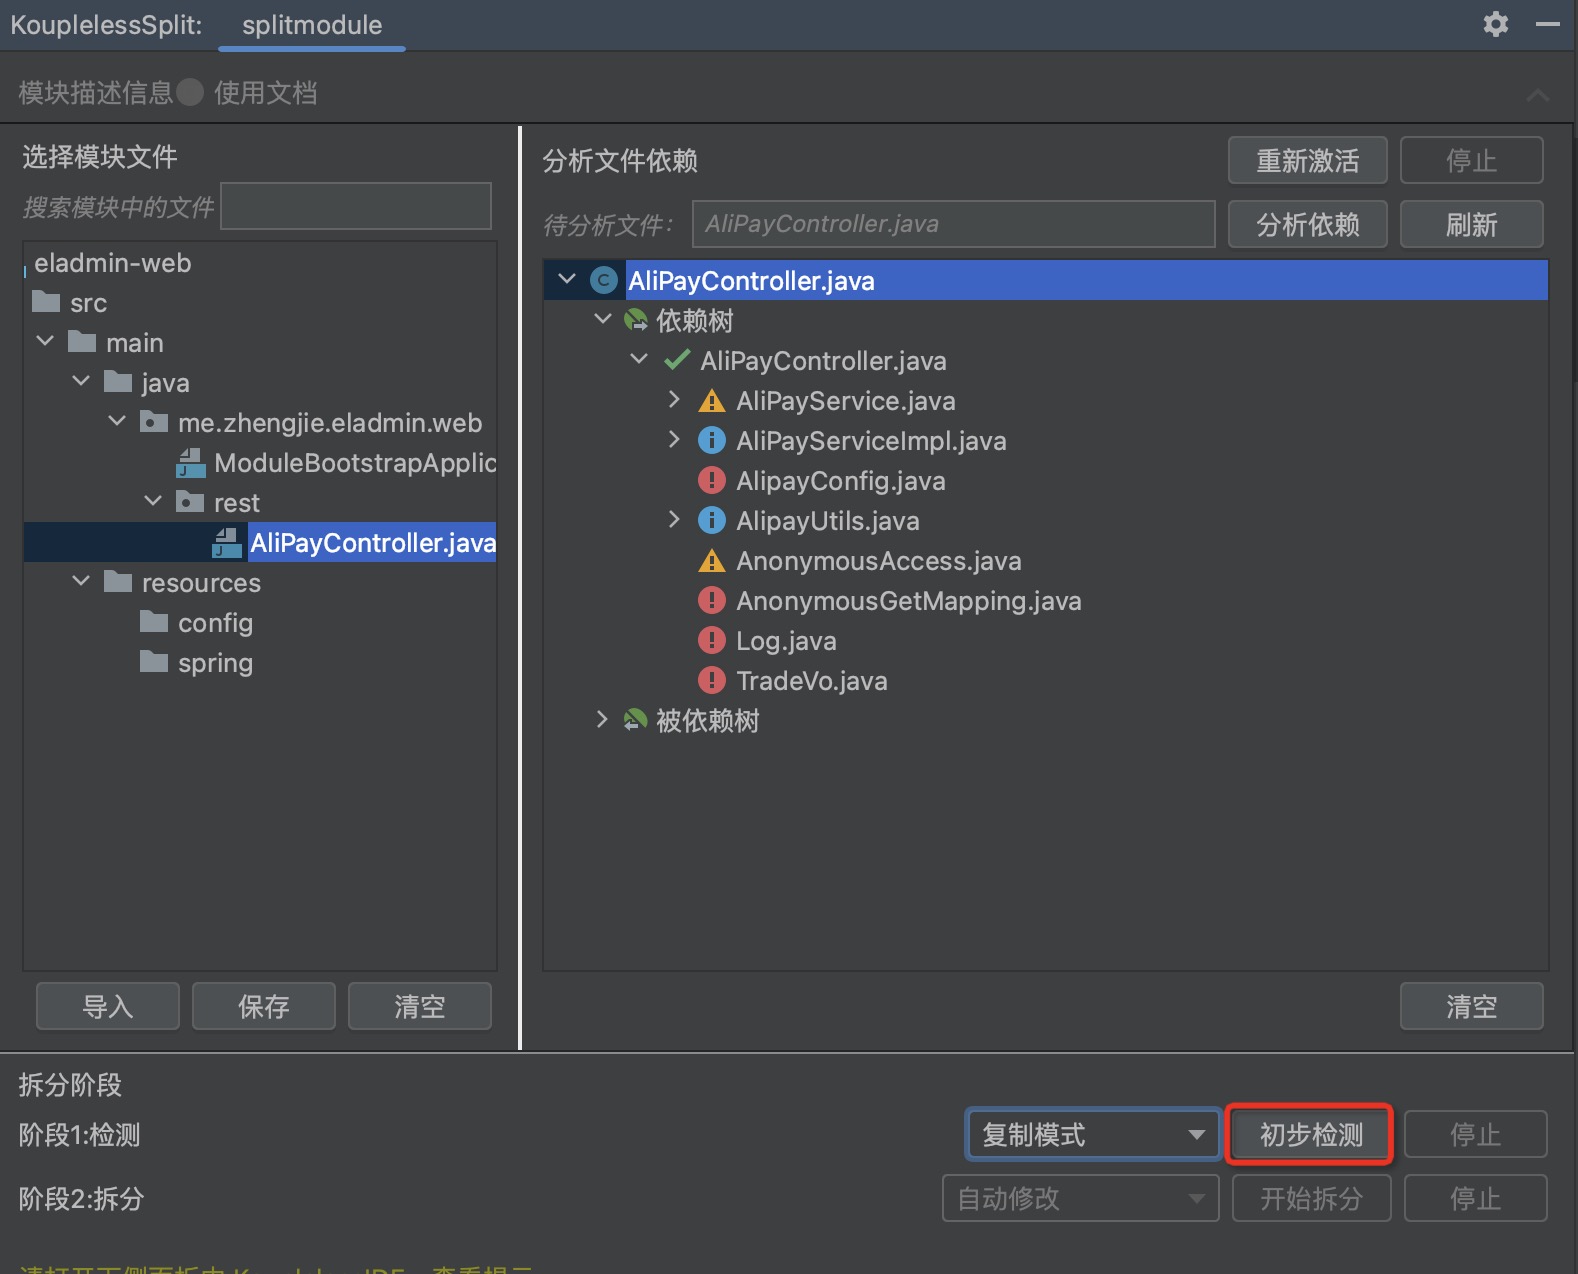
Open the lower sidebar in KouplelessIDE to view the prompts.
6. Splitting
Click to start the splitting.
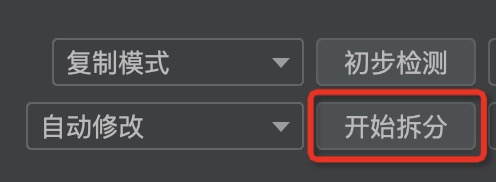
Open the lower sidebar in KouplelessIDE to view the prompts.

4.2 - 6.5.4.2 Is it too difficult to collaborate on developing a monolithic application? Koupleless brings Split Plugin to help you streamline and improve the efficiency of collaborative development!
Background
Is the collaboration efficiency of your enterprise application low?
It takes ten minutes to compile and deploy the code even though only one line is changed;
When multiple developers work on a codebase, they frequently encounter resource contention and mutual coverage during debugging, resulting in mutual waiting for deployment…
As the project code gradually expands and the business develops, the problems of code coupling, release coupling, and resource coupling are increasingly serious, and the development efficiency keeps decreasing.
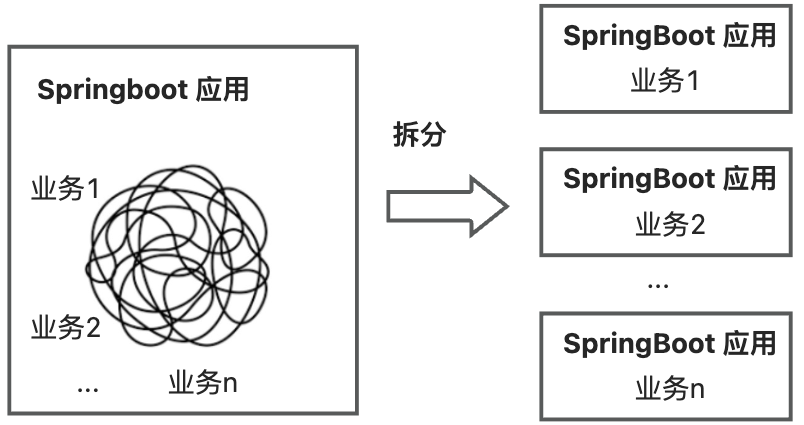
How to solve it? Try splitting a single Springboot application into multiple Springboot applications! After splitting, multiple Springboot applications can be developed in parallel without interfering with each other. In the Koupleless mode, the business can split the Springboot application into a base and multiple Koupleless modules (Koupleless modules are also Springboot applications).
🙌 Scroll down to the “Koupleless Split Plugin Solution” section to watch the demonstration video of splitting a monolithic application!
Key Challenges
There are three key challenges in splitting multiple Springboot applications from a single one:
First, before splitting the sub-application, the complex monolithic application has high code coupling, complex dependency relationships, and a complex project structure, making it difficult to analyze the coupling between files and even more difficult to split out sub-applications, hence the need to solve the problem of analyzing file dependencies in the complex monolithic application before splitting.
Second, when splitting the sub-application, the operation of splitting is cumbersome, time-consuming, and requires users to analyze dependency relationships while splitting, thus imposing high demands on users, therefore there is a need to reduce the user interaction cost during the splitting.
Third, after splitting the sub-application, the monolithic application evolves into a multi-application coexistence, and its coding mode will change. The way Bean is called transitions from a single application call to a cross-application call, and special multi-application coding modes need to be adjusted according to the framework documentation. For example, in Koupleless, in order to reduce the data source connection of modules, modules will use the data source of the base in a certain way, resulting in a very high learning and adjustment cost, hence the need to solve the problem of the evolution of coding modes in multiple applications after splitting.
Koupleless Split Plugin Solution
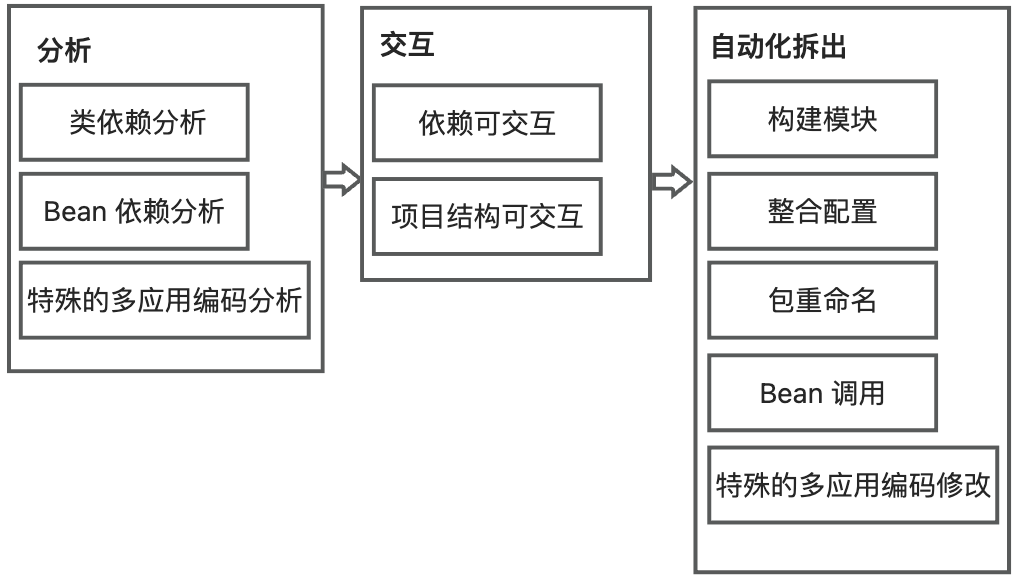
In response to the above three key challenges, the Koupleless IntelliJ IDEA Plugin divides the solution into 3 parts: analysis, interaction, and automated splitting, providing dependency analysis, user-friendly interaction, and automated splitting capabilities, as shown in the following figure:
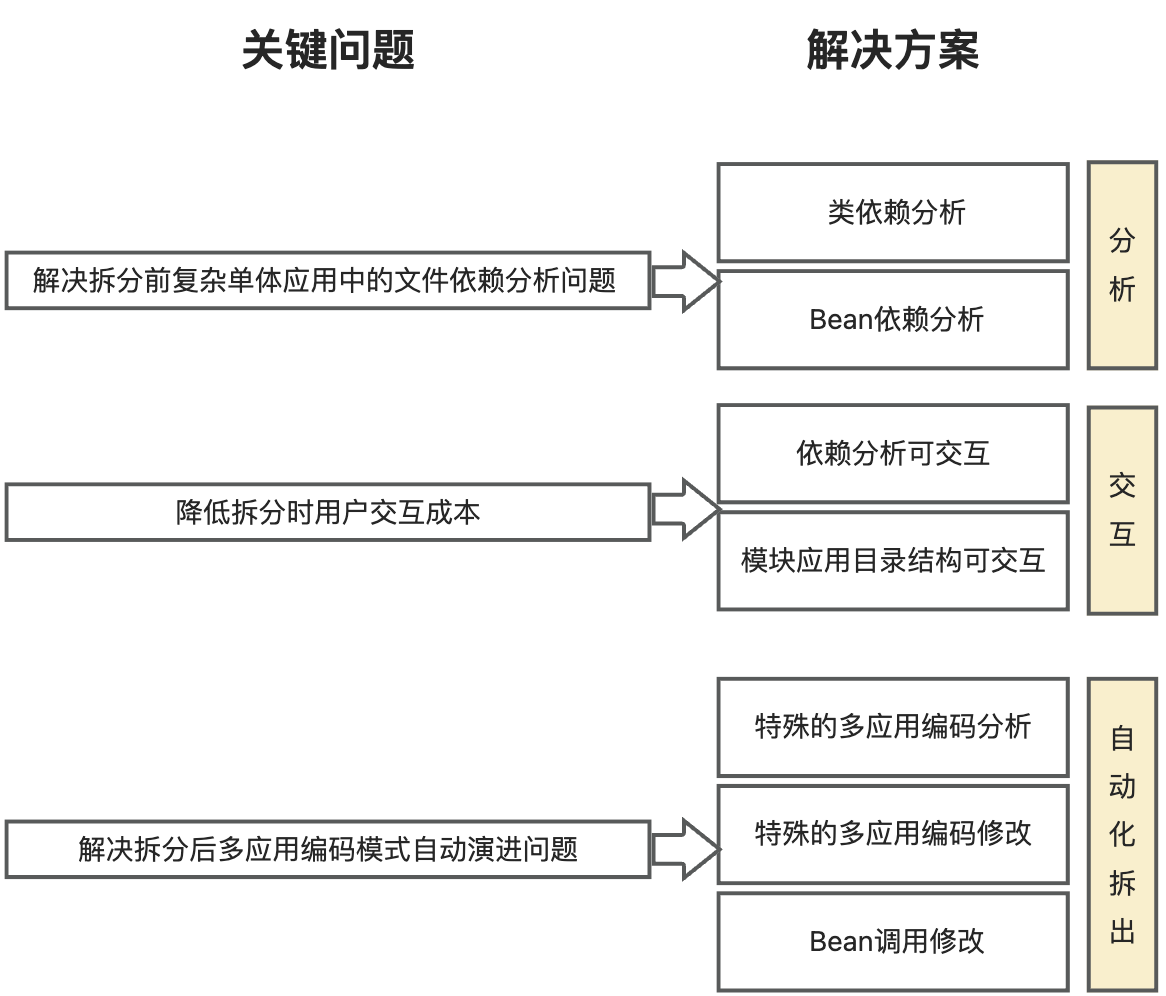
- In the analysis, analyze the dependency relationships in the project, including class dependencies and Bean dependencies, to solve the problem of analyzing file dependencies in the complex monolithic application before splitting;
- In the interaction, visualize the dependency relationships between class files to help users sort out the relationships. At the same time, visualize the module directory structure, allowing users to decide which module files to split by dragging and dropping, thus reducing the user interaction cost during splitting;
- In the automated splitting, the plugin will build the modules and modify the code according to the special multi-application coding, solving the problem of the evolution of coding modes in multiple applications after splitting.
🙌 Here is a demonstration video of the semi-automatic splitting with Koupleless, which will help you better understand how the plugin provides assistance in analysis, interaction, and automated splitting.
Example of Understanding the Advantages of Koupleless Solution
Suppose a business needs to separate the code related to the system into modules, while keeping the common capabilities in the base. Here we take the entry service of the system, QuartzJobController, as an example.
Step 1: Analyze Project File Dependencies
First, we will analyze which classes and beans QuartzJobController depends on.
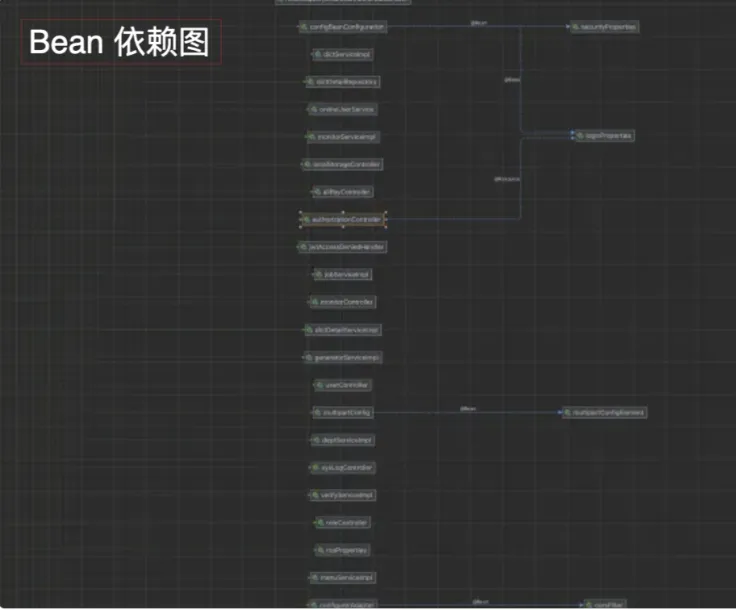
Method 1: Using IntelliJ IDEA Ultimate, perform bean and class analysis on the controller to obtain the following bean dependency diagram and class dependency diagram.
 | 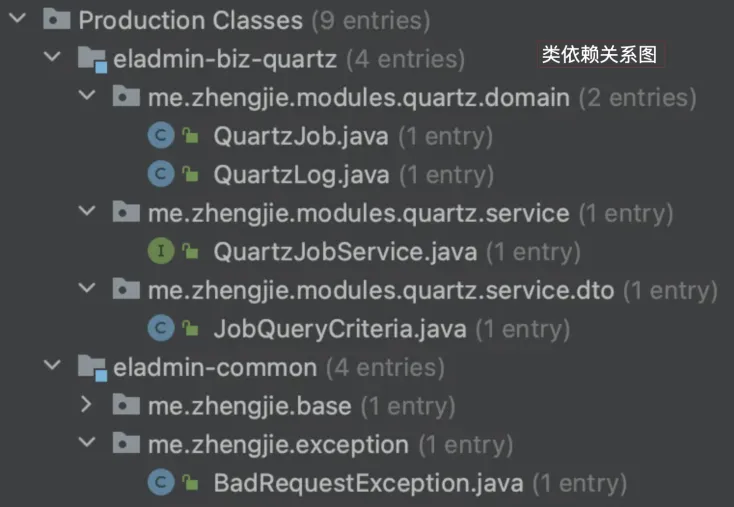 |
|---|
- Advantage: Comprehensive analysis with the help of IntelliJ IDEA Ultimate
- Disadvantage: Requires analysis of each class file, and the bean dependency diagram may not be very readable.
Method 2: Use mental analysis
When class A depends on classes B, C, D, … N, when separating them, it is necessary to analyze whether each class is being depended on by other classes and whether it can be separated into modules.
- Advantage: Intuitive
- Disadvantage: When class A has many dependencies, it requires recursive mental analysis.
Method 3: Use the Koupleless assistant tool for easy analysis! Select any class file you want to analyze, click “Analyze Dependencies,” and the plugin will help you analyze. It not only analyzes the classes and beans that the class file depends on, but also suggests which classes can be separated out and which cannot.
For example, when the selected module includes QuartzJobController, QuartzJobService, and QuartzJobServiceImpl, the dependency of QuartzJobController on classes and beans is as shown in the following diagram:
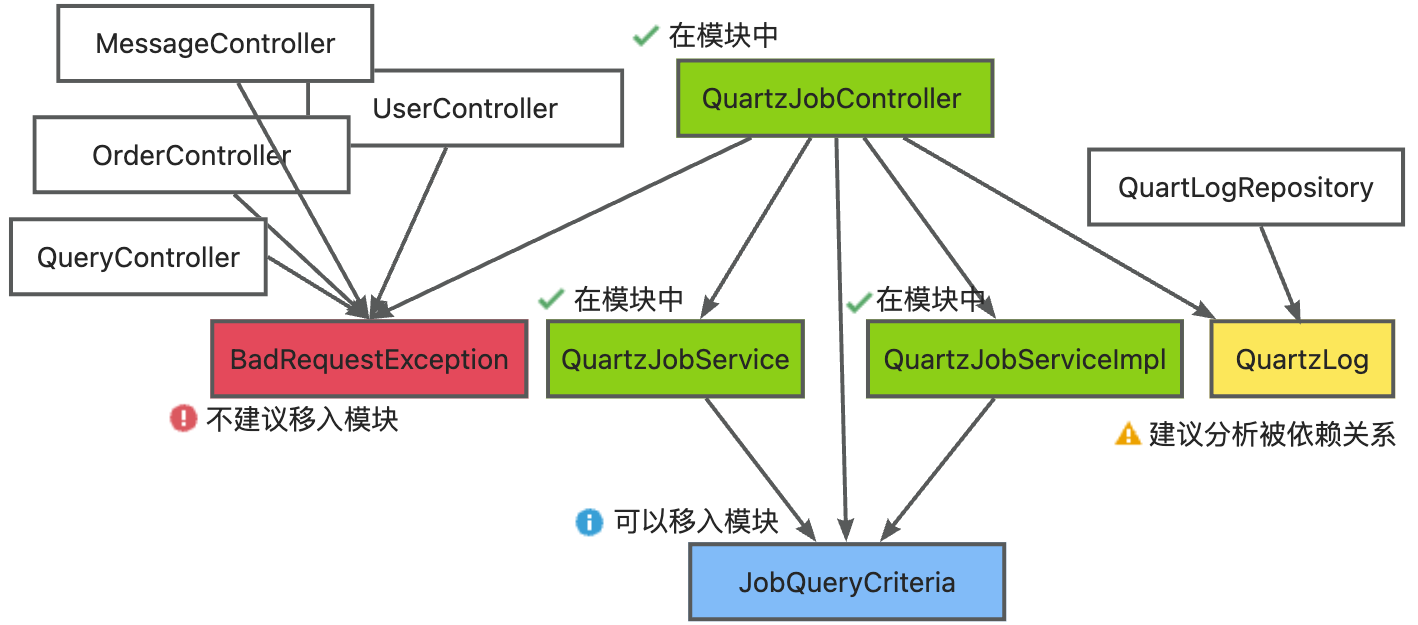
The dependent classes/beans of QuartzJobController are divided into four categories: already in the module, can be moved into the module, suggested to analyze the dependency relationship, and not recommended to be moved into the module.
- If it is in the module, it is marked as green “already in the module,” such as QuartzJobService and QuartzJobServiceImpl.
- If it is only depended on by module classes, then it is marked as blue “can be moved into the module,” such as JobQueryCriteria.
- If it is only depended on by one non-module class, then it is marked as yellow “suggested to analyze the dependency relationship,” such as QuartLog.
- If it is depended on by many non-module classes, then it is marked as red “not recommended to be moved into the module,” such as BadRequestException.
When using the plugin to analyze QuartzJobController and JobQueryCriteria, the dependency tree and the dependency by tree are as follows, corresponding to the analysis above:
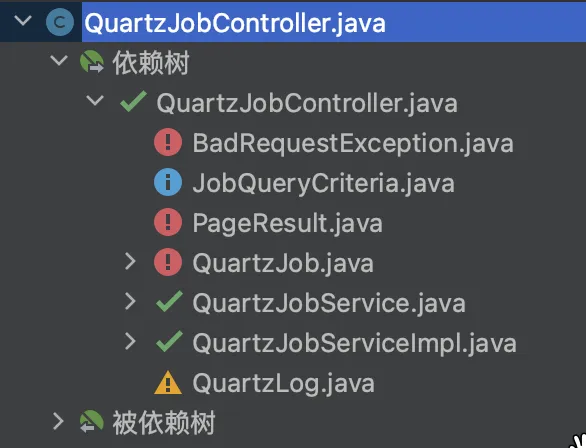 | 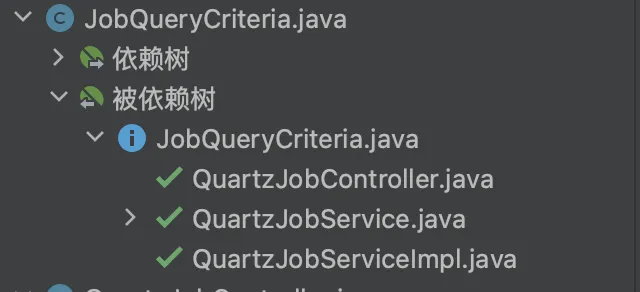 |
|---|
- Advantage: Intuitive, easy to use, and friendly prompts
- Disadvantage: The plugin only supports the analysis of common bean definitions and class references
Step 2: Separate into Modules & Modify Single Application Coding to Multi-Application Coding Mode
Separate the relevant class files into modules.
Method 1: Copy and paste each file, mentally analyze the bean calls between all module and bases, and modify the code according to the multi-application coding mode.
When separating, questions may arise: Where did I just separate to? Is this file in the module? Do I need to refactor these package names? Are the bean calls cross-application? Where is the documentation for multi-application coding?
- Advantage: Can handle multi-application coding modes that the plugin cannot handle
- Disadvantage: Users not only need to analyze cross-application bean dependencies, but also need to learn the multi-application coding mode, resulting in high manual costs.
Method 2: Use the Koupleless assistant tool for easy separation!
Drag the files you want to separate into the panel according to the module directory structure. Click “Separate,” and the plugin will help you analyze and modify according to the Koupleless multi-application coding mode.

- Advantage: Intuitive, convenient interaction, and the plugin automatically modifies the way cross-application bean calls are made and some special multi-application coding modes
- Disadvantage: The plugin can only modify the code based on some multi-application coding modes, so users need to understand the capabilities of the plugin.
Technical Solution
The plugin divides the overall process into 3 stages: analysis stage, interaction stage, and automated separation stage, as shown in the following diagram:
- In the analysis stage, it analyzes the dependencies in the project, including class dependencies, bean dependencies, and special multi-application coding analysis, such as MyBatis configuration dependencies.
- In the interaction stage, it visualizes the dependencies between class files and the module directory structure.
- In the automated separation stage, the plugin first builds the module and integrates the configuration, then refactors the package names according to the user’s needs, modifies the way module base bean calls are made, and modifies the code according to special multi-application coding modes, such as automatically reusing the base data source.
Next, we will briefly introduce the main technologies used in the analysis stage, interaction stage, and automated separation stage.
Analysis Phase
Plugins use JavaParser and commons-configuration2 to scan Java files and configuration files in the project.
Class Dependency Analysis
To accurately analyze the class dependency of the project, the plugin needs to fully analyze all the project classes used in a class file, that is: analyze each statement involving types in the code.
The plugin first scans all class information, then uses JavaParser to scan the code of each class, analyzes the types of project class files involved in the code, and finally records their relationships. The types of statements involved are as follows:
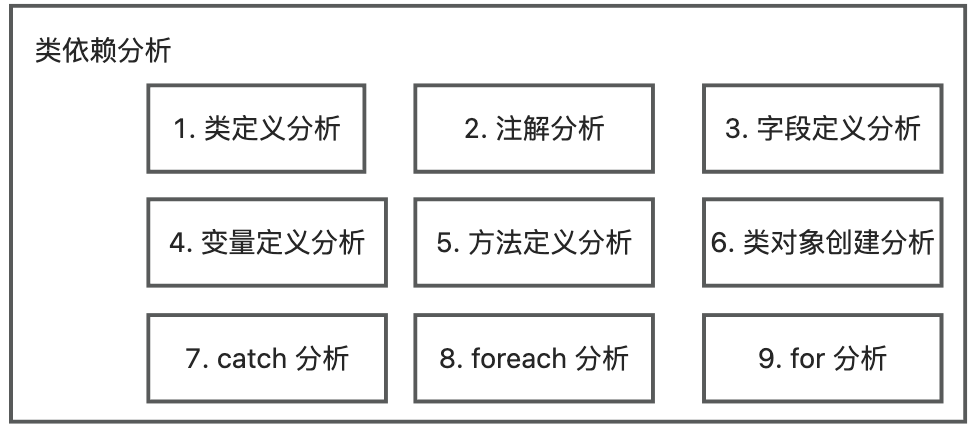
- Class definition analysis: Parsing the parent class type and implementing interface type as referenced types;
- Annotation analysis: Parsing the annotation type as referenced types;
- Field definition analysis: Parsing the field type as referenced types;
- Variable definition analysis: Parsing the variable type as referenced types;
- Method definition analysis: Parsing the return type of the method, parameter types, annotations, and thrown types as referenced types;
- Class object creation analysis: Parsing the object type of the class object creation statement as referenced types;
- Catch analysis: Parsing the object type of catch as referenced types;
- Foreach analysis: Parsing the object type of foreach as referenced types;
- For analysis: Parsing the object type of for as referenced types; To quickly parse object types, since directly using JavaParser for parsing is slow, first check if there are matching types through imports. If the match fails, then use JavaParser for parsing.
Bean Dependency Analysis
To accurately analyze the project’s bean dependency, the plugin needs to scan all the bean definitions and dependency injection methods in the project, and then analyze all the project beans that the class file depends on through static code analysis.
There are three main ways to define beans: class name annotation, method name annotation, and xml. Different ways of bean definition correspond to different bean dependency injection analysis methods, and the ultimately dependent beans are determined by the dependency injection type. The overall process is as follows:
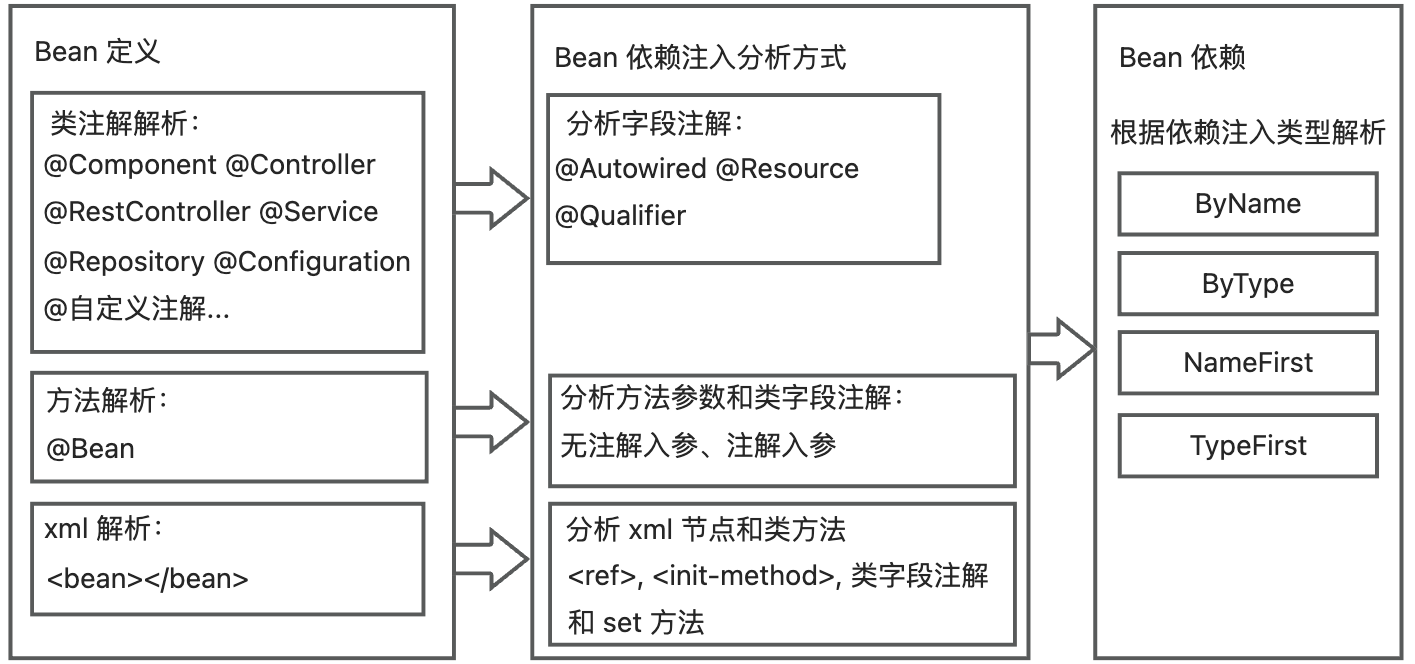
When scanning beans, the plugin parses and records bean information, dependency injection type, and dependent bean information.
- For classes defined with class annotations, it will parse the field annotations and analyze the dependency injection type and dependent bean information of the field.
- For classes defined with methods, it will parse the parameter information and analyze the dependency injection type and dependent bean information of the parameter.
- For classes defined with xml, it will analyze the dependency injection by parsing the xml and class methods:
- Parse dependencies of type byName using and
- Parse the dependency injection type and dependent bean information by parsing the fields.
- If the dependency injection type of the xml is not ’no’, then parse the dependency injection type and the corresponding dependent bean information of the set method.
- Parse dependencies of type byName using and
Finally, according to the dependency injection type, find the dependent bean information in the project’s recorded bean definitions to analyze the bean dependency relationship.
Special Multi-Application Code Analysis
Here we take the MyBatis configuration dependency analysis as an example.
When splitting out the Mapper to a module, the module needs to reuse the base data source, so the plugin needs to analyze all MyBatis configuration classes associated with the Mapper. The overall relationship between the various MyBatis configuration classes and Mapper files is connected through the MapperScanner configuration, as shown in the figure below:
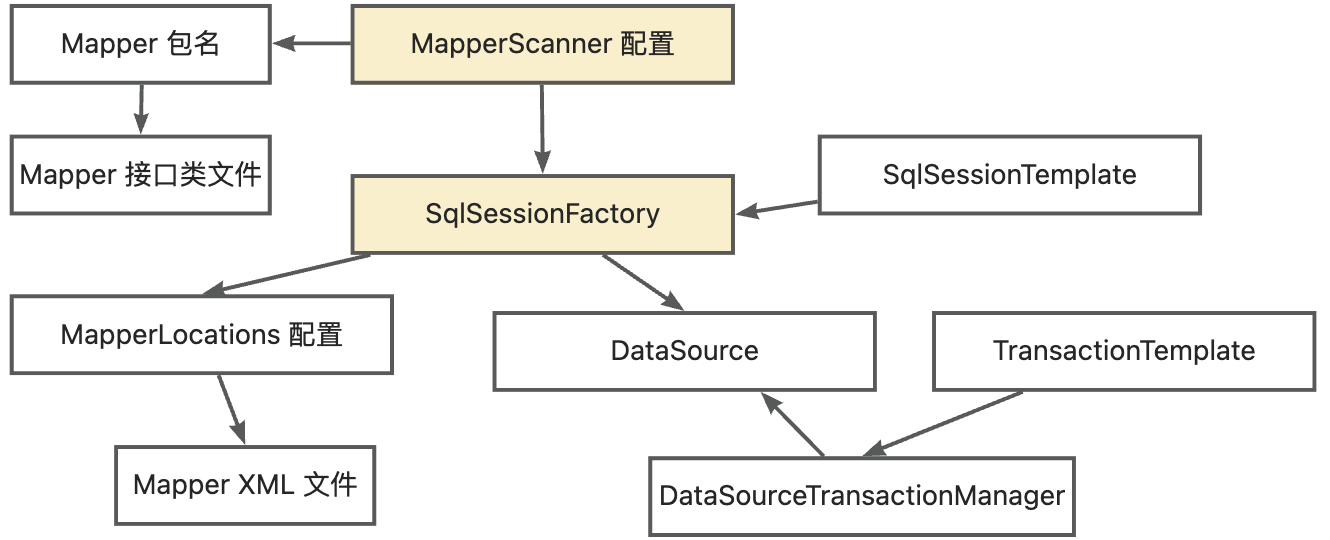
Therefore, the plugin records all Mapper class files and XML files, analyzes the associated MapperScanner, and parses all Mybatis configuration bean information associated with the MapperScanner configuration.
Interaction Phase
Here is a brief description of the implementation of dependency visualization and cross-level import.
- Visualization of dependency relationships: The plugin recursively analyzes the dependency relationships between all class files (including class dependency relationships and bean dependency relationships). Since there may be cyclic dependencies between class files, a cache is used to record all class file nodes. When recursing, the plugin prioritizes taking the dependency nodes from the cache to avoid stack overflow problems when constructing tree nodes.
- Cross-level import: Record all selected files. If folders and files within folders are selected, only import the marked files during import.
Automation Phase of Splitting
Here is a brief description of the implementation of package renaming, configuration integration, bean invocation, and special multi-application code modification (using “reusing the base data source” as an example).
- Package renaming: When the user customizes the package name, the plugin will modify the class package name and, according to the class dependency relationship, modify its import field to the new package name.
- Configuration integration: For each module of the sub-application, read all the original module configurations where the split files are located and integrate them into the new module; automatically extract bean nodes related to the sub-application from XML.
- Bean invocation: Based on the bean dependency relationship analyzed earlier, the plugin filters out the bean calls between the module and the base, and modifies the field annotations (@Autowired @Resource @Qualifier) to @AutowiredFromBase or @AutowiredFromBiz.
- Reuse of the base data source: Based on the user’s selection of Mapper files and MyBatis configuration dependency relationships, extract the MyBatis configuration information related to the Mapper. Then fill in the configuration information to the data source reuse template file and save it in the module.
Future Outlook
The above-mentioned features have been completed internally but have not been officially open-sourced. It is expected to be open-sourced in the first half of 2024. Stay tuned.
In addition, in terms of functionality, there are still more challenges to be addressed in the future: how to split the unit tests and how to verify the consistency of the split multi-application ability and single-application ability.
We welcome more interested students to pay attention to the construction of the Koupleless community together to build the Koupleless ecosystem.