This is the multi-page printable view of this section. Click here to print.
4.3 Module Development
- 1: 4.3.1 Coding Standards
- 2: 4.3.2 Module Slimming
- 3: 4.3.3 Module Startup
- 4: 4.3.4 Module Communication Module to Module and Module to Base Communication
- 5: 4.3.5 Module Local Development and Debugging
- 6: 4.3.6 Reusing Base Data Source
- 7: 4.3.7 Reusing Base Interceptors
- 8: 4.3.8 Thread Pool Usage
- 9: 4.3.9 Multiple Configurations for Modules
- 10: 4.3.10 Multimodule Integration Testing
- 11: 4.3.11 Static Merge Deployment
- 12: 4.3.12 Officially Supported Middleware Clients in Modules
- 13: 4.3.13 Koupleless Configuration
- 14: 4.3.14 SOFAArk Key User Documentation
1 - 4.3.1 Coding Standards
Basic Specifications
- The list of middleware clients officially verified and compatible in Koupleless modules can be found here. Any middleware client can be used in the base.
- If you need to use
System.setProperties()andSystem.getProperties()in module without sharing with the base, please addMultiBizProperties.initSystem()in the main method of the base platform. For details, refer to samples. - If the module hot unload capability is used, you can use the following API to decorate ExecutorService (typical for various thread pools), Timer, and Thread objects declared in the module code. When the module is unloaded,
the Koupleless Arklet client will attempt to automatically clean up the decorated ExecutorService, Timer, and Thread:
- In the module code, decorate the ExecutorService that needs to be automatically cleaned up. The underlying code will call the shutdownNow and awaitTermination interfaces of the ExecutorService object, attempting to gracefully release threads (not guaranteed to release 100%, such as when threads are waiting). The specific usage is:
Where myExecutorService needs to be a subtype of ExecutorService. You can also configure com.alipay.koupleless.executor.cleanup.timeout.seconds in the module’s SpringBoot or SOFABoot properties file to specify the graceful waiting time for thread pool awaitTermination.ShutdownExecutorServicesOnUninstallEventHandler.manageExecutorService(myExecutorService); - In the module code, decorate the Timer that needs to be automatically cleaned up. The underlying code will call the cancel method of the Timer object. The specific usage is:
CancelTimersOnUninstallEventHandler.manageTimer(myTimer); - In the module code, decorate the Thread that needs to be automatically cleaned up. The underlying code will forcibly call the stop method of the Thread object. The specific usage is:
Note: JDK does not recommend forcibly stopping threads, as it may cause unexpected problems such as forcibly releasing locks on threads. Unless you are sure that forcibly closing threads will not cause any related issues, use it with caution.ForceStopThreadsOnUninstallEventHandler.manageThread(myThread);
- In the module code, decorate the ExecutorService that needs to be automatically cleaned up. The underlying code will call the shutdownNow and awaitTermination interfaces of the ExecutorService object, attempting to gracefully release threads (not guaranteed to release 100%, such as when threads are waiting). The specific usage is:
- If the module hot unload capability is used and there are other resources or objects that need to be cleaned up, you can listen for the Spring ContextClosedEvent event and clean up the necessary resources and objects in the event handler function.
You can also specify their destroy-method at the place where Beans are defined in Spring XML. When the module is unloaded, Spring will automatically execute the destroy-method.
- When the base is started, all modules will be deployed. Therefore, when coding the base, make sure to be compatible with all modules, otherwise the base deployment will fail. If there are incompatible changes that cannot be bypassed (usually there will be many incompatible changes between the base and modules during the module splitting process),
please refer to Incompatible Base and Module Upgrade。
Knowledge Points
Module Slimming (Important)
Module-to-Module and Module-to-Base Communication (Important)
Module Testing (Important)
Reuse Base Interceptors in Modules
Reuse Base Data Sources in Modules
Introduction to the Principle of Class Delegation Between Base and Modules
Multiple Configurations for Modules
2 - 4.3.2 Module Slimming
Why Slimming?
Using the underlying SOFAArk framework, Koupleless achieves class isolation between modules and between modules and the base. When the module starts, it initializes various objects and prioritizes using the module’s class loader to load classes, resources, and JAR files from the FatJar build artifact. Classes that cannot be found will be delegated to the base’s class loader for retrieval.

Based on this class delegation loading mechanism, the common classes, resources, and JAR files shared by the base and modules all sink into the base, allowing the module build artifact to be very small, resulting in very low memory consumption for the module and very fast startup.
Furthermore, after the module starts, many objects will be created in the Spring context. If module hot-unloading is enabled, complete recycling may not be possible, and excessive installations can cause high overhead in the Old generation and Metaspace, triggering frequent FullGC. Therefore, it is necessary to control the size of individual module packages to be < 5MB. In this way, the base can hot deploy and hot unload hundreds of times without replacement or restarting.
The so-called “module slimming” means that the JAR dependencies already present in the base do not participate in the module packaging and construction, thus achieving the two benefits mentioned above:
- Increase the speed of module installation, reduce module package size, reduce startup dependencies, and control module installation time < 30 seconds, or even < 5 seconds.
- In the hot deploy and hot unload scenario, the base can hot deploy and hot unload hundreds of times without replacement or restart.
Slimming Principles
The principle of building the ark-biz jar package is to place common packages such as frameworks and middleware in the base as much as possible while ensuring the functionality of the module, and reuse the base packages in the module, making the resulting ark-biz jar more lightweight.
In different scenarios, complex applications can choose different slimming methods.
Scenarios and Corresponding Slimming Methods
Scenario 1: The base and the module have close cooperation, such as the middle platform mode/shared library mode
In the case of close cooperation between the base and modules, the modules should perceive some facade classes of the base and the dependency versions currently used by the base during development, and import the required dependencies as needed. During module packaging, only two types of dependencies should be included: dependencies that the base does not have, and dependencies whose versions are inconsistent with those of the base.
Therefore, the base needs to:
- Unified control over module dependency versions to let module developers know which dependencies the base has during development, to mitigate risks, and allow module developers to import part of the dependencies as needed without specifying versions.
The module needs to:
- Only include dependencies that are not in the base and dependencies whose versions are inconsistent with those of the base during packaging to reduce the cost of slimming the module
Step 1: Packaging “base-dependencies-starter”
Objective
This step will produce “base-dependencies-starter” for unified control of module dependency versions.
Pom configuration for base bootstrap:
Note: The dependencyArtifactId in the following configuration needs to be modified, generally to ${baseAppName}-dependencies-starter
<build>
<plugins>
    <plugin>
        <groupId>com.alipay.sofa.koupleless</groupId>
        <artifactId>koupleless-base-build-plugin</artifactId>
        <!--        koupleless.runtime.version >= 1.3.0 -->
        <version>${koupleless.runtime.version}</version>
        <configuration>
            <!-- Generate the artifactId of the starter (groupId consistent with the base), which needs to be modified here!! -->
            <dependencyArtifactId>${baseAppName}-dependencies-starter</dependencyArtifactId>
            <!-- Generate the version number of the jar -->
            <dependencyVersion>0.0.1-SNAPSHOT</dependencyVersion>
            <!-- For debugging, change to true to see the intermediate products of the packaging -->
            <cleanAfterPackageDependencies>false</cleanAfterPackageDependencies>
        </configuration>
    </plugin>
  </plugins>
</build>
Local test
- Pack the base-dependencies-starter jar: execute the command in the root directory of the base:
mvn com.alipay.sofa.koupleless:koupleless-base-build-plugin::packageDependency -f ${Relative path of the base bootstrap pom to the root directory of the base}
The constructed pom will be in the outputs directory and will be automatically installed in the local Maven repository.
Note, this step will not upload “base-dependencies-starter” to the maven repository. We welcome further discussion to supplement the solution of “uploading to the maven repository”.
Step 2: Module modification packaging plugin and parent
Objective
- When developing the module, use the “base-dependencies-starter” from Step 1 as the parent of the module project for unified management of dependency versions;
- Modify the module packaging plug-in to only include “dependencies not in the base” and “dependencies whose versions are inconsistent with those of the base” when packaging the module, eliminating the need to manually configure “provided” and achieving automatic slimming of the module.
In addition: For some dependencies, even if the module and base use the same dependency version, the dependency needs to be retained when the module is packaged, i.e., the module slimming dependency whitelist needs to be configured. This feature will be launched at the end of July.
Configure the parent in the module’s root directory pom:
<parent>
   <groupId>com.alipay</groupId>
   <artifactId>${baseAppName}-dependencies-starter</artifactId>
   <version>0.0.1-SNAPSHOT</version>
</parent>
Configure plugin in the module’s packaging pom:
<build>
   <plugins>
       <plugin>
           <groupId>com.alipay.sofa</groupId>
           <artifactId>sofa-ark-maven-plugin</artifactId>
           <!--           since ${sofa.ark.version} >= 2.2.13    -->
           <version>${sofa.ark.version}</version>
           <executions>
               <execution>
                   <id>default-cli</id>
                   <goals>
                       <goal>repackage</goal>
                   </goals>
               </execution>
           </executions>
           <configuration>
               <!-- Configure the identifier of "base-dependencies-starter", standardized as '${groupId}:${artifactId}':'version' -->
               <baseDependencyParentIdentity>com.alipay:${baseAppName}-dependencies-starter:0.0.1-SNAPSHOT</baseDependencyParentIdentity>
           </configuration>
       </plugin>
   </plugins>
</build>
Step 3: Configure Module Dependency Whitelist
For some dependencies, even if the module and base use the same version of the dependency, the dependency needs to be retained when the module is packaged. This requires configuring a module slimming dependency whitelist.
Configuration Procedure: Add the dependencies that need to be retained in the module project root directory/conf/ark/bootstrap.properties or module project root directory/conf/ark/bootstrap.yml. If these files do not exist, you can create the directories and files yourself. The following provides three different levels of configuration, which can be added according to the actual situation.
# includes config ${groupId}:${artifactId}, split by ','
includes=org.apache.commons:commons-lang3,commons-beanutils:commons-beanutils
# includeGroupIds config ${groupId}, split by ','
includeGroupIds=org.springframework
# includeArtifactIds config ${artifactId}, split by ','
includeArtifactIds=sofa-ark-spi
# includes config ${groupId}:${artifactId}
includes:
  - org.apache.commons:commons-lang3
  - commons-beanutils:commons-beanutils
# includeGroupIds config ${groupId}
includeGroupIds:
  - org.springframework
# includeArtifactIds config ${artifactId}
includeArtifactIds:
  - sofa-ark-spi
Step 4: Package Building
Scenario 2: The base and the module have loose cooperation, such as resource saving in multi-application merge deployment
In the case of loose cooperation between the base and the module, the module should not perceive the dependency versions currently used by the base during development, so the module needs to focus more on the low-cost access to module slimming. Dependencies that need to be excluded from module packaging can be configured.
Method 1: SOFAArk Configuration File Combining
Step 1
SOFAArk Module Slimming reads configuration from two places:
- “Module Project Root Directory/conf/ark/bootstrap.properties”, such as: my-module/conf/ark/bootstrap.properties
- “Module Project Root Directory/conf/ark/bootstrap.yml”, such as: my-module/conf/ark/bootstrap.yml
Configuration
bootstrap.properties (recommended)
Configure the common package of frameworks and middleware that need to be sunk to the base in “Module Project Root Directory/conf/ark/bootstrap.properties” in the following format, such as:
# excludes config ${groupId}:{artifactId}:{version}, split by ','
excludes=org.apache.commons:commons-lang3,commons-beanutils:commons-beanutils
# excludeGroupIds config ${groupId}, split by ','
excludeGroupIds=org.springframework
# excludeArtifactIds config ${artifactId}, split by ','
excludeArtifactIds=sofa-ark-spi
bootstrap.yml (recommended)
Configure the common package of frameworks and middleware that need to be sunk to the base in “Module Project Root Directory/conf/ark/bootstrap.yml” in the following format, such as:
# excludes config ${groupId}:{artifactId}:{version}, split by '-'
# excludeGroupIds config ${groupId}, split by '-'
# excludeArtifactIds config ${artifactId}, split by '-'
excludes:
  - org.apache.commons:commons-lang3
  - commons-beanutils:commons-beanutils
excludeGroupIds:
  - org.springframework
excludeArtifactIds:
  - sofa-ark-spi
Step 2
Upgrade the module packaging plug-in sofa-ark-maven-plugin version >= 2.2.12
    <!-- Plugin 1: Packaging plug-in for sofa-ark biz to package as ark biz jar -->
    <plugin>
        <groupId>com.alipay.sofa</groupId>
        <artifactId>sofa-ark-maven-plugin</artifactId>
        <version>${sofa.ark.version}</version>
        <executions>
            <execution>
                <id>default-cli</id>
                <goals>
                    <goal>repackage</goal>
                </goals>
            </execution>
        </executions>
        <configuration>
            <skipArkExecutable>true</skipArkExecutable>
            <outputDirectory>./target</outputDirectory>
            <bizName>biz1</bizName>
            <webContextPath>biz1</webContextPath>
            <declaredMode>true</declaredMode>
        </configuration>
    </plugin>
Step 3
Simply build the module ark-biz jar package, and you will see a significant difference in the size of the slimmed ark-biz jar package.
You can click here to view the complete example project for module slimming.
3 - 4.3.3 Module Startup
Module Startup Parameters
Modules can be deployed in two ways: static merged deployment and hot deployment.
Static merged deployment does not support configuration startup parameters. Most of the startup parameters for the module can be placed in the module configuration (application.properties); for example, when configuring the profile: change the startup parameter --spring.profiles.active=dev to spring.profiles.active=true in the application.properties file.
Hot deployment modules support configuration of startup parameters. For example, when using Arklet to install a module via a web request, you can configure startup parameters and environment variables:
curl --location --request POST 'localhost:1238/installBiz' \
--header 'Content-Type: application/json' \
--data '{
    "bizName": "${Module Name}",
    "bizVersion": "${Module Version}",
    "bizUrl": "file:///path/to/ark/biz/jar/target/xx-xxxx-ark-biz.jar",
    "args": ["--spring.profiles.active=dev"],
    "env": {
        "XXX": "YYY"
    }
}'
Module Startup Acceleration
Design Concept for Module Startup Acceleration
The overall idea for module startup acceleration is:
- The base platform should start the services in advance, which only requires the base platform to pre-import the dependencies.
- The module can reuse the base platform’s services in various ways. The methods for reusing the base services include, but are not limited to, analyzing the specific use case; if there are any questions, feel free to discuss in the community group:
- Reuse through sharing class static variables.
- Reuse by having the base platform encapsulate some service interface APIs, allowing the module to call these APIs directly.
- Obtain proxy objects of base platform objects through annotations, using tools provided by Koupleless like
@AutowiredFromBase,@AutowiredFromBiz,SpringServiceFinder, and some annotations supporting JVM service calls provided by Dubbo or SOFARpc. - Find objects across modules to directly obtain base platform objects, using tools like
SpringBeanFinderprovided by Koupleless. There is an implicit issue here: for modules to successfully invoke base platform services, they need to use certain model classes. Therefore, modules typically need to import the dependencies corresponding to those services, leading to these service configurations being scanned during module startup, which may result in reinitializing these services. This can cause unnecessary services to start and slow down the module startup, increasing memory consumption. Thus, to accelerate module startup, three tasks must be completed:
- The base platform should start the services in advance.
- The module should prohibit the startup of these services, which is the focus of this article.
- The module should reuse base platform services.
How Modules Can Prohibit Startup of Certain Services
Starting from version 1.1.0, Koupleless provides the following configuration capability:
koupleless.module.autoconfigure.exclude # Services that do not need to start during module startup
koupleless.module.autoconfigure.include # Services that need to start during module startup. If a service is configured with both include and exclude, the service will start.
This configuration can be set in the base platform or in the module. If configured in the base platform, it applies to all modules. If configured in the module, it only applies to that module and will override the configuration in the base platform.
Benchmark
Detailed benchmark information is yet to be added.
4 - 4.3.4 Module Communication Module to Module and Module to Base Communication
Between the base and modules, and among modules, there is spring context isolation, meaning their beans do not conflict and are not visible to each other. However, in many scenarios such as the middleware mode and independent module mode, there are situations where the base calls the module, the module calls the base, and modules call each other. Currently, three methods are supported for invocation: @AutowiredFromBiz, @AutowiredFromBase, and SpringServiceFinder method calls. Note that the usage of these three methods varies.
Spring Environment
Importing Dependencies in Modules
<dependency>
    <groupId>com.alipay.koupleless</groupId>
    <artifactId>koupleless-app-starter</artifactId>
    <version>0.5.6</version>
    <scope>provided</scope>
</dependency>
Base Calling Module
Only SpringServiceFinder can be used.
@RestController
public class SampleController {

    @RequestMapping(value = "/", method = RequestMethod.GET)
    public String hello() {

        Provider studentProvider = SpringServiceFinder.getModuleService("biz", "0.0.1-SNAPSHOT",
                "studentProvider", Provider.class);
        Result result = studentProvider.provide(new Param());

        Provider teacherProvider = SpringServiceFinder.getModuleService("biz", "0.0.1-SNAPSHOT",
                "teacherProvider", Provider.class);
        Result result1 = teacherProvider.provide(new Param());

        Map<String, Provider> providerMap = SpringServiceFinder.listModuleServices("biz", "0.0.1-SNAPSHOT",
                Provider.class);
        for (String beanName : providerMap.keySet()) {
            Result result2 = providerMap.get(beanName).provide(new Param());
        }

        return "hello to ark master biz";
    }
}
Module Calling Base
Method 1: Annotation @AutowiredFromBase
@RestController
public class SampleController {

    @AutowiredFromBase(name = "sampleServiceImplNew")
    private SampleService sampleServiceImplNew;

    @AutowiredFromBase(name = "sampleServiceImpl")
    private SampleService sampleServiceImpl;

    @AutowiredFromBase
    private List<SampleService> sampleServiceList;

    @AutowiredFromBase
    private Map<String, SampleService> sampleServiceMap;

    @AutowiredFromBase
    private AppService appService;

    @RequestMapping(value = "/", method = RequestMethod.GET)
    public String hello() {

        sampleServiceImplNew.service();

        sampleServiceImpl.service();

        for (SampleService sampleService : sampleServiceList) {
            sampleService.service();
        }

        for (String beanName : sampleServiceMap.keySet()) {
            sampleServiceMap.get(beanName).service();
        }

        appService.getAppName();

        return "hello to ark2 dynamic deploy";
    }
}
Method 2: Programming API SpringServiceFinder
@RestController
public class SampleController {

    @RequestMapping(value = "/", method = RequestMethod.GET)
    public String hello() {

        SampleService sampleServiceImplFromFinder = SpringServiceFinder.getBaseService("sampleServiceImpl", SampleService.class);
        String result = sampleServiceImplFromFinder.service();
        System.out.println(result);

        Map<String, SampleService> sampleServiceMapFromFinder = SpringServiceFinder.listBaseServices(SampleService.class);
        for (String beanName : sampleServiceMapFromFinder.keySet()) {
            String result1 = sampleServiceMapFromFinder.get(beanName).service();
            System.out.println(result1);
        }

        return "hello to ark2 dynamic deploy";
    }
}
Module Calling Module
Referencing the module calling the base, the annotation is used with @AutowiredFromBiz and the programming API is supported by SpringServiceFinder.
Method 1: Annotation @AutowiredFromBiz
@RestController
public class SampleController {

    @AutowiredFromBiz(bizName = "biz", bizVersion = "0.0.1-SNAPSHOT", name = "studentProvider")
    private Provider studentProvider;

    @AutowiredFromBiz(bizName = "biz", name = "teacherProvider")
    private Provider teacherProvider;

    @AutowiredFromBiz(bizName = "biz", bizVersion = "0.0.1-SNAPSHOT")
    private List<Provider> providers;

    @RequestMapping(value = "/", method = RequestMethod.GET)
    public String hello() {

        Result provide = studentProvider.provide(new Param());

        Result provide1 = teacherProvider.provide(new Param());

        for (Provider provider : providers) {
            Result provide2 = provider.provide(new Param());
        }

        return "hello to ark2 dynamic deploy";
    }
}
Method 2: Programming API SpringServiceFinder
@RestController
public class SampleController {

    @RequestMapping(value = "/", method = RequestMethod.GET)
    public String hello() {

        Provider teacherProvider1 = SpringServiceFinder.getModuleService("biz", "0.0.1-SNAPSHOT", "teacherProvider", Provider.class);
        Result result1 = teacherProvider1.provide(new Param());

        Map<String, Provider> providerMap = SpringServiceFinder.listModuleServices("biz", "0.0.1-SNAPSHOT", Provider.class);
        for (String beanName : providerMap.keySet()) {
            Result result2 = providerMap.get(beanName).provide(new Param());
        }

        return "hello to ark2 dynamic deploy";
    }
}
SOFABoot Environment
Please refer to this documentation
5 - 4.3.5 Module Local Development and Debugging
Arkctl Tool Installation
The Arkctl module installation mainly provides automated packaging and deployment capabilities, including invoking the mvn command to automatically build the module as a JAR file and calling the API interface provided by Arklet for completion of deployment. The installation method for Arkctl can refer to the documentation: arkctl Installation in the Local Environment Development Verification section.
Installation Method 1: Using the Golang Toolchain
- Download the corresponding version of Golang from the Golang official website; the version must be above 1.21.
- Execute the command
go install github.com/koupleless/arkctl@v0.2.1to install the Arkctl tool.
Installation Method 2: Downloading Binary Files
- Download Arkctl based on the actual operating system. Download Arkctl.
- Unzip the corresponding binary file and place it in a directory that is included in the system’s PATH variable.
- After the base and module have been modified and the base has been started, the Arkctl tool can be used to quickly complete the build and deployment of the module into the base.
How to Find the PATH Value on Linux/Mac?
Execute in the terminal:
echo $PATH
# Choose a directory and place arkctl in that directory
How to Find the PATH Value on Windows?
Press Windows + R, type cmd, and then press Enter to open the command prompt. In the command prompt window, enter the following command and press Enter:
echo %PATH%
Note: In the Windows environment, if Windows Defender is enabled, it may falsely report issues when downloading binaries through the browser, as shown below:

You can refer to the [Go official documentation](https://go.dev/doc/faq#virus) for the reason behind the error. This error can be ignored; feel free to download. > Since Arkctl deployment is actually completed by calling the API, if you prefer not to use the command-line tool, you can directly use the Arklet [API interface](/docs/contribution-guidelines/arklet/architecture) to complete the deployment operation. We also provide a telnet method for module deployment; [detailed instructions can be found here](https://www.sofastack.tech/projects/sofa-boot/sofa-ark-ark-telnet/).
Local Quick Deployment
You can use the Arkctl tool to quickly build and deploy modules, improving the efficiency of local debugging and development.
Scenario 1: Building a Module JAR and Deploying to a Locally Running Base.
Preparation:
- Start a base locally.
- Open a module project repository.
Execute the command:
# This needs to be executed in the root directory of the repository.
# For example, if it is a Maven project, execute it in the directory where the root pom.xml is located.
arkctl deploy
Once the command completes, it is successfully deployed, and the user can debug and validate the relevant module functionalities.
Scenario 2: Deploying a Locally Built JAR to a Locally Running Base.
Preparation:
- Start a base locally.
- Prepare a built JAR file.
Execute the command:
arkctl deploy /path/to/your/pre/built/bundle-biz.jar
Once the command completes, it is successfully deployed, and the user can debug and validate the relevant module functionalities.
Scenario 3: Deploying a Locally Unbuilt JAR to a Locally Running Base.
Preparation:
- Start a base locally.
Execute the command:
arkctl deploy ./path/to/your/biz/
Note: This command is applicable if the module can be built independently (e.g., if commands like mvn package can be successfully executed in the biz directory), the command will automatically build the module and deploy it to the base.
Scenario 4: Building and Deploying Submodule JARs in a Multi-Module Maven Project from the Root.
Preparation:
- Start a base locally.
- Open a multi-module Maven project repository.
Execute the command:
# This needs to be executed in the root directory of the repository.
# For example, if it is a Maven project, execute it in the directory where the root pom.xml is located.
arkctl deploy --sub ./path/to/your/sub/module
Once the command completes, it is successfully deployed, and the user can debug and validate the relevant module functionalities.
Scenario 5: Building a Module JAR and Deploying to a Remote Running K8s Base.
Preparation:
- Ensure that a base pod is already running remotely.
- Open a module project repository.
- You must have a K8s certificate with exec permissions and the kubectl command-line tool available locally.
Execute the command:
# This needs to be executed in the root directory of the repository.
# For example, if it is a Maven project, execute it in the directory where the root pom.xml is located.
arkctl deploy --pod {namespace}/{podName}
Once the command completes, it is successfully deployed, and the user can debug and validate the relevant module functionalities.
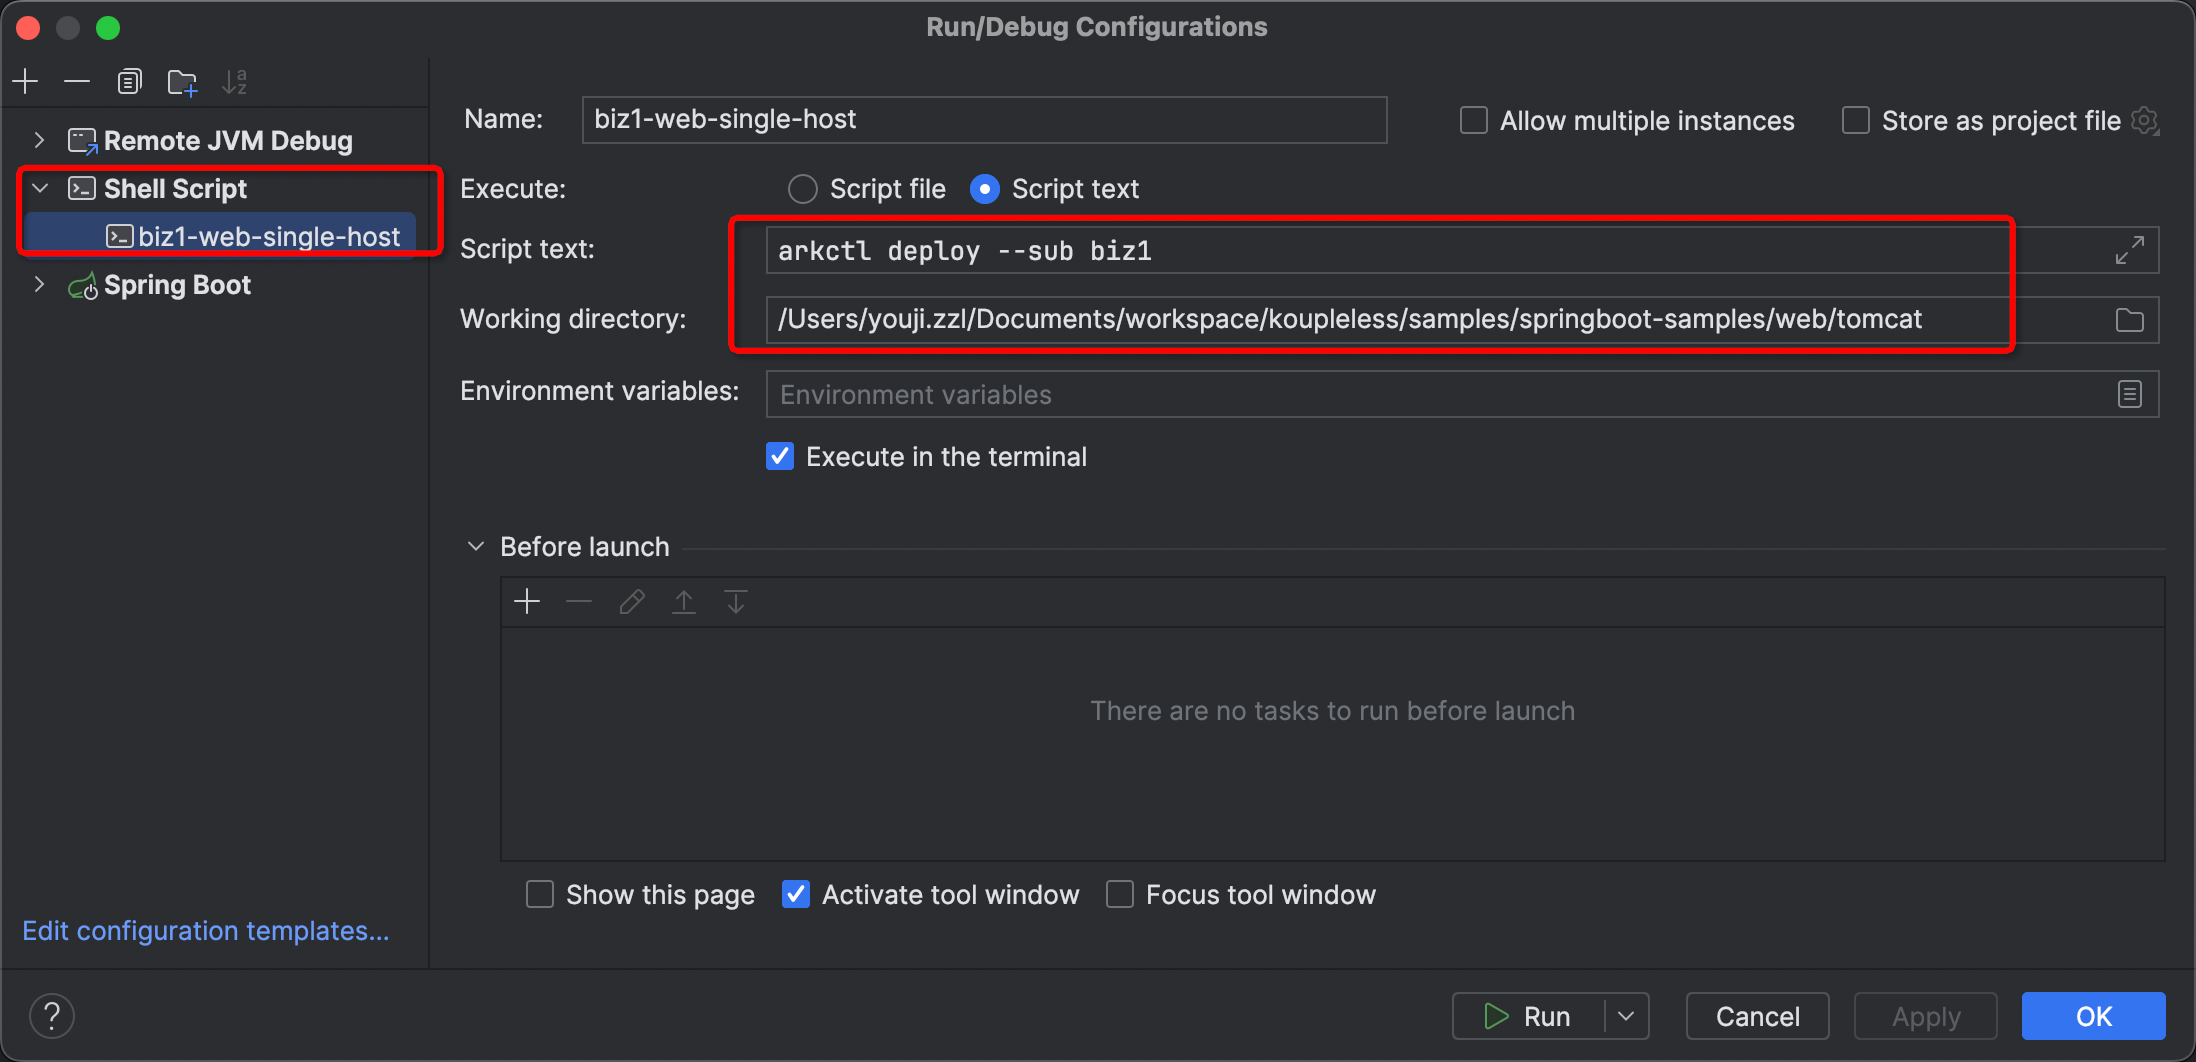
Scenario 6: How to Use This Command More Quickly
You can create a Shell Script in IDEA, set the running directory, and then enter the corresponding Arkctl command as shown in the image below.
Local Module Debugging
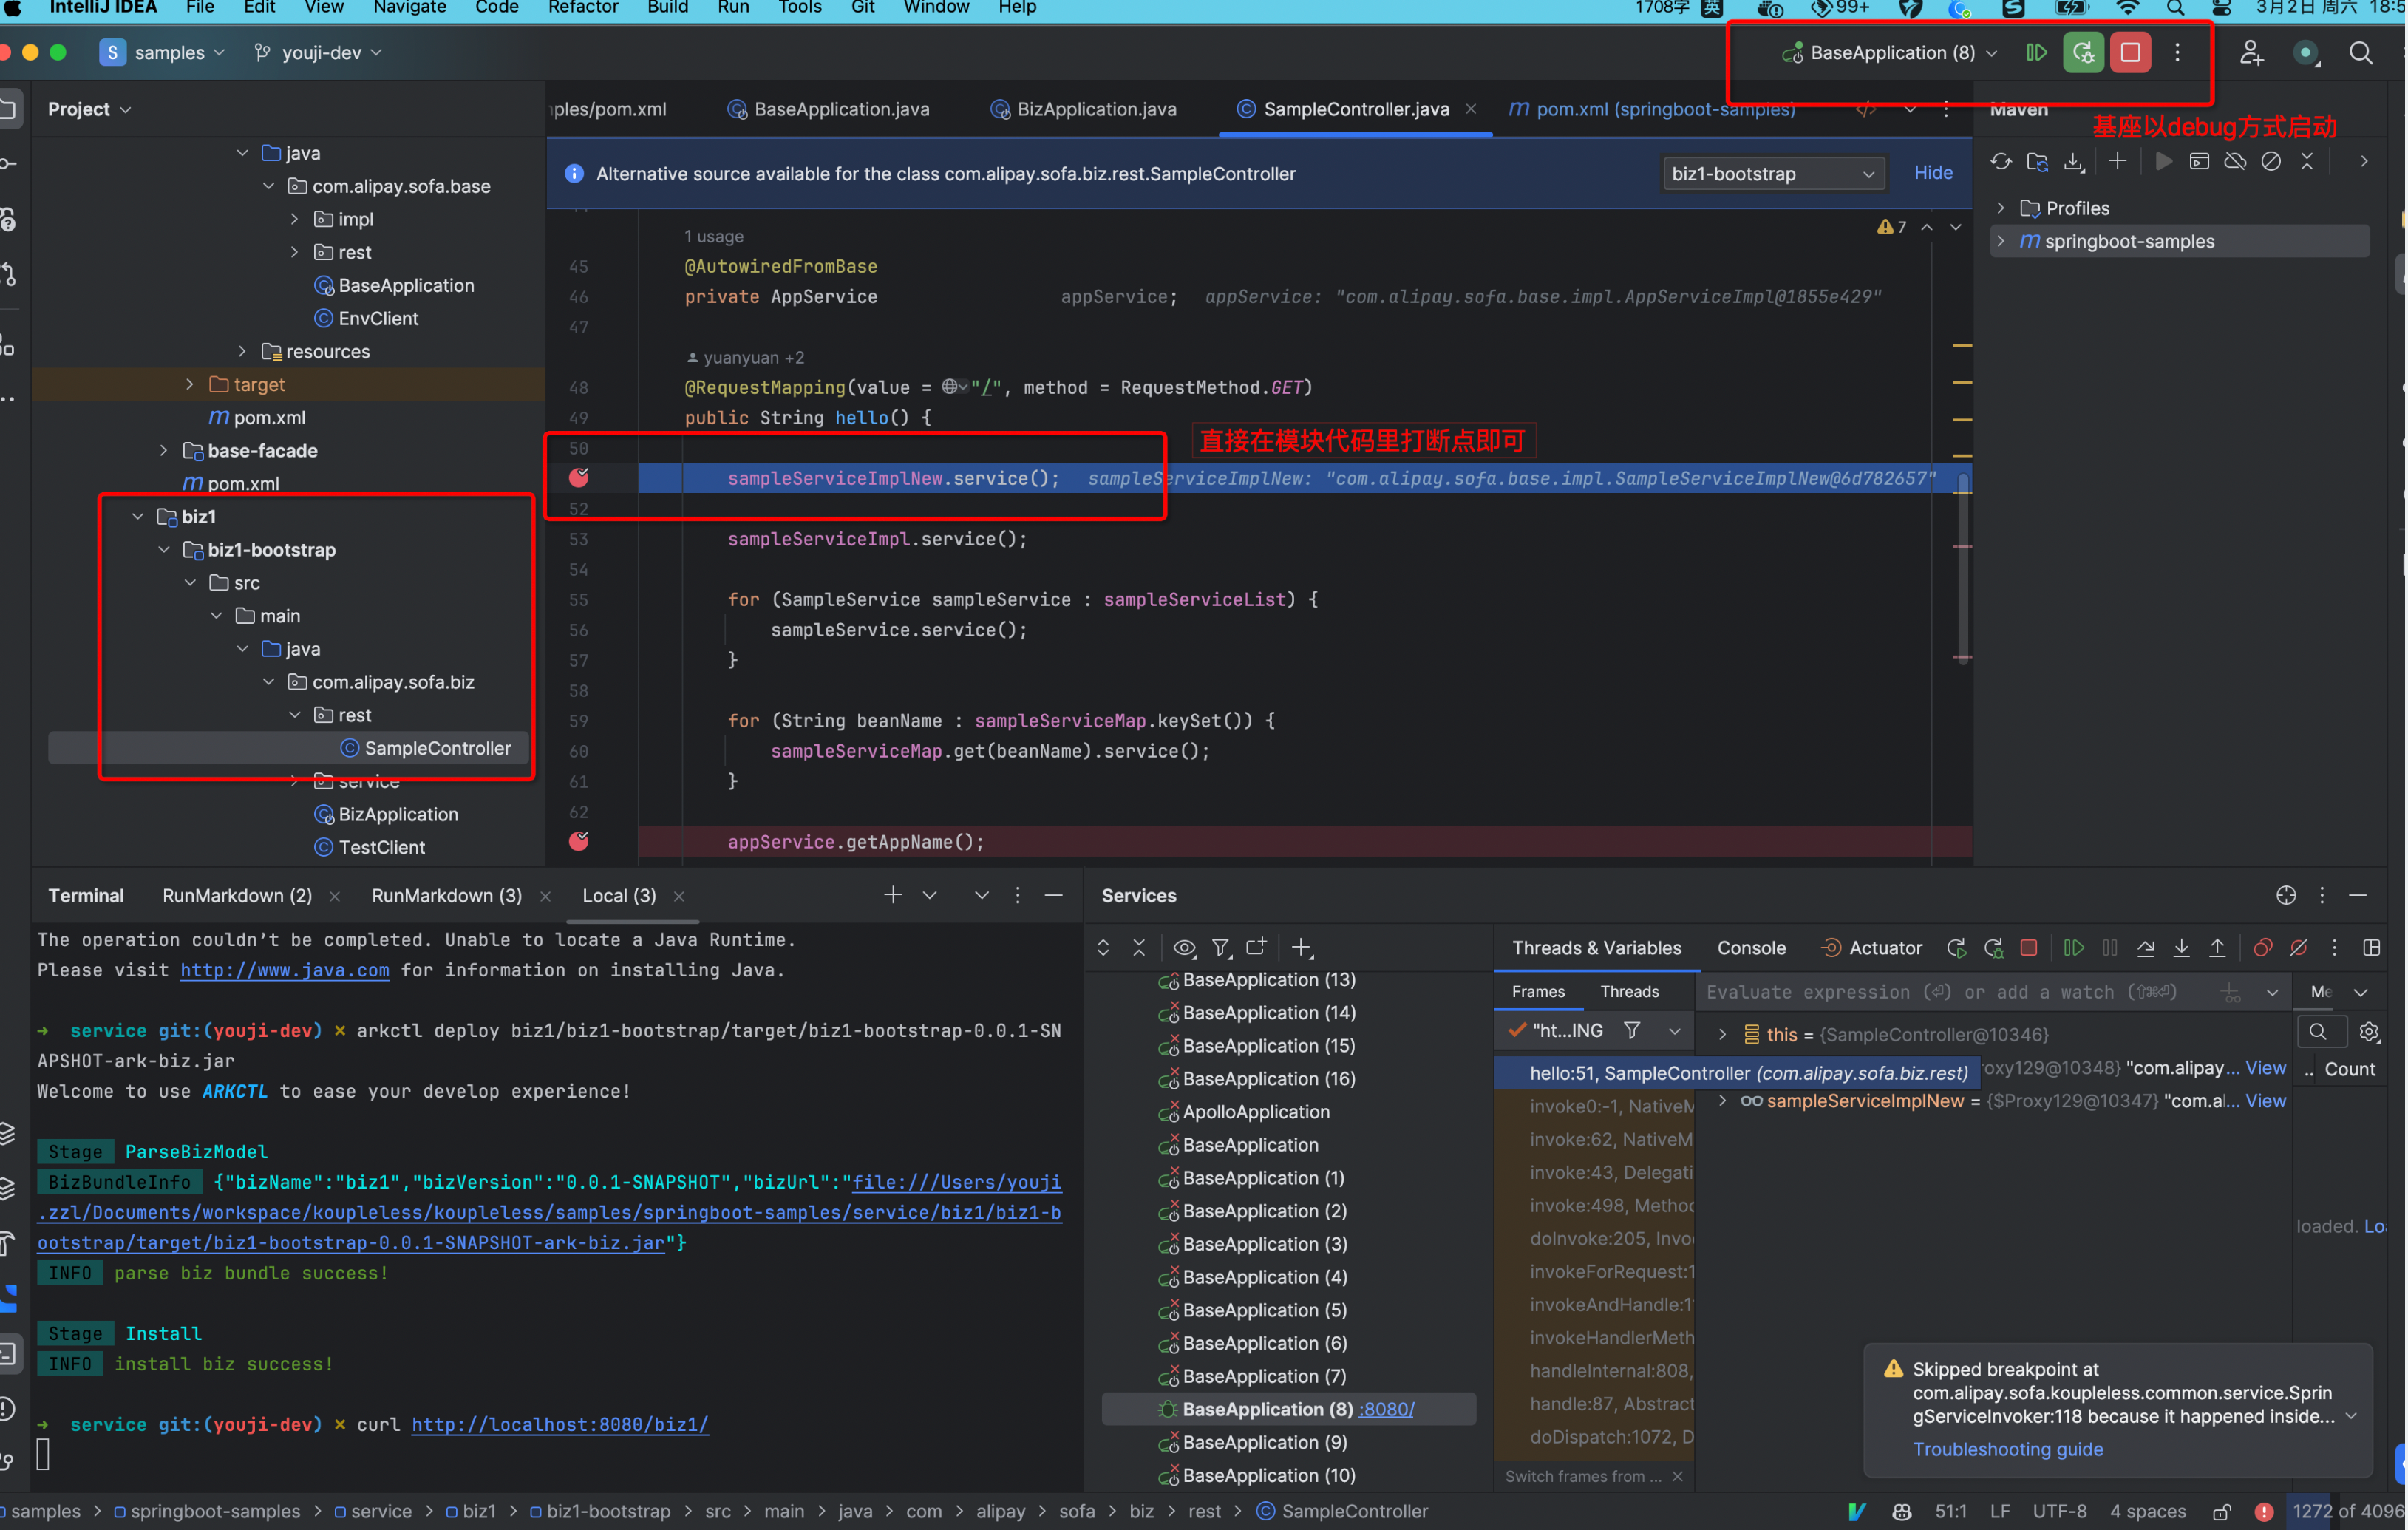
Module and Base in the Same IDEA Project
Since the IDEA project can see the module code, debugging the module is no different from normal debugging. Just set breakpoints in the module code and start the base in debug mode.
Module and Base in Different IDEA Projects
- Add the debug configuration to the base startup parameters:
-agentlib:jdwp=transport=dt_socket,server=y,suspend=n,address=8000, then start the base. - Add remote JVM debug to the module, setting host to localhost:
-agentlib:jdwp=transport=dt_socket,server=y,suspend=n,address=8000. - Set breakpoints in the module.
- After installing the module, you can begin debugging.
Checking Deployment Status
Scenario 1: Querying Modules Already Deployed in the Current Base.
Preparation:
- Start a base locally.
Execute the command:
arkctl status
Scenario 2: Querying Modules Already Deployed in the Remote K8s Environment Base.
Preparation:
- Start a base in the remote K8s environment.
- Ensure you have Kube certificates and the necessary permissions locally.
Execute the command:
arkctl status --pod {namespace}/{name}
Viewing Runtime Module Status and Information Using Arthas
Retrieve All Biz Information
vmtool -x 1 --action getInstances --className com.alipay.sofa.ark.container.model.BizModel --limit 100
For example:
Retrieve Specific Biz Information
# Please replace ${bizName}
vmtool -x 1 --action getInstances --className com.alipay.sofa.ark.container.model.BizModel --limit 100 | grep ${bizName} -A 4
For example:
Retrieve Biz Information Corresponding to a Specific BizClassLoader
# Please replace ${BizClassLoaderHashCode}
vmtool -x 1 --action getInstances --className com.alipay.sofa.ark.container.model.BizModel --limit 100 | grep ${BizClassLoaderHashCode} -B 1 -A 3
For example:
6 - 4.3.6 Reusing Base Data Source
Recommendation
It is highly recommended to use the approach outlined in this document to reuse the base data source within the module whenever possible. Failing to do so may result in repeated creation and consumption of data source connections during module deployments, leading to slower module publishing and operations, as well as increased memory usage.
SpringBoot Solution
Simply create a MybatisConfig class in the module’s code. This way, the transaction template is reused from the base, and only the Mybatis SqlSessionFactoryBean needs to be newly created. Refer to the demo: /koupleless/samples/springboot-samples/db/mybatis/biz1
Use SpringBeanFinder.getBaseBean to obtain the base Bean object, and then register it as the module’s Bean:
@Configuration
@MapperScan(basePackages = "com.alipay.sofa.biz1.mapper", sqlSessionFactoryRef = "mysqlSqlFactory")
@EnableTransactionManagement
public class MybatisConfig {

    // Note: Do not initialize a base DataSource, as it will be destroyed when the module is uninstalled.
    // However, resources such as transactionManager, transactionTemplate, and mysqlSqlFactory can be safely destroyed.

    @Bean(name = "transactionManager")
    public PlatformTransactionManager platformTransactionManager() {
        return (PlatformTransactionManager) getBaseBean("transactionManager");
    }

    @Bean(name = "transactionTemplate")
    public TransactionTemplate transactionTemplate() {
        return (TransactionTemplate) getBaseBean("transactionTemplate");
    }

    @Bean(name = "mysqlSqlFactory")
    public SqlSessionFactoryBean mysqlSqlFactory() throws IOException {
        // The data source cannot be declared as a bean in the module's Spring context, as it will be closed when the module is uninstalled.

        DataSource dataSource = (DataSource) getBaseBean("dataSource");
        SqlSessionFactoryBean mysqlSqlFactory = new SqlSessionFactoryBean();
        mysqlSqlFactory.setDataSource(dataSource);
        mysqlSqlFactory.setMapperLocations(new PathMatchingResourcePatternResolver()
                .getResources("classpath:mappers/*.xml"));
        return mysqlSqlFactory;
    }
}
SOFABoot Solution
If the SOFABoot base does not enable multi-bundle (there is no MANIFEST.MF file in the Package), the solution is identical to the SpringBoot solution mentioned above. If there is a MANIFEST.MF file, you need to call BaseAppUtils.getBeanOfBundle to obtain the base Bean, where BASE_DAL_BUNDLE_NAME is theModule-Name in the MANIFEST.MF file:
@Configuration
@MapperScan(basePackages = "com.alipay.koupleless.dal.dao", sqlSessionFactoryRef = "mysqlSqlFactory")
@EnableTransactionManagement
public class MybatisConfig {

    // Note: Do not initialize a base DataSource, as it will be destroyed when the module is uninstalled.
    // However, resources such as transactionManager, transactionTemplate, and mysqlSqlFactory can be safely destroyed

    private static final String BASE_DAL_BUNDLE_NAME = "com.alipay.koupleless.dal"

    @Bean(name = "transactionManager")
    public PlatformTransactionManager platformTransactionManager() {
        return (PlatformTransactionManager) BaseAppUtils.getBeanOfBundle("transactionManager",BASE_DAL_BUNDLE_NAME);
    }

    @Bean(name = "transactionTemplate")
    public TransactionTemplate transactionTemplate() {
        return (TransactionTemplate) BaseAppUtils.getBeanOfBundle("transactionTemplate",BASE_DAL_BUNDLE_NAME);
    }

    @Bean(name = "mysqlSqlFactory")
    public SqlSessionFactoryBean mysqlSqlFactory() throws IOException {
        // The data source cannot be declared as a bean in the module's Spring context, as it will be closed when the module is uninstalled.
        ZdalDataSource dataSource = (ZdalDataSource) BaseAppUtils.getBeanOfBundle("dataSource",BASE_DAL_BUNDLE_NAME);
        SqlSessionFactoryBean mysqlSqlFactory = new SqlSessionFactoryBean();
        mysqlSqlFactory.setDataSource(dataSource);
        mysqlSqlFactory.setMapperLocations(new PathMatchingResourcePatternResolver()
                .getResources("classpath:mapper/*.xml"));
        return mysqlSqlFactory;
    }
}
7 - 4.3.7 Reusing Base Interceptors
Objective
In the base, many Aspect interceptors (Spring interceptors) are defined, and you may want to reuse them in the module. However, the Spring contexts of the module and the base are isolated, which means that Aspect interceptors will not take effect in the module.
Solution
Create a proxy object for the original interceptor class, allowing the module to invoke this proxy object. Then, the module initializes this proxy object through the AutoConfiguration annotation. The complete steps and example code are as follows:
Step 1:
The base code defines an interface that defines the execution method of the interceptor. This interface needs to be visible to the module (referenced in the module dependencies):
public interface AnnotionService {
    Object doAround(ProceedingJoinPoint joinPoint) throws Throwable;
}
Step 2:
Write the specific implementation of the interceptor in the base. This implementation class needs to be annotated with @SofaService (SOFABoot) or @SpringService (SpringBoot, under construction):
@Service
@SofaService(uniqueId = "facadeAroundHandler")
public class FacadeAroundHandler implements AnnotionService {

    private final static Logger LOG = LoggerConst.MY_LOGGER;

    public Object doAround(ProceedingJoinPoint joinPoint) throws Throwable {
        log.info("Start execution")
        joinPoint.proceed();
        log.info("Execution completed")
    }
}
Step 3:
In the module, use the @Aspect annotation to implement an Aspect. SOFABoot injects the FacadeAroundHandler on the base via @SofaReference. If it is SpringBoot, then use @AutowiredFromBase to inject FacadeAroundHandler on the base.
Note: Do not declare this as a bean, do not add @Component or @Service annotation, only @Aspect annotation is needed.
// Note: Do not declare this as a bean, do not add @Component or @Service annotation
@Aspect
public class FacadeAroundAspect {

    // If it is SOFABoot, use @SofaReference; if it is SpringBoot, use @AutowiredFromBase.
    @SofaReference(uniqueId = "facadeAroundHandler")
    //@AutowiredFromBase
    private AnnotionService facadeAroundHandler;

    @Pointcut("@annotation(com.alipay.linglongmng.presentation.mvc.interceptor.FacadeAround)")
    public void facadeAroundPointcut() {
    }

    @Around("facadeAroundPointcut()")
    public Object doAround(ProceedingJoinPoint joinPoint) throws Throwable {
        return facadeAroundHandler.doAround(joinPoint);
    }
}
Step 4:
Use the @Configuration annotation to create a Configuration class, and declare the aspectj objects needed by the module as Spring Beans.
Note: This Configuration class needs to be visible to the module, and related Spring Jar dependencies need to be imported with
@Configuration
public class MngAspectConfiguration {
    @Bean
    public FacadeAroundAspect facadeAroundAspect() {
        return new FacadeAroundAspect();
    }
    @Bean
    public EnvRouteAspect envRouteAspect() {
        return new EnvRouteAspect();
    }
    @Bean
    public FacadeAroundAspect facadeAroundAspect() {
        return new FacadeAroundAspect();
    }

}
Step 5:
Explicitly depend on the Configuration class MngAspectConfiguration created in step 4 in the module code.
@SpringBootApplication
@ImportResource("classpath*:META-INF/spring/*.xml")
@ImportAutoConfiguration(value = {MngAspectConfiguration.class})
public class ModuleBootstrapApplication {
    public static void main(String[] args) {
        SpringApplicationBuilder builder = new SpringApplicationBuilder(ModuleBootstrapApplication.class)
        	.web(WebApplicationType.NONE);
        builder.build().run(args);
    }
}
8 - 4.3.8 Thread Pool Usage
Background
When multiple modules or a module and a base share the same thread pool, the Classloader used by the thread executing a task in the thread pool may differ from the Classloader that was used when the task was created. This can lead to a ClassNotFoundException when the thread pool executes the task.
As a result, when multiple modules or a module and a base share the same thread pool, in order to ensure consistency between the Classloader used during task execution and the Classloader used at the creation of the task, we need to make some modifications to the thread pool.
⚠️Note: There will be no such issue if each module uses its own thread pool.
There are 4 common ways to use thread pools in Java:
- Directly create thread tasks and submit them to the thread pool, such as: Runnable, Callable, ForkJoinTask
- Customize ThreadPoolExecutor and submit tasks to ThreadPoolExecutor
- Use ThreadPoolExecutor or ScheduledThreadPoolExecutor from the third-party libraries.
- Create thread pools through Executors and submit tasks to ExecutorService, ScheduledExecutorService, ForkJoinPool
- For SpringBoot users, submit tasks to ThreadPoolTaskExecutor, SchedulerThreadPoolTaskExecutor
This article will introduce how each method is used on Koupleless.
How to Use
1. Directly create thread tasks and submit them to the thread pool
The original method:
threadPool.execute(new Runnable(){
    public void run() {
        //do something
    }
});


threadPool.execute(new Callable<String>(){
public String call() {
        //do something
        return "mock";
 }
});
If the threadPool remains unchanged, then it is necessary to wrap Runnable as KouplelessRunnable and Callable as KouplelessCallable, as follows:
// Runnable
// wrap function:
threadPool.execute(KouplelessRunnable.wrap(new Runnable(){
    public void run() {
        //do something
    }
});

// or new KouplelessRunnable:
threadPool.execute(new KouplelessRunnable(){
    public void run() {
        //do something
    }
});

// Runnable
// wrap function:
threadPool.execute(KouplelessCallable.wrap(new Callable<String>(){
    public String call() {
        //do something
        return "mock";
    }
});

// or new KouplelessRunnable
threadPool.execute(new KouplelessCallable<String>(){
    public String call() {
        //do something
        return "mock";
    }
});
2. Customize ThreadPoolExecutor
The original method:
ThreadPoolExecutor threadPool = new ThreadPoolExecutor(5, 5, 0L, TimeUnit.MILLISECONDS, new LinkedBlockingQueue<Runnable>());

threadPool.execute(new Runnable(){
    public void run() {
        //do something
    }
});


threadPool.execute(new Callable<String>(){
public String call() {
        //do something
        return "mock";
 }
});
To keep Runnable and Callable unchanged, there are two ways to modify:
- Change threadPool to KouplelessThreadPoolExecutor
- Or use kouplelessExecutorService.
First, let’s take an example of the first modification method: change threadPool to KouplelessThreadPoolExecutor. As follows:
// modify ThreadPoolExecutor as KouplelessThreadPoolExecutor
ThreadPoolExecutor threadPool = new KouplelessThreadPoolExecutor(5, 5, 0L, TimeUnit.MILLISECONDS, new LinkedBlockingQueue<Runnable>());

threadPool.execute(new Runnable(){
    public void run() {
        //do something
    }
});


threadPool.execute(new Callable<String>(){
public String call() {
        //do something
        return "mock";
 }
});
Then, illustrate the second method of modification: using kouplelessExecutorService. As follows:
// use kouplelessExecutorService
ExecutorService executor        = new KouplelessExecutorService(new ThreadPoolExecutor(5, 5, 0L, TimeUnit.MILLISECONDS, new LinkedBlockingQueue<Runnable>()));

// use executor to execute task
executor.execute(new Runnable(){
    public void run() {
        //do something
    }
});
executor.execute(new Callable<String>(){
public String call() {
        //do something
        return "mock";
 }
});
3. Use ThreadPoolExecutor or ScheduledThreadPoolExecutor from the third-party libraries.
The original method:
ThreadPoolExecutorA executorService = new ThreadPoolExecutorA();

executorService.execute(new Runnable(){
    public void run() {
        //do something
    }
});


executorService.execute(new Callable<String>(){
public String call() {
        //do something
        return "mock";
 }
});

ScheduledThreadPoolExecutorA scheduledExecutorService = new ScheduledThreadPoolExecutorA();

scheduledExecutorService.execute(new Runnable(){
    public void run() {
        //do something
    }
});

scheduledExecutorService.execute(new Callable<String>(){
    public String call() {
        //do something
        return "mock";
    }
});
To keep Runnable and Callable unchanged, it is necessary to use kouplelessExecutorService and kouplelessScheduledExecutorService, as follows:
// use KouplelessExecutorService
        ExecutorService executor        = new KouplelessExecutorService(new ThreadPoolExecutorA());

// use executor to execute tasks
executor.execute(new Runnable(){
    public void run() {
        //do something
    }
});
executor.execute(new Callable<String>(){
    public String call() {
        //do something
    return "mock";
    }
});

// use scheduledExecutorService
ScheduledExecutorService scheduledExecutor = new KouplelessScheduledExecutorService(new ScheduledThreadPoolExecutorA());

// use scheduledExecutor to execute tasks
scheduledExecutor.execute(new Runnable(){
    public void run() {
        //do something
    }
});
scheduledExecutor.execute(new Callable<String>(){
    public String call() {
        //do something
        return "mock";
    }
});
4. Create thread pools through Executors
The original method:
ExecutorService executorService = Executors.newFixedThreadPool(6);

executorService.execute(new Runnable(){
    public void run() {
        //do something
    }
});


executorService.execute(new Callable<String>(){
public String call() {
        //do something
        return "mock";
 }
});

ScheduledExecutorService scheduledExecutorService = Executors.newSingleThreadScheduledExecutor();

scheduledExecutorService.execute(new Runnable(){
    public void run() {
        //do something
    }
});

scheduledExecutorService.execute(new Callable<String>(){
    public String call() {
        //do something
        return "mock";
    }
});
To keep Runnable and Callable unchanged, it is necessary to use kouplelessExecutorService and kouplelessScheduledExecutorService, as follows:
// use KouplelessExecutorService
ExecutorService executor        = new KouplelessExecutorService(Executors.newFixedThreadPool(6));

// use executor to execute tasks
executor.execute(new Runnable(){
    public void run() {
        //do something
    }
});
executor.execute(new Callable<String>(){
    public String call() {
        //do something
    return "mock";
    }
});

// use KouplelessScheduledExecutorService
ScheduledExecutorService scheduledExecutor = new KouplelessScheduledExecutorService(Executors.newSingleThreadScheduledExecutor());

// use scheduledExecutor to execute tasks
scheduledExecutor.execute(new Runnable(){
    public void run() {
        //do something
    }
});
scheduledExecutor.execute(new Callable<String>(){
    public String call() {
        //do something
        return "mock";
    }
});
5. For SpringBoot users, submit tasks to ThreadPoolTaskExecutor, SchedulerThreadPoolTaskExecutor
Due to koupeless having already adapted ThreadPoolTaskExecutor and SchedulerThreadPoolTaskExecutor for springboot (2.3.0-2.7.x), they can be used directly.
@Autowired
private ThreadPoolTaskExecutor threadPoolTaskExecutor;

@Autowired
private SchedulerThreadPoolTaskExecutor schedulerThreadPoolTaskExecutor;

threadPoolTaskExecutor.execute(new Runnable(){
    public void run() {
        //do something
    }
});

schedulerThreadPoolTaskExecutor.execute(new Runnable(){
    public void run() {
        //do something
    }
});
9 - 4.3.9 Multiple Configurations for Modules
Why Use Multiple Configurations
In different scenarios, a module’s code may be deployed to different applications but require different configurations.
How to Use
Step 1: When packaging a module’s code for different scenarios, configure different bizName, such as biz1, biz2.
<plugin>
    <groupId>com.alipay.sofa</groupId>
    <artifactId>sofa-ark-maven-plugin</artifactId>
    <version>${sofa.ark.version}</version>
    <executions>
        <execution>
            <id>default-cli</id>
            <goals>
                <goal>repackage</goal>
            </goals>
        </execution>
    </executions>
    <configuration>
        <!-- Configure different bizName for different scenarios, such as biz1, biz2 -->
        <bizName>biz1</bizName>
        <!-- ... Other properties -->
    </configuration>
</plugin>
Step 2: In the resources directory of the module, add the following files, where config , biz1 and biz2 are folders:
config/biz1/application.propertiesconfig/biz2/application.propertiesStep 3: Package two differentark-bizfiles with differentbizNamevalues (biz1,biz2):biz1-0.0.1-SNAPSHOT-ark-biz.jarbiz2-0.0.1-SNAPSHOT-ark-biz.jarStep 4: Install the correspondingark-bizmodule for different scenarios. When the module starts, it will read the configuration files based on thebizNamevalue:config/biz1/application.propertiesconfig/biz2/application.properties
Principle
When the module starts, it reads the following files as property sources based on the module name and spring.profiles.active field:
config/${bizName}/application-${profile}.propertiesconfig/${bizName}/application.propertiesIfspring.profiles.activeis not set, it reads the following file as the property source:config/${bizName}/application.properties
10 - 4.3.10 Multimodule Integration Testing
Why Do We Need an Integration Testing Framework?
Without an integration testing framework, the validation steps for developers when verifying koupleless module logic can be cumbersome and involve the following steps:
- Start a base process.
- Build the module JAR package.
- Install the module.
- Call the module’s HTTP interface (or other methods) to validate the logic. If the logic does not meet expectations, developers need to repeat the above steps, making such a validation process highly inefficient. To improve the validation efficiency for developers, we decided to provide the koupleless integration testing framework, allowing developers to start both the base and the module within a single process.
Integration Testing Framework
Principle
The integration testing framework simulates a multi-module deployment scenario by enhancing the class loading behavior of the base and the modules. The specific source code can be referenced in koupleless-test-suite.
How to Use
Taking webflux-samples as an example, the project structure of webflux-samples is as follows:
- demowebflux: Base Code.
- bizwebflux: Module Code.
We create a new Maven module:
- webflux-integration-test: Integration Testing Module.
First, this module needs to add the integration testing framework dependency:
<dependency>
    <groupId>com.alipay.sofa.koupleless</groupId>
    <artifactId>koupleless-test-suite</artifactId>
    <version>${koupleless.runtime.version}</version>
</dependency>
Next, we need to add the dependencies for the base and the module:
<!-- Base Dependency -->
<dependency>
    <groupId>com.alipay.sofa.web.webflux</groupId>
    <artifactId>demowebflux</artifactId>
    <version>0.0.1-SNAPSHOT</version>
    <classifier>lib</classifier>
</dependency>
<!-- Module Dependency -->
<dependency>
    <groupId>com.alipay.sofa.web.webflux</groupId>
    <artifactId>bizwebflux</artifactId>
    <version>0.0.1-SNAPSHOT</version>
</dependency>
Then, we need to write the integration test case:
public static void setUp() {
    TestMultiSpringApplication multiApp = new TestMultiSpringApplication(
            MultiSpringTestConfig
                    .builder()
                    .baseConfig(
                            BaseSpringTestConfig
                                    .builder()
                                    // Pass in the base application's startup class.
                                    .mainClass(DemoWebfluxApplication.class)
                                    .build()
                    )
                    .bizConfigs(
                            Lists.newArrayList(
                                    BizSpringTestConfig
                                            .builder()
                                            .bizName("biz")
                                            // Pass in the module's startup class.
                                            .mainClass(BizWebfluxApplication.class)
                                            .build()))
                    .build());
    multiApp.run();
}
Finally, by starting the tests in IDEA, we will find that both the base and module’s Spring containers are up and running. This allows us to validate the multi-module logic within a single process.
Thus, we have completed an integration test case.
Summary
Through the above experiment, we have validated that the koupleless integration testing framework can quickly verify multi-module logic, improving developers’ validation efficiency.
11 - 4.3.11 Static Merge Deployment
Introduction
SOFAArk provides the capability of static merge deployment, where the Base package (foundation application) can start already constructed Biz package (module application) during startup. The default way of obtaining the module is through local directory, local file URL, and remote URL.
In addition, SOFAArk also provides an extension interface for static merge deployment, where developers can customize the way of obtaining the Biz package (module application).
Usage
Step 1: Package Module Application into Ark Biz
If developers wish for their application’s Ark Biz package to be used as a Jar package dependency by other applications, running on the same SOFAArk container, they need to package and publish the Ark Biz package. For details, see Ark Biz Introduction. The Ark Biz package is generated using the Maven plugin sofa-ark-maven-plugin.
<build>
    <plugin>
        <groupId>com.alipay.sofa</groupId>
        <artifactId>sofa-ark-maven-plugin</artifactId>
        <version>${sofa.ark.version}</version>
        <executions>
            <execution>
                <id>default-cli</id>
                <goals>
                    <goal>repackage</goal>
                </goals>
            </execution>
        </executions>
        <configuration>
            <!-- Default is 100, larger values indicate later installation, with Koupleless runtime version greater than or equal to 1.2.2 -->
            <priority>200</priority>
        </configuration>
    </plugin>
</build>
Step 2: Base Fetching Ark Biz for Merge Deployment
Requirements:
- JDK8
- sofa.ark.version >= 2.2.12
- koupleless.runtime.version >= 1.2.3
- JDK17/JDK21
- sofa.ark.version >= 3.1.5
- koupleless.runtime.version >= 2.1.4
Method 1: Using Official Default Retrieval Method, Supporting Local Directory, Local File URL, Remote URL
1. Base Configuration of Local Directory, Local File URL, Remote URL
Developers need to specify the Ark Biz package that needs to be merged and deployed in the base’s ark configuration file (conf/ark/bootstrap.properties or conf/ark/bootstrap.yml), supporting:
- Local directory
- Local file URL (windows system as
file:\\, linux system asfile://) - Remote URL (supporting
http://,https://) InintegrateBizURLsfield for local file URL and remote URL, andintegrateLocalDirsfield for local directory. The configuration is as follows:
integrateBizURLs=file://${xxx}/koupleless_samples/springboot-samples/service/biz1/biz1-bootstrap/target/biz1-bootstrap-0.0.1-SNAPSHOT-ark-biz.jar,\
  file://${xxx}/koupleless_samples/springboot-samples/service/biz2/biz2-bootstrap/target/biz2-bootstrap-0.0.1-SNAPSHOT-ark-biz.jar,\
  https://oss.xxxxx/biz2-bootstrap-0.0.1-SNAPSHOT-ark-biz.jar
integrateLocalDirs=/home/${xxx}/sofa-ark/biz,\
  /home/${xxx}/sofa-ark/biz2
or
integrateBizURLs:
  - file://${xxx}/springboot-samples/service/biz2/biz2-bootstrap/target/biz2-bootstrap-0.0.1-SNAPSHOT-ark-biz.jar
  - file://${xxx}/koupleless_samples/springboot-samples/service/biz2/biz2-bootstrap/target/biz2-bootstrap-0.0.1-SNAPSHOT-ark-biz.jar
integrateLocalDirs:
  - /home/${xxx}/sofa-ark/biz
  - /home/${xxx}/sofa-ark/biz2
2. Base Configuration of Packaged Plugin Target integrate-biz
Add the
<plugin>
    <groupId>com.alipay.sofa.koupleless</groupId>
    <artifactId>koupleless-base-build-plugin</artifactId>
    <version>${koupleless.runtime.version}</version>
    <executions>
        <execution>
            <goals>
                <goal>add-patch</goal>
                <!-- Used for static merge deployment -->
                <goal>integrate-biz</goal>
            </goals>
        </execution>
    </executions>
</plugin>
After the build, if the packaged jar file is manually unpacked, the specified module ark-biz package can be seen in classPath/SOFA-ARK/biz.
Method 2: Using Custom Retrieval Method
1. Ark Extension Mechanism Principle
Refer to Ark Extension Mechanism Introduction
2. Implement AddBizToStaticDeployHook Interface
In the base/third-party package, implement the AddBizToStaticDeployHook interface, using AddBizInResourcesHook as an example, as shown below:
@Extension("add-biz-in-resources-to-deploy")
public class AddBizInResourcesHook implements AddBizToStaticDeployHook {
    @Override
    public List<BizArchive> getStaticBizToAdd() throws Exception {
        List<BizArchive> archives = new ArrayList<>();
        // ...
        archives.addAll(getBizArchiveFromResources());
        return archives;
    }
    protected List<BizArchive> getBizArchiveFromResources() throws Exception {
        // ... Read Ark Biz package in resources
        return archives;
    }
}
3. Configure SPI
Add the /META-INF/services/sofa-ark/ directory in the resources directory, then add a file named com.alipay.sofa.ark.spi.service.biz.AddBizToStaticDeployHook in /META-INF/services/sofa-ark/ directory, where the file contains the fully qualified name of the hook class:
com.alipay.sofa.ark.support.common.AddBizInResourcesHook
Rebuild the base.
Step 3: Start the Base
Add the JVM parameter configuration: -Dsofa.ark.embed.static.biz.enable=true
12 - 4.3.12 Officially Supported Middleware Clients in Modules
Compatibility Relationships Across Different Versions of the Framework
Users can choose to import the Koupleless version as needed, based on actual JDK and SpringBoot versions.
| JDK | SpringBoot | SOFA-ARK | Koupleless |
|---|---|---|---|
| 1.8 | 2.x | 2.x.x | 1.x.x |
| 17 | 3.0.x, 3.1.x | 3.0.7 (不再更新) | 2.0.4(不再更新) |
| 17 & 21 | 3.2.x and above | 3.1.x | 2.1.x |
For Koupleless SDK latest versions, please refer to https://github.com/koupleless/runtime/releases
In Koupleless modules, the official support currently includes and is compatible with common middleware clients.
Note: Here, “already supported” needs to be included in the base POM by importing the relevant client dependencies (strongly recommended to use the SpringBoot Starter method to import the dependencies), and also in the module POM by importing the relevant dependencies and setting <scope>provided</scope> to delegate the dependencies to the base for loading.
Compatibility Report for Various Components
| Middleware Client | Version | Remarks |
|---|---|---|
| JDK | 8.x 17.x | Already Supported |
| SpringBoot | >= 2.3.0 or 3.x | Already Supported Base and module complete usage examples for JDK17 + SpringBoot3.x can be seen here |
| SpringBoot Cloud | >= 2.7.x | Already Supported Complete usage examples for base and modules can be seen here |
| SOFABoot | >= 3.9.0 or 4.x | Already Supported |
| JMX | N/A | Already Supported Requires adding the -Dspring.jmx.default-domain=${spring.application.name} startup parameter to the base |
| log4j2 | Any | Already Supported. Import log4j2 in the base and module, and additionally import the dependency: <dependency> <groupId>com.alipay.koupleless</groupId> <artifactId>koupleless-adapter-log4j2</artifactId> <version>${latest Koupleless version}</version> <scope>provided</scope> <!– Module needs provided –> </dependency> Complete usage examples for base and modules seen here |
| slf4j-api | 1.x and >= 1.7 | Already Supported |
| tomcat | 7.x, 8.x, 9.x, 10.x and above | Already Supported Complete usage examples for base and modules seen here |
| netty | 4.x | Already Supported Complete usage examples for base and modules seen here |
| sofarpc | >= 5.8.6 | Already Supported |
| dubbo | 3.x | Already Supported Complete usage examples and considerations for base and modules can be seen here |
| grpc | 1.x and >= 1.42 | Already Supported Complete usage examples and considerations for base and modules can be seen here |
| protobuf-java | 3.x and >= 3.17 | Already Supported Complete usage examples and considerations for base and modules can be seen here |
| apollo | 1.x and >= 1.6.0 | Already Supported Complete usage examples and considerations for base and modules can be seen here |
| nacos | 2.1.x | Already Supported Complete usage examples and considerations for base and modules can be seen here |
| kafka-client | >= 2.8.0 or >= 3.4.0 | Already Supported Complete usage examples for base and modules can be seen here |
| rocketmq | 4.x and >= 4.3.0 | Already Supported Complete usage examples for base and modules can be seen here |
| jedis | 3.x | Already Supported Complete usage examples for base and modules can be seen here |
| xxl-job | 2.x and >= 2.1.0 | Already Supported Needs to be declared as a compile dependency for use in modules |
| mybatis | >= 2.2.2 or >= 3.5.12 | Already Supported Complete usage examples for base and modules can be seen here |
| druid | 1.x | Already Supported Complete usage examples for base and modules can be seen here |
| mysql-connector-java | 8.x | Already Supported Complete usage examples for base and modules can be seen here |
| postgresql | 42.x and >= 42.3.8 | Already Supported |
| mongodb | 4.6.1 | Already Supported Complete usage examples for base and modules can be seen here |
| hibernate | 5.x and >= 5.6.15 | Already Supported |
| j2cache | Any | Already Supported Needs to be declared as a compile dependency for independent use in modules |
| opentracing | 0.x and >= 0.32.0 | Already Supported |
| elasticsearch | 7.x and >= 7.6.2 | Already Supported |
| jaspyt | 1.x and >= 1.9.3 | Already Supported |
| OKHttp | - | Already Supported Needs to be placed in the base, please use module automatic slimming capability |
| io.kubernetes:client | 10.x and >= 10.0.0 | Already Supported |
| net.java.dev.jna | 5.x and >= 5.12.1 | Already Supported |
| prometheus | - | Support to be verified |
| skywalking | - | The official does not support multiple service_names for one process. Tracing isolation can only be achieved by having each module print logs to separate directories. Please refer to the logging samples |
Compatibility Relationships among Framework Versions
Note: Users can choose Koupleless versions according to their actual JDK and SpringBoot versions.
| JDK | SpringBoot | SOFAARK | Koupleless |
|---|---|---|---|
| 1.8 | 2.x | 2.2.10 | 1.x.x |
| 17 | 3.0.x, 3.1.x | 3.0.x | 2.0.x |
| 17 | 3.2.x and above | 3.1.x | 2.1.x |
13 - 4.3.13 Koupleless Configuration
Packaging Phase
Base Packaging Plugin Configuration
Plugin Parameter Configuration
The complete koupleless-base-build-plugin plugin configuration template is as follows:
<plugin>
  <groupId>com.alipay.sofa.koupleless</groupId>
  <artifactId>koupleless-base-build-plugin</artifactId>
  <version>${koupleless.runtime.version}</version>
  <executions>
    <execution>
      <goals>
        <goal>add-patch</goal>
        <!-- Used for static merger deployment-->
        <goal>integrate-biz</goal>
      </goals>
    </execution>
  </executions>
  <configuration>
      <!--Base packaging directory, default is the project build directory-->
      <outputDirectory>./target</outputDirectory>

      <!--The groupId of the starter to be packaged, which defaults to the groupId of the project-->
      <dependencyGroupId>${groupId}</dependencyGroupId>

      <!--ArtifactId of the starter to be packaged-->
      <dependencyArtifactId>${baseAppName}-dependencies-starter</dependencyArtifactId>

      <!--Version number of the starter to be packaged-->
      <dependencyVersion>0.0.1-SNAPSHOT</dependencyVersion>

      <!--For debugging, change to true to see the intermediate products of the packaged starter-->
      <cleanAfterPackageDependencies>false</cleanAfterPackageDependencies>
  </configuration>
</plugin>
Static Integration Deployment Configuration
Developers need to specify the Ark Biz package that needs to be integrated and deployed in the ark configuration file of the base (conf/ark/bootstrap.properties or conf/ark/bootstrap.yml), with support for:
- Local directory
- Local file URL (File path for Windows is
file:\\, and for Linux it isfile://) - Remote URL (supports
http://,https://) The configuration is as follows:
integrateBizURLs=file://${xxx}/koupleless_samples/springboot-samples/service/biz1/biz1-bootstrap/target/biz1-bootstrap-0.0.1-SNAPSHOT-ark-biz.jar,\
  file://${xxx}/koupleless_samples/springboot-samples/service/biz2/biz2-bootstrap/target/biz2-bootstrap-0.0.1-SNAPSHOT-ark-biz.jar,\
  https://oss.xxxxx/biz2-bootstrap-0.0.1-SNAPSHOT-ark-biz.jar
integrateLocalDirs=/home/${xxx}/sofa-ark/biz,\
  /home/${xxx}/sofa-ark/biz2
or
integrateBizURLs:
  - file://${xxx}/springboot-samples/service/biz2/biz2-bootstrap/target/biz2-bootstrap-0.0.1-SNAPSHOT-ark-biz.jar
  - file://${xxx}/koupleless_samples/springboot-samples/service/biz2/biz2-bootstrap/target/biz2-bootstrap-0.0.1-SNAPSHOT-ark-biz.jar
integrateLocalDirs:
  - /home/${xxx}/sofa-ark/biz
  - /home/${xxx}/sofa-ark/biz2
Module Packaging Plugin Configuration
Plugin Parameter Configuration
The complete sofa-ark-maven-plguin plugin configuration template is as follows:
<plugins>
    <plugin>
        <groupId>com.alipay.sofa</groupId>
        <artifactId>sofa-ark-maven-plugin</artifactId>
        <version>${sofa.ark.version}</version>
        <executions>
            <execution>
                <id>default-cli</id>
                <goals>
                    <goal>repackage</goal>
                </goals>
                <configuration>
                    <!--Ark package and ark biz packaging directory, default is the project build directory-->
                    <outputDirectory>./target</outputDirectory>
                    <!--Set the root directory of the application for reading the ${base.dir}/conf/ark/bootstrap.application configuration file, default to ${project.basedir}-->
                    <baseDir>./</baseDir>
                    <!--Generated ark package file name, default is ${artifactId}-->
                    <finalName>demo-ark</finalName>
                    <!--Whether to skip the goal:repackage execution, default to false-->
                    <skip>false</skip>
                    <!--Whether to package, install and publish ark biz, details please refer to the Ark Biz document, default to false-->
                    <attach>true</attach>
                    <!--Set the classifier of the ark package, default to empty-->
                    <arkClassifier>ark</arkClassifier>
                    <!--Set the classifier of the ark biz, default to ark-biz-->
                    <bizClassifier>ark-biz</bizClassifier>
                    <!--Set the biz name of the ark biz, default to ${artifactId}-->
                    <bizName>demo-ark</bizName>
                    <!--Set the biz version of the ark biz, default to ${artifactId}-->
                    <bizVersion>0.0.1</bizVersion>
                    <!--Set the startup priority of the ark biz, smaller priority has higher priority, ${artifactId}-->
                    <priority>100</priority>
                    <!--Set the startup entry of the ark biz, it will automatically search for the entry class that contains the main method and has the org.springframework.boot.autoconfigure.SpringBootApplication annotation-->
                    <mainClass>com.alipay.sofa.xx.xx.MainEntry</mainClass>
                    <!--Set whether to package dependencies with scope=provided, default to false-->
                    <packageProvided>false</packageProvided>
                    <!--Set whether to generate the Biz package, default to true-->
                    <keepArkBizJar>true</keepArkBizJar>
                    <!--For web applications, set the context path, default to /, each module should configure its own webContextPath, e.g.: biz1-->
                    <webContextPath>/</webContextPath>
                    <!--When packaging ark biz, exclude specified package dependencies; format: ${groupId:artifactId} or ${groupId:artifactId:classifier}-->
                    <excludes>
                        <exclude>org.apache.commons:commons-lang3</exclude>
                    </excludes>
                    <!--When packaging ark biz, exclude dependencies with the specified groupId-->
                    <excludeGroupIds>
                        <excludeGroupId>org.springframework</excludeGroupId>
                    </excludeGroupIds>
                    <!--When packaging ark biz, exclude dependencies with the specified artifactId-->
                    <excludeArtifactIds>
                        <excludeArtifactId>sofa-ark-spi</excludeArtifactId>
                    </excludeArtifactIds>
                    <!--When packaging ark biz, configure classes not covered by the ark plugin index; by default, ark biz will prioritize indexing all exported classes of ark plugin, which means it will only load the class locally, rather than delegating ark plugin to load-->
                    <denyImportClasses>
                        <class>com.alipay.sofa.SampleClass1</class>
                        <class>com.alipay.sofa.SampleClass2</class>
                    </denyImportClasses>
                    <!--Corresponding to the denyImportClasses configuration, package level can be configured-->
                    <denyImportPackages>
                        <package>com.alipay.sofa</package>
                        <package>org.springframework.*</package>
                    </denyImportPackages>
                    <!--When packaging ark biz, configure resources not covered by the ark plugin index; by default, ark biz will prioritize indexing all exported resources of the ark plugin, adding that configuration means that ark biz will only search for the resources internally without searching from the ark plugin-->
                    <denyImportResources>
                        <resource>META-INF/spring/test1.xml</resource>
                        <resource>META-INF/spring/test2.xml</resource>
                    </denyImportResources>

                     <!--Isolates the dependencies that the ark biz has declared in its pom, default to false-->
                    <declaredMode>true</declaredMode>
                    <!--When packaging ark biz, only package dependencies that the base does not have, or dependencies of modules that are different from the base. This parameter specifies the "dependency management" identifier of the base, and is required to be a parent of module pom with the format ${groupId}:${artifactId}:${version}-->
                    <baseDependencyParentIdentity>${groupId}:${artifactId}:${version}</baseDependencyParentIdentity>
                </configuration>
            </execution>
        </executions>
    </plugin>
</plugins>
Module Slimming Configuration
SOFAArk module slimming reads configuration from two places:
module project root directory/conf/ark/bootstrap.properties, e.g.: my-module/conf/ark/bootstrap.propertiesmodule project root directory/conf/ark/bootstrap.yml, e.g.: my-module/conf/ark/bootstrap.yml bootstrap.properties In themodule project root directory/conf/ark/bootstrap.properties, configure the commonly used packages of the framework and middleware that need to be down to the base as follows:
# excludes config ${groupId}:{artifactId}:{version}, split by ','
excludes=org.apache.commons:commons-lang3,commons-beanutils:commons-beanutils
# excludeGroupIds config ${groupId}, split by ','
excludeGroupIds=org.springframework
# excludeArtifactIds config ${artifactId}, split by ','
excludeArtifactIds=sofa-ark-spi
bootstrap.yml
In the module project root directory/conf/ark/bootstrap.yml, configure the commonly used packages of the framework and middleware that need to be down to the base as follows:
# excludes 中配置 ${groupId}:{artifactId}:{version}, 不同依赖以 - 隔开
# excludeGroupIds 中配置 ${groupId}, 不同依赖以 - 隔开
# excludeArtifactIds 中配置 ${artifactId}, 不同依赖以 - 隔开
excludes:
  - org.apache.commons:commons-lang3
  - commons-beanutils:commons-beanutils
excludeGroupIds:
  - org.springframework
excludeArtifactIds:
  - sofa-ark-spi
For partial dependencies, even if the dependency versions used by the module and the base are consistent, the dependency must still be retained when the module is packaged. This means you need to configure a whitelist for module dependency trimming.
Configuration method: Add the dependencies that need to be retained in the module project root directory/conf/ark/bootstrap.properties or module project root directory/conf/ark/bootstrap.yml. If these files do not exist, you can create the directories and files yourself.
bootstrap.properties
# includes config ${groupId}:${artifactId}, split by ','
includes=org.apache.commons:commons-lang3,commons-beanutils:commons-beanutils
# includeGroupIds config ${groupId}, split by ','
includeGroupIds=org.springframework
# includeArtifactIds config ${artifactId}, split by ','
includeArtifactIds=sofa-ark-spi
bootstrap.yml
# includes config ${groupId}:${artifactId}
includes:
  - org.apache.commons:commons-lang3
  - commons-beanutils:commons-beanutils
# includeGroupIds config ${groupId}
includeGroupIds:
  - org.springframework
# includeArtifactIds config ${artifactId}
includeArtifactIds:
  - sofa-ark-spi
declaredMode Whitelist Configuration
Under the declaredMode setting, only dependencies declared in the module can be delegated to the base when loading classes or resources. However, in some special scenarios, even if a dependency is not declared in the module, it may still be necessary to access resources/classes from that dependency in the base. In such cases, you can configure a declaredMode whitelist in the module’s ark configuration file (conf/ark/bootstrap.properties or conf/ark/bootstrap.yml).
bootstrap.properties
# declared libraries whitelist config {groupId:artifactId}, split by ','
declared.libraries.whitelist=com.ark:ark-common,com.biz:biz-common
bootstrap.yml
# declared libraries whitelist config {groupId:artifactId}

declared:
  libraries:
    whitelist:
      - com.ark.yml:ark-common-yml
Development Phase
Arklet Configuration
Port Configuration
When the base is started, configure the port in the JVM parameters, default is 1238
-Dkoupleless.arklet.http.port=XXXX
Module Runtime Configuration
Configuration of Health Check
Configuration in the application.properties of the base:
# Or do not configure management.endpoints.web.exposure.include
management.endpoints.web.exposure.include=health
# If all information needs to be displayed, configure the following content
management.endpoint.health.show-components=always
management.endpoint.health.show-details=always
# Do not ignore module startup status
koupleless.healthcheck.base.readiness.withAllBizReadiness=true
Web Gateway Configuration
When traditional applications are split into modules, each module has its own webContextPath, and the upstream caller needs to modify the request path. To avoid the modification, you can configure Web Gateway forwarding rules in the application.properties or application.yaml, allowing the upstream caller not to modify. In the configuration, three strategies can be configured:
- Domain matching: specifies that
requests that meet HostAare forwarded toModuleA - Path matching: specifies that
requests that meet PathAare forwarded tospecific PathBofModuleA - Domain and path matching: specifies that
requests that meet HostA and PathAwill be forwarded tospecific PathB of ModuleAapplication.yaml Configuration example:
koupleless:
  web:
    gateway:
      forwards:
# host in [a.xxx,b.xxx,c.xxx] path /${anyPath} --forward to--> biz1/${anyPath}
        - contextPath: biz1
        - hosts:
            - a
            - b
            - c
# /idx2/** -> /biz2/**, /t2/** -> /biz2/timestamp/**
        - contextPath: biz2
        - paths:
            - from: /idx2
            - to: /
            - from: /t2
            - to: /timestamp
# /idx1/** -> /biz1/**, /t1/** -> /biz1/timestamp/**
        - contextPath: biz1
        - paths:
            - from: /idx1
            - to: /
            - from: /t1
            - to: /timestamp
application.properties Configuration example:
# host in [a.xxx,b.xxx,c.xxx] path /${anyPath} --forward to--> biz1/${anyPath}
koupleless.web.gateway.forwards[0].contextPath=biz1
koupleless.web.gateway.forwards[0].hosts[0]=a
koupleless.web.gateway.forwards[0].hosts[1]=b
koupleless.web.gateway.forwards[0].hosts[2]=c
# /idx2/** -> /biz2/**, /t2/** -> /biz2/timestamp/**
koupleless.web.gateway.forwards[1].contextPath=biz2
koupleless.web.gateway.forwards[1].paths[0].from=/idx2
koupleless.web.gateway.forwards[1].paths[0].to=/
koupleless.web.gateway.forwards[1].paths[1].from=/t2
koupleless.web.gateway.forwards[1].paths[1].to=/timestamp
# /idx1/** -> /biz1/**, /t1/** -> /biz1/timestamp/**
koupleless.web.gateway.forwards[2].contextPath=biz1
koupleless.web.gateway.forwards[2].paths[0].from=/idx1
koupleless.web.gateway.forwards[2].paths[0].to=/
koupleless.web.gateway.forwards[2].paths[1].from=/t1
koupleless.web.gateway.forwards[2].paths[1].to=/timestamp
In addition, when Koupleless meets the following versions, the module can configure forwarding rules in its own application.properties or application.yaml:
- JDK 8:
koupleless.runtime.version>= 1.3.3 - JDK 17:
koupleless.runtime.version>= 2.1.8