4.3.5 Module Local Development and Debugging
Arkctl Tool Installation
The Arkctl module installation mainly provides automated packaging and deployment capabilities, including invoking the mvn command to automatically build the module as a JAR file and calling the API interface provided by Arklet for completion of deployment. The installation method for Arkctl can refer to the documentation: arkctl Installation in the Local Environment Development Verification section.
Installation Method 1: Using the Golang Toolchain
- Download the corresponding version of Golang from the Golang official website; the version must be above 1.21.
- Execute the command
go install github.com/koupleless/arkctl@v0.2.1to install the Arkctl tool.
Installation Method 2: Downloading Binary Files
- Download Arkctl based on the actual operating system. Download Arkctl.
- Unzip the corresponding binary file and place it in a directory that is included in the system’s PATH variable.
- After the base and module have been modified and the base has been started, the Arkctl tool can be used to quickly complete the build and deployment of the module into the base.
How to Find the PATH Value on Linux/Mac?
Execute in the terminal:
echo $PATH
# Choose a directory and place arkctl in that directory
How to Find the PATH Value on Windows?
Press Windows + R, type cmd, and then press Enter to open the command prompt. In the command prompt window, enter the following command and press Enter:
echo %PATH%
Note: In the Windows environment, if Windows Defender is enabled, it may falsely report issues when downloading binaries through the browser, as shown below:

You can refer to the [Go official documentation](https://go.dev/doc/faq#virus) for the reason behind the error. This error can be ignored; feel free to download. > Since Arkctl deployment is actually completed by calling the API, if you prefer not to use the command-line tool, you can directly use the Arklet [API interface](/docs/contribution-guidelines/arklet/architecture) to complete the deployment operation. We also provide a telnet method for module deployment; [detailed instructions can be found here](https://www.sofastack.tech/projects/sofa-boot/sofa-ark-ark-telnet/).
Local Quick Deployment
You can use the Arkctl tool to quickly build and deploy modules, improving the efficiency of local debugging and development.
Scenario 1: Building a Module JAR and Deploying to a Locally Running Base.
Preparation:
- Start a base locally.
- Open a module project repository.
Execute the command:
# This needs to be executed in the root directory of the repository.
# For example, if it is a Maven project, execute it in the directory where the root pom.xml is located.
arkctl deploy
Once the command completes, it is successfully deployed, and the user can debug and validate the relevant module functionalities.
Scenario 2: Deploying a Locally Built JAR to a Locally Running Base.
Preparation:
- Start a base locally.
- Prepare a built JAR file.
Execute the command:
arkctl deploy /path/to/your/pre/built/bundle-biz.jar
Once the command completes, it is successfully deployed, and the user can debug and validate the relevant module functionalities.
Scenario 3: Deploying a Locally Unbuilt JAR to a Locally Running Base.
Preparation:
- Start a base locally.
Execute the command:
arkctl deploy ./path/to/your/biz/
Note: This command is applicable if the module can be built independently (e.g., if commands like mvn package can be successfully executed in the biz directory), the command will automatically build the module and deploy it to the base.
Scenario 4: Building and Deploying Submodule JARs in a Multi-Module Maven Project from the Root.
Preparation:
- Start a base locally.
- Open a multi-module Maven project repository.
Execute the command:
# This needs to be executed in the root directory of the repository.
# For example, if it is a Maven project, execute it in the directory where the root pom.xml is located.
arkctl deploy --sub ./path/to/your/sub/module
Once the command completes, it is successfully deployed, and the user can debug and validate the relevant module functionalities.
Scenario 5: Building a Module JAR and Deploying to a Remote Running K8s Base.
Preparation:
- Ensure that a base pod is already running remotely.
- Open a module project repository.
- You must have a K8s certificate with exec permissions and the kubectl command-line tool available locally.
Execute the command:
# This needs to be executed in the root directory of the repository.
# For example, if it is a Maven project, execute it in the directory where the root pom.xml is located.
arkctl deploy --pod {namespace}/{podName}
Once the command completes, it is successfully deployed, and the user can debug and validate the relevant module functionalities.
Scenario 6: How to Use This Command More Quickly
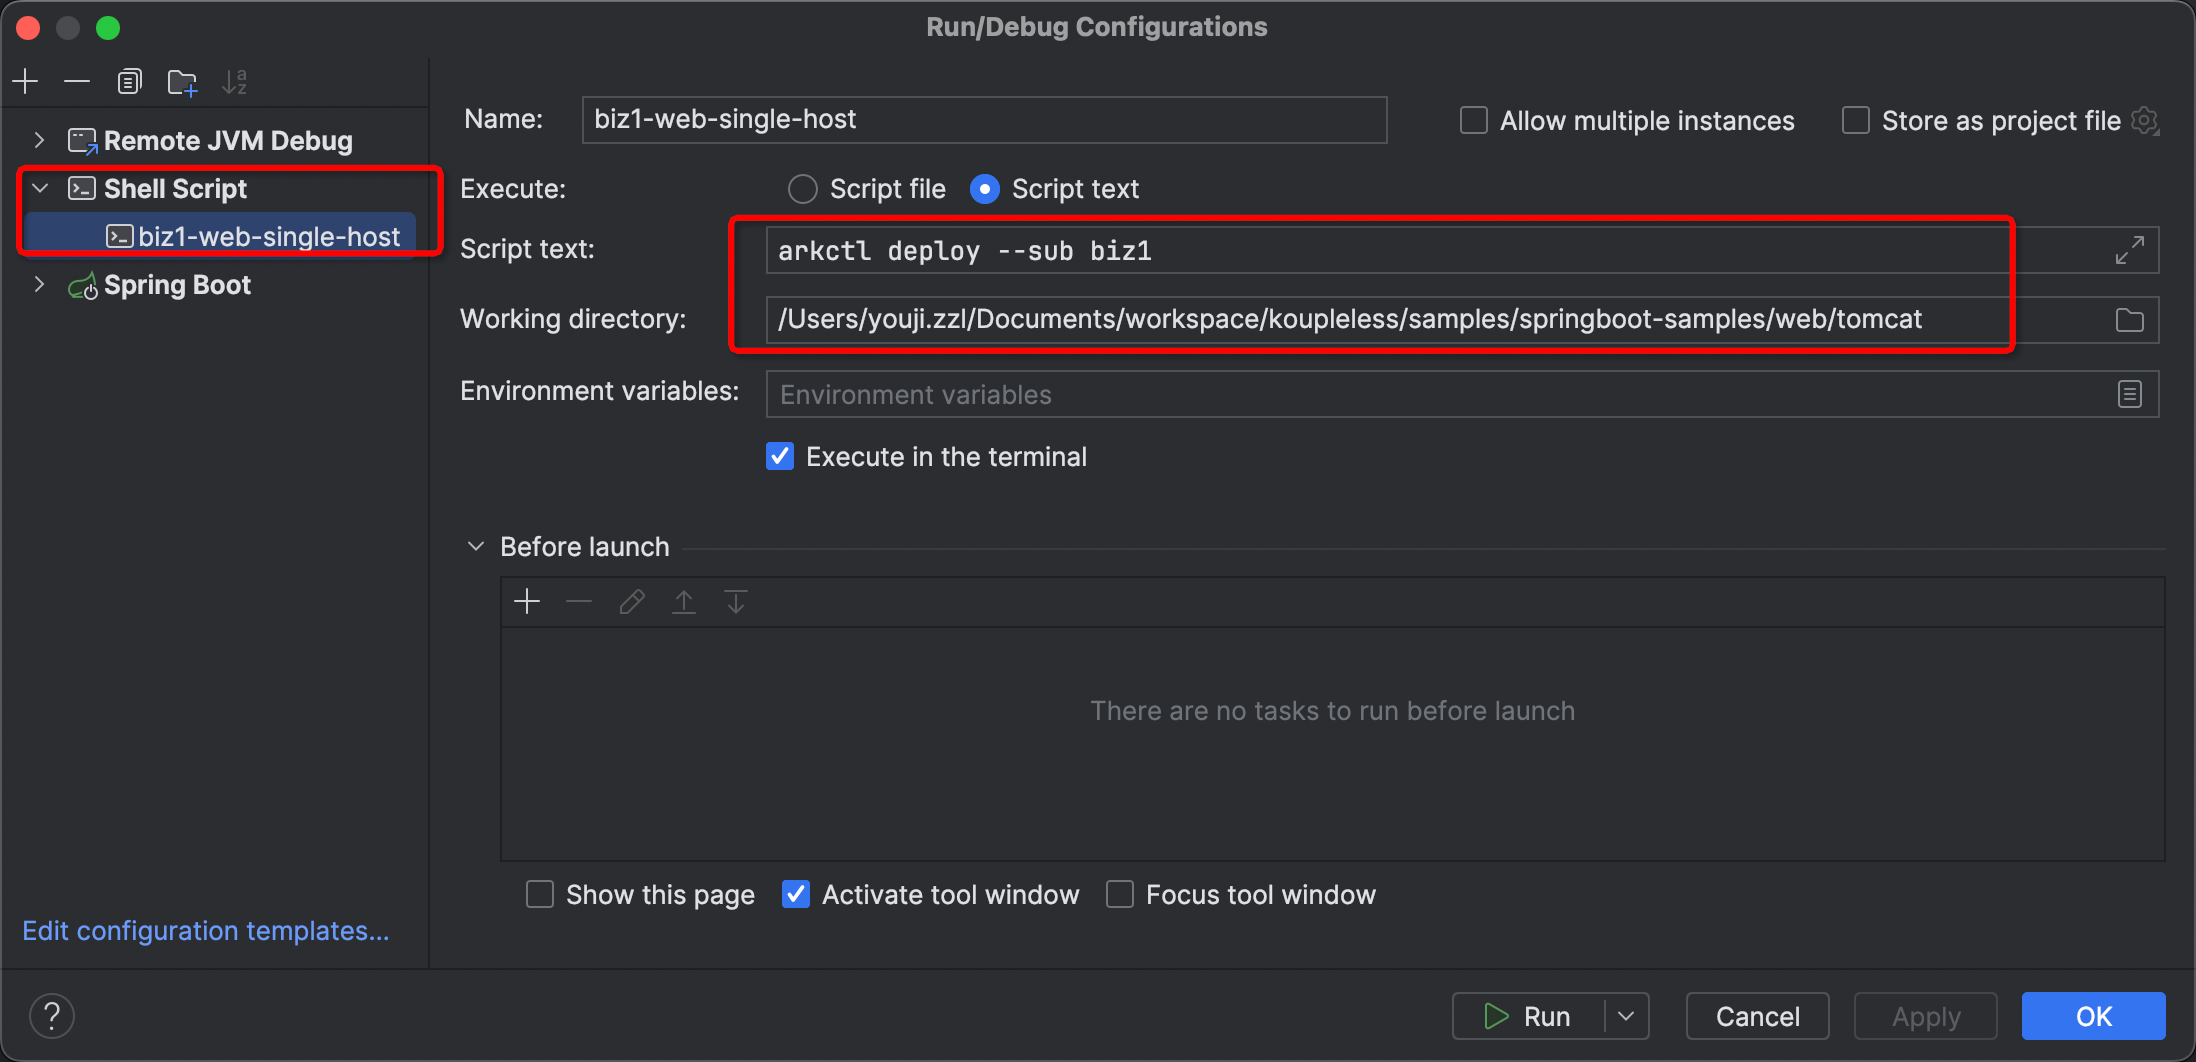
You can create a Shell Script in IDEA, set the running directory, and then enter the corresponding Arkctl command as shown in the image below.

Local Module Debugging
Module and Base in the Same IDEA Project
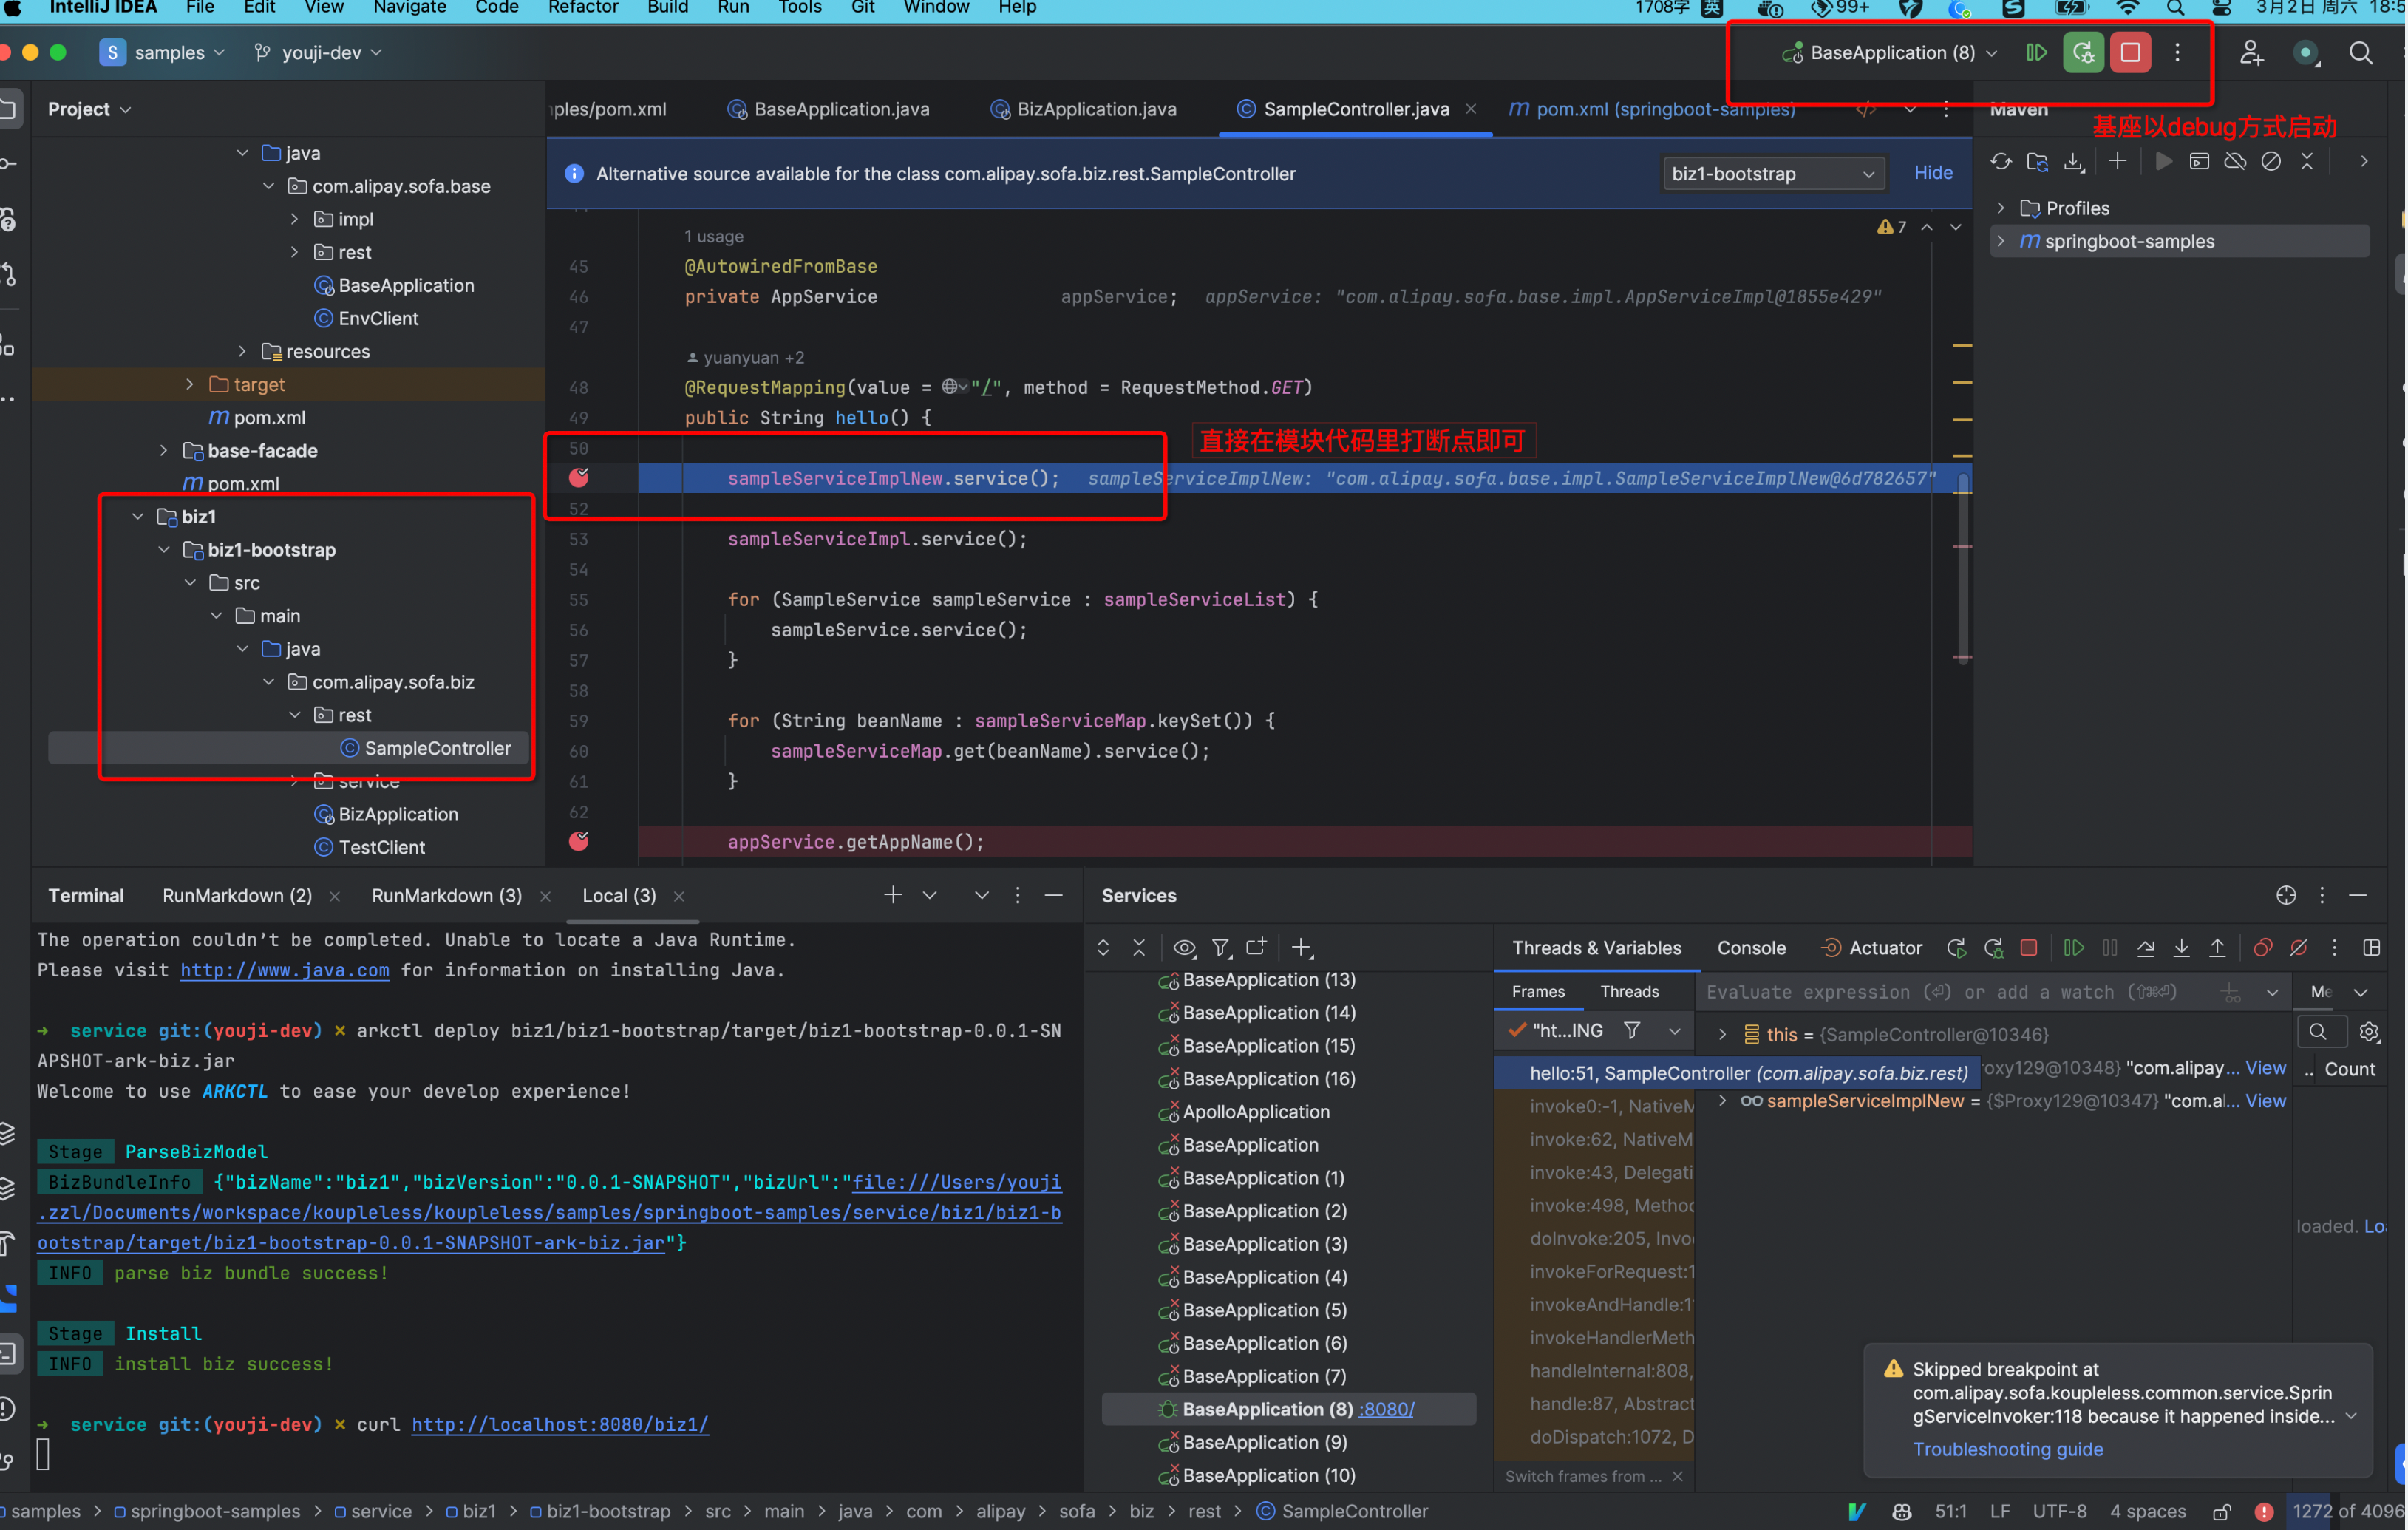
Since the IDEA project can see the module code, debugging the module is no different from normal debugging. Just set breakpoints in the module code and start the base in debug mode.

Module and Base in Different IDEA Projects
- Add the debug configuration to the base startup parameters:
-agentlib:jdwp=transport=dt_socket,server=y,suspend=n,address=8000, then start the base. - Add remote JVM debug to the module, setting host to localhost:
-agentlib:jdwp=transport=dt_socket,server=y,suspend=n,address=8000. - Set breakpoints in the module.
- After installing the module, you can begin debugging.
Checking Deployment Status
Scenario 1: Querying Modules Already Deployed in the Current Base.
Preparation:
- Start a base locally.
Execute the command:
arkctl status
Scenario 2: Querying Modules Already Deployed in the Remote K8s Environment Base.
Preparation:
- Start a base in the remote K8s environment.
- Ensure you have Kube certificates and the necessary permissions locally.
Execute the command:
arkctl status --pod {namespace}/{name}
Viewing Runtime Module Status and Information Using Arthas
Retrieve All Biz Information
vmtool -x 1 --action getInstances --className com.alipay.sofa.ark.container.model.BizModel --limit 100
For example:
Retrieve Specific Biz Information
# Please replace ${bizName}
vmtool -x 1 --action getInstances --className com.alipay.sofa.ark.container.model.BizModel --limit 100 | grep ${bizName} -A 4
For example:
Retrieve Biz Information Corresponding to a Specific BizClassLoader
# Please replace ${BizClassLoaderHashCode}
vmtool -x 1 --action getInstances --className com.alipay.sofa.ark.container.model.BizModel --limit 100 | grep ${BizClassLoaderHashCode} -B 1 -A 3
For example:
Feedback
Was this page helpful?
Welcome propose feedback to community!
Welcome propose feedback to community, or improve this document directly.。